Printer #
In the Printer section, you can create and manage printers linked to your POS system. This feature allows you to configure and organize your printing setup, ensuring seamless communication between the POS system and various printers for efficient order processing and receipt generation.
Click Printer under Device in the menu bar to configure the printers.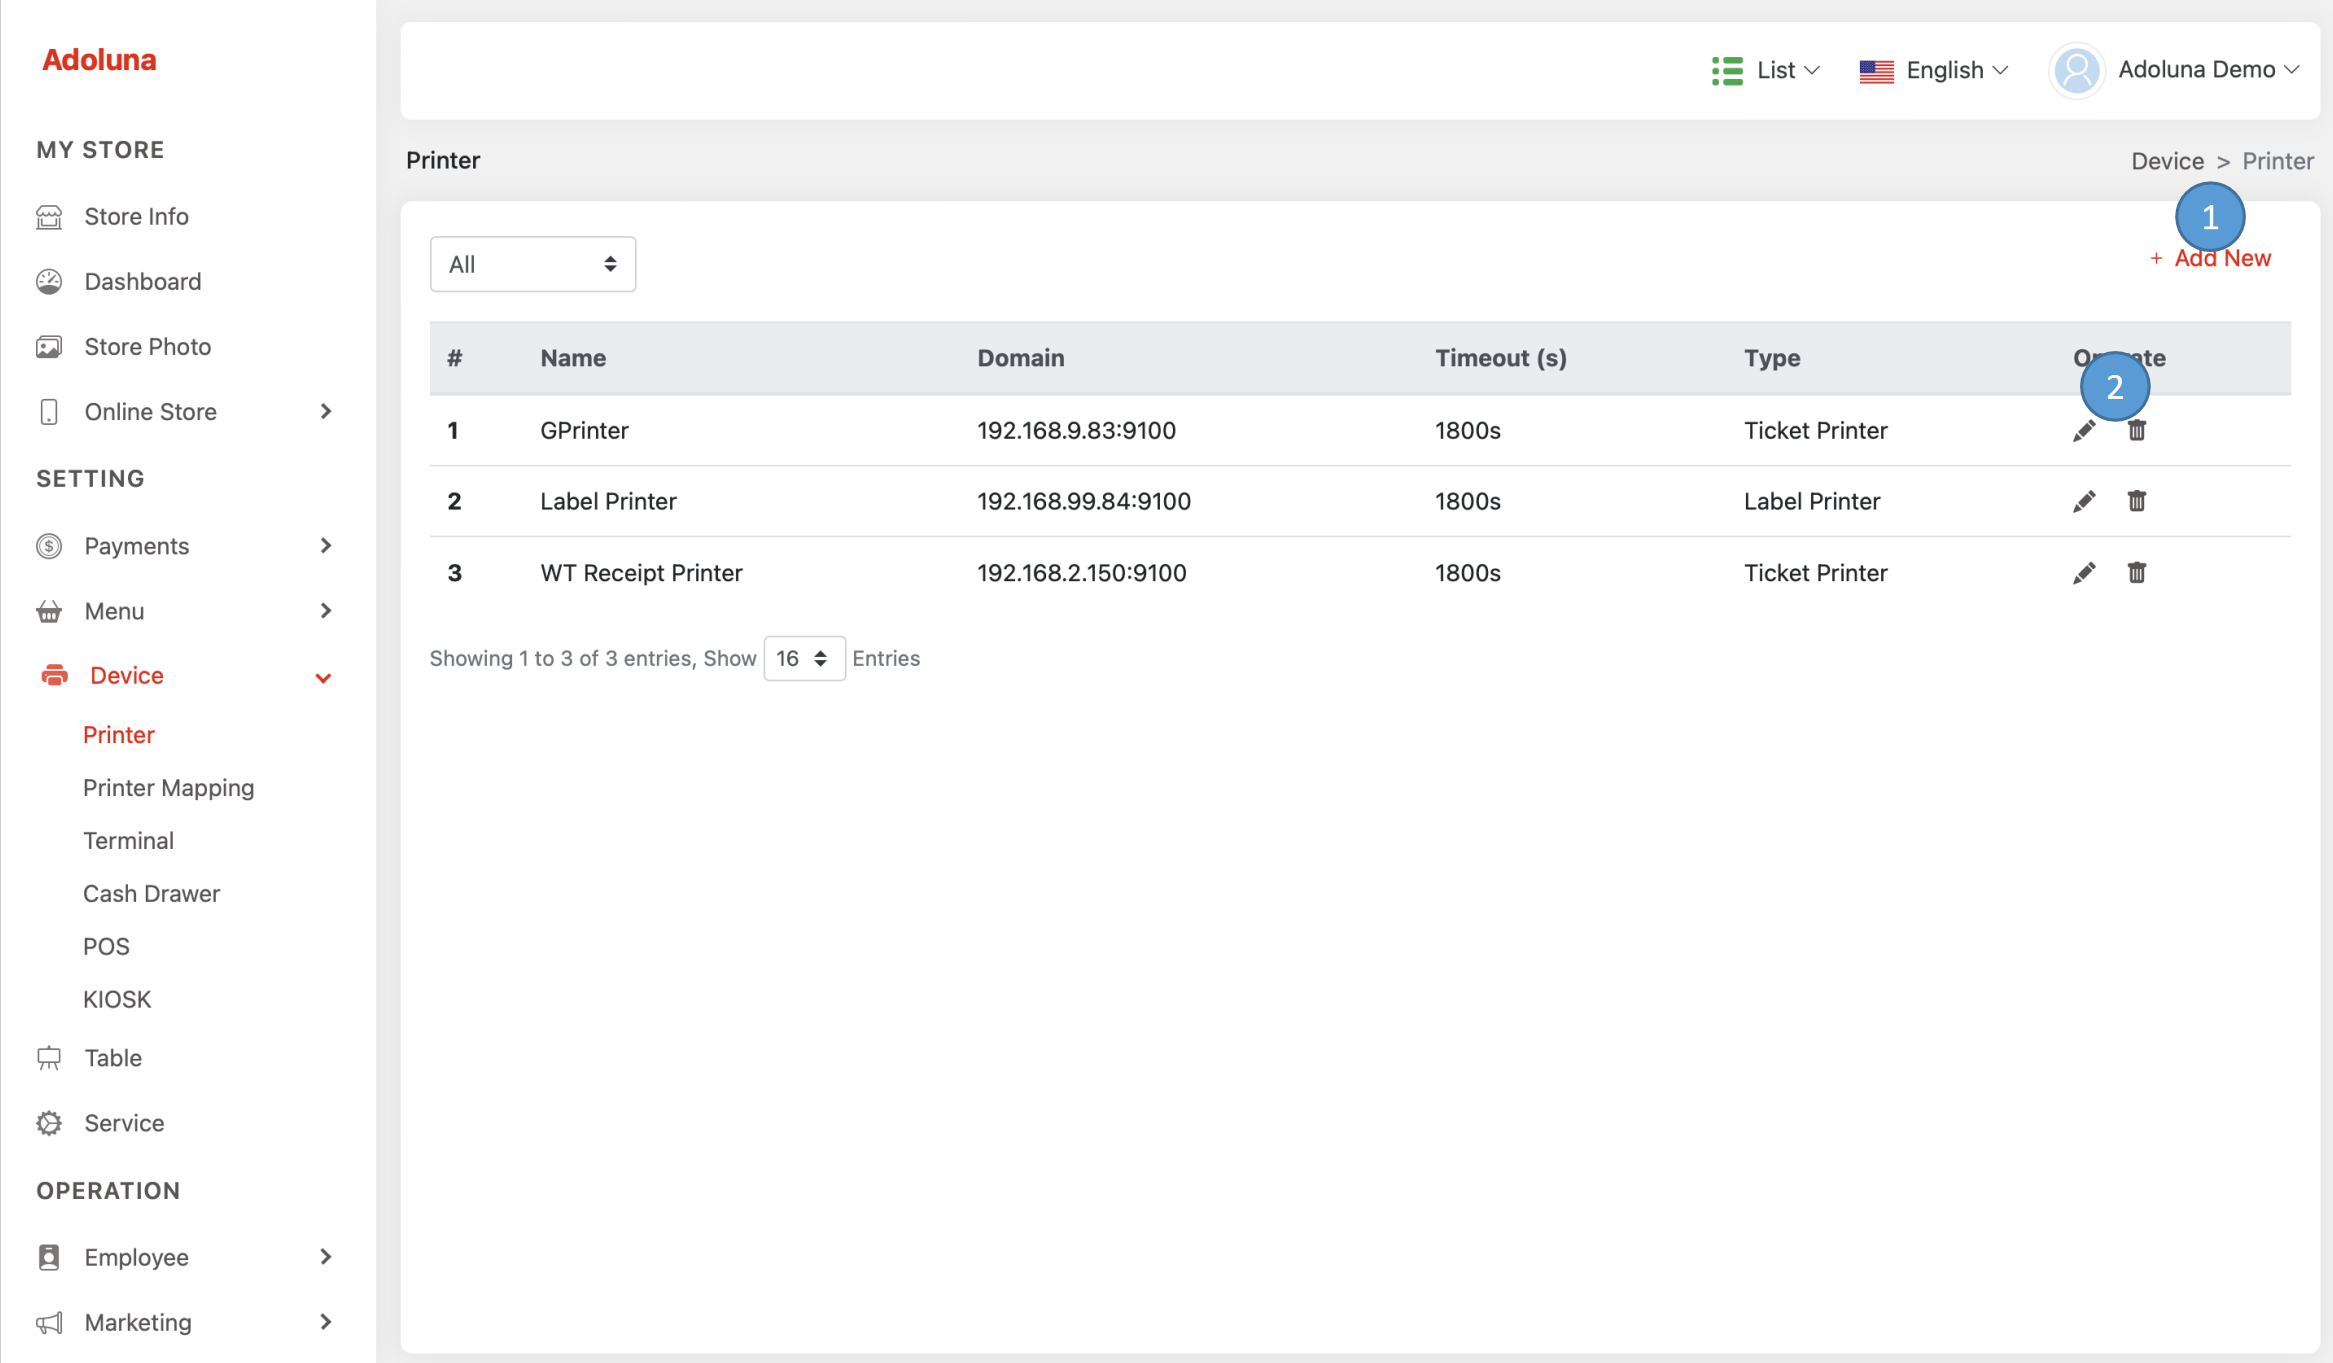
- Click +Add New to create a new printer.
- Click the
 icon to edit the printer, and
  to delete the printer.
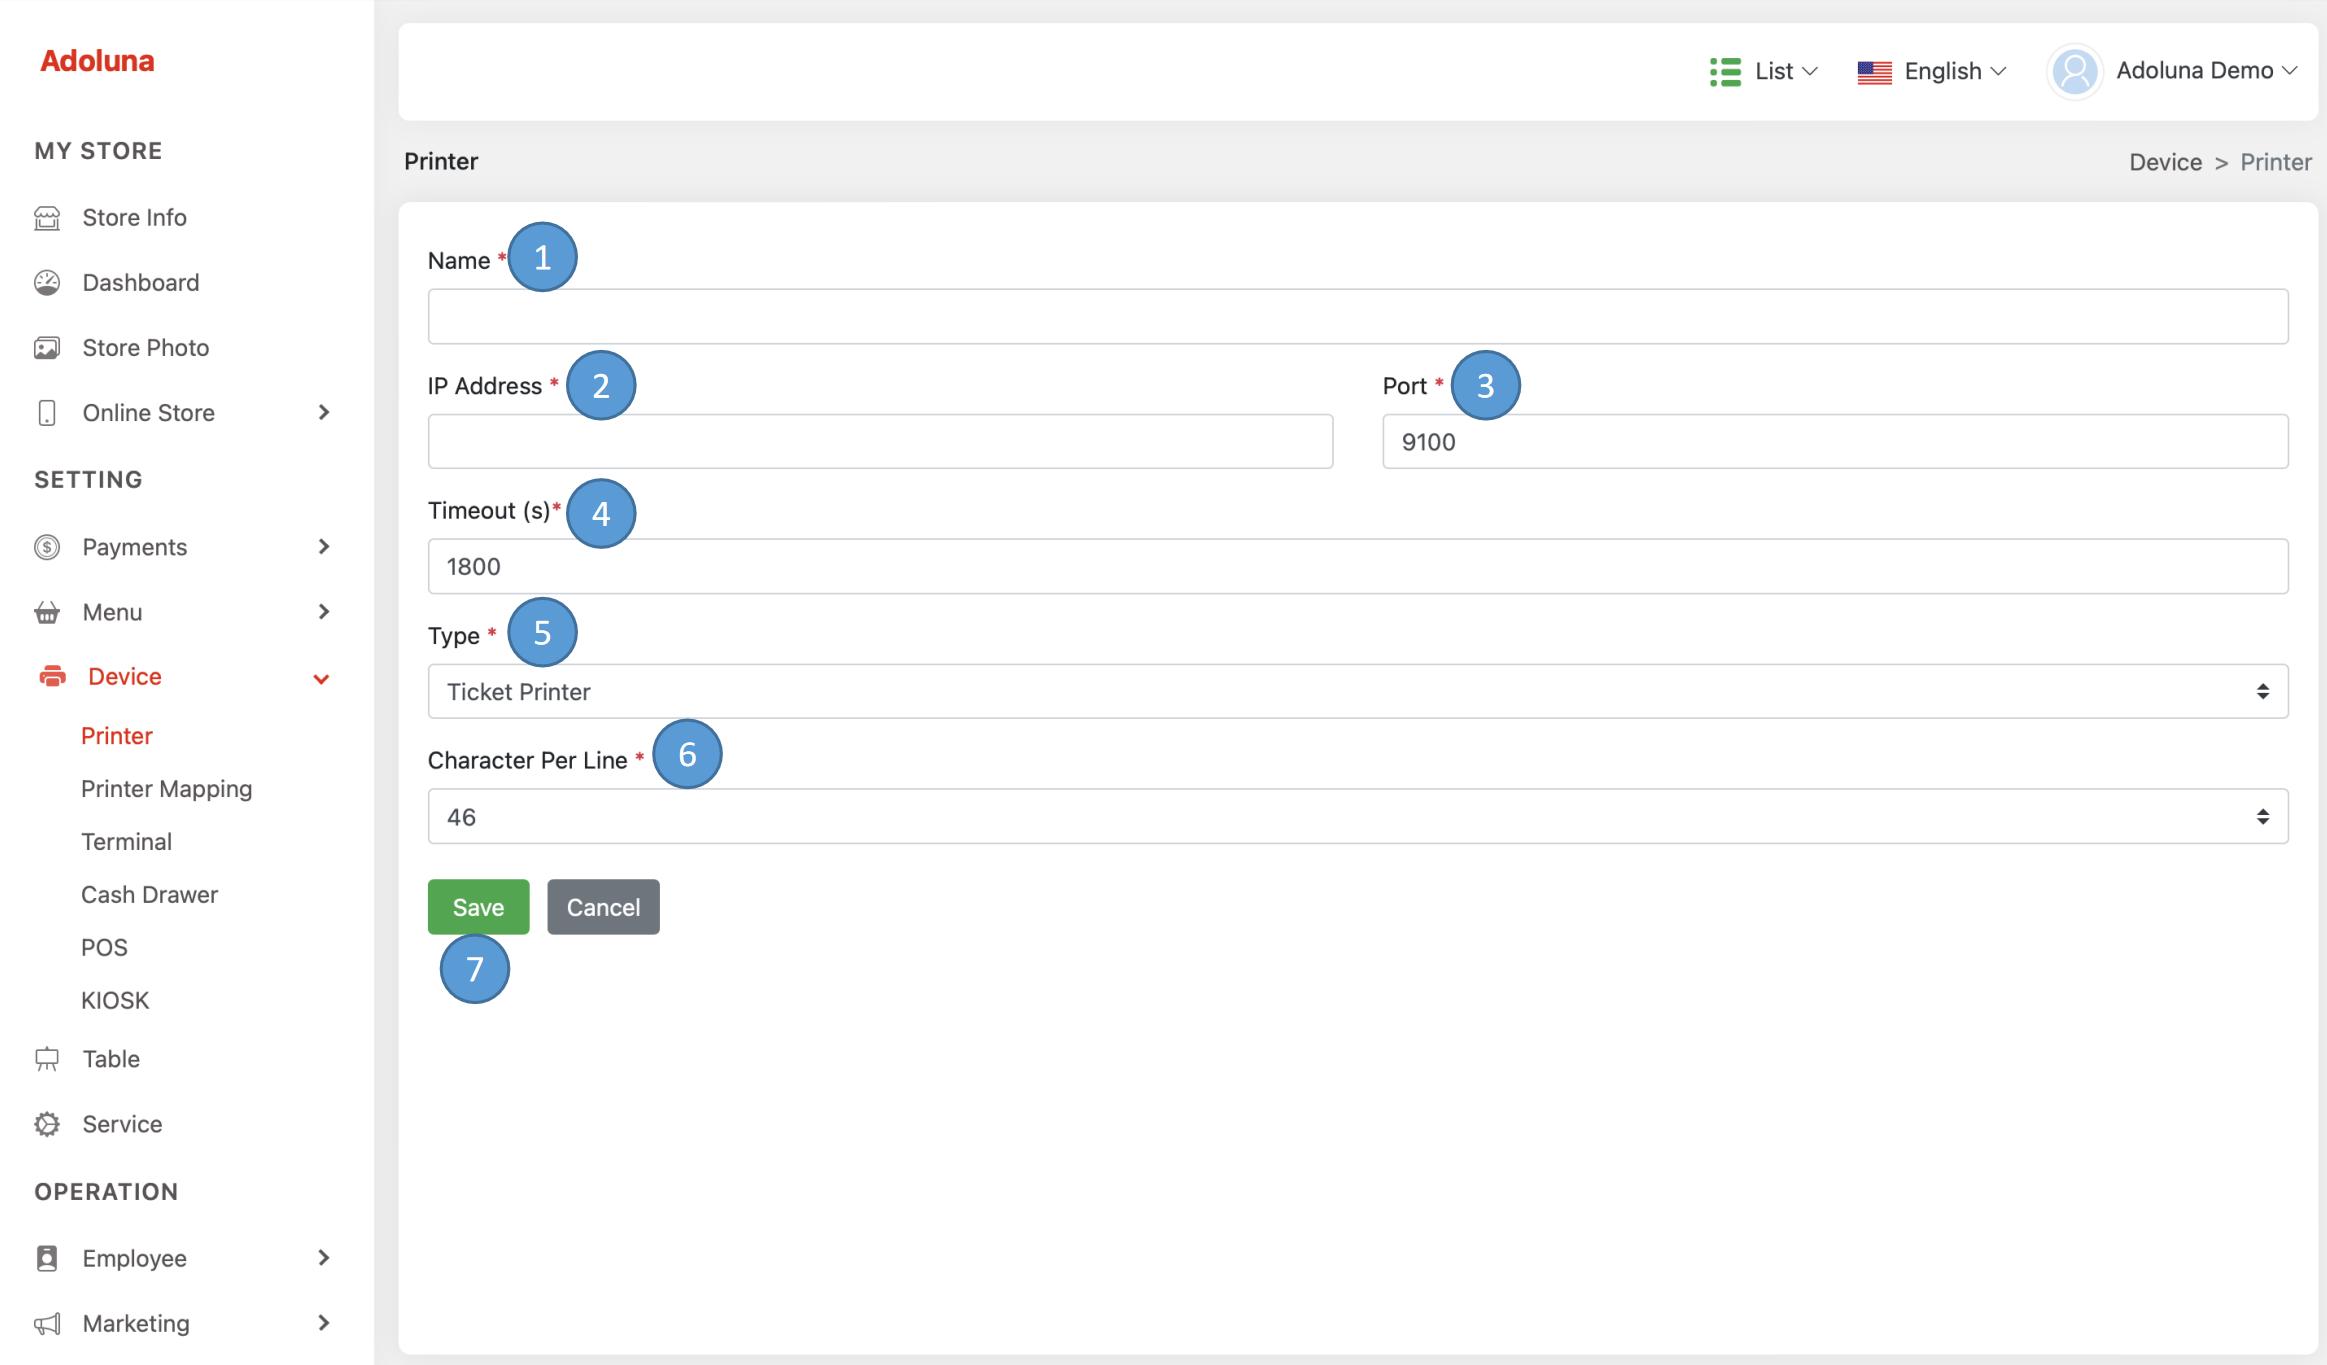
- Name: Assign a name to this printer.
- IP Address: Assign an IP address to this printer.
- Port: Assign the printer port to this printer, 9100 is the default value for most printers.
- Time Out: Set the printer timeout duration, measured in seconds, for which a printing job is sent to the printer. If the printer does not respond within this time, the system will drop the printing job. This feature is specific to Printer Mapping under Kitchen Printers.
- Type: Select a printer type.
- Character Per Line: Specifies the maximum number of characters that can be printed on each line.
- Click Save to apply the change.
Printer Mapping #
Click Printer Mapping under Device in the menu bar to configure the printer mapping.

- Click here to switch between printer mapping types.
- Click +Add New to create a new printer.
- Click the
 icon to edit the printer, and
  to delete the printer.

- Type: Select a printing job type.
- Kitchen: Links with menu items to print food orders.
- Receipt: Links to the POS devices to print customer receipts.
- Packager: Used to print packaging receipts.
- Name: Assign a name to this printing job.
- Printer: Choose the printer to which this printing job is linked.
- Language: Choose the printout language for this printing job.
- Font Size: Choose the printout font size for this printing job.
- Weight Size: Choose the printout weight size for this printing job.
- Beep Count: Choose the number of beeps after printing for this printing job.
- Beep Time: Choose the time in milliseconds between each beep for this printing job.
- Kitchen Receipt Breakdown: Choose the method for breaking down kitchen order printouts for this printing job.
- Click Save to apply the change
Terminal #
The Terminal section enables you to create and manage credit card terminals linked to your POS system. This feature ensures a seamless integration of credit card processing, allowing for efficient and secure transactions through your POS system.
Click Terminal under Device in the menu bar to configure the credit card terminals.
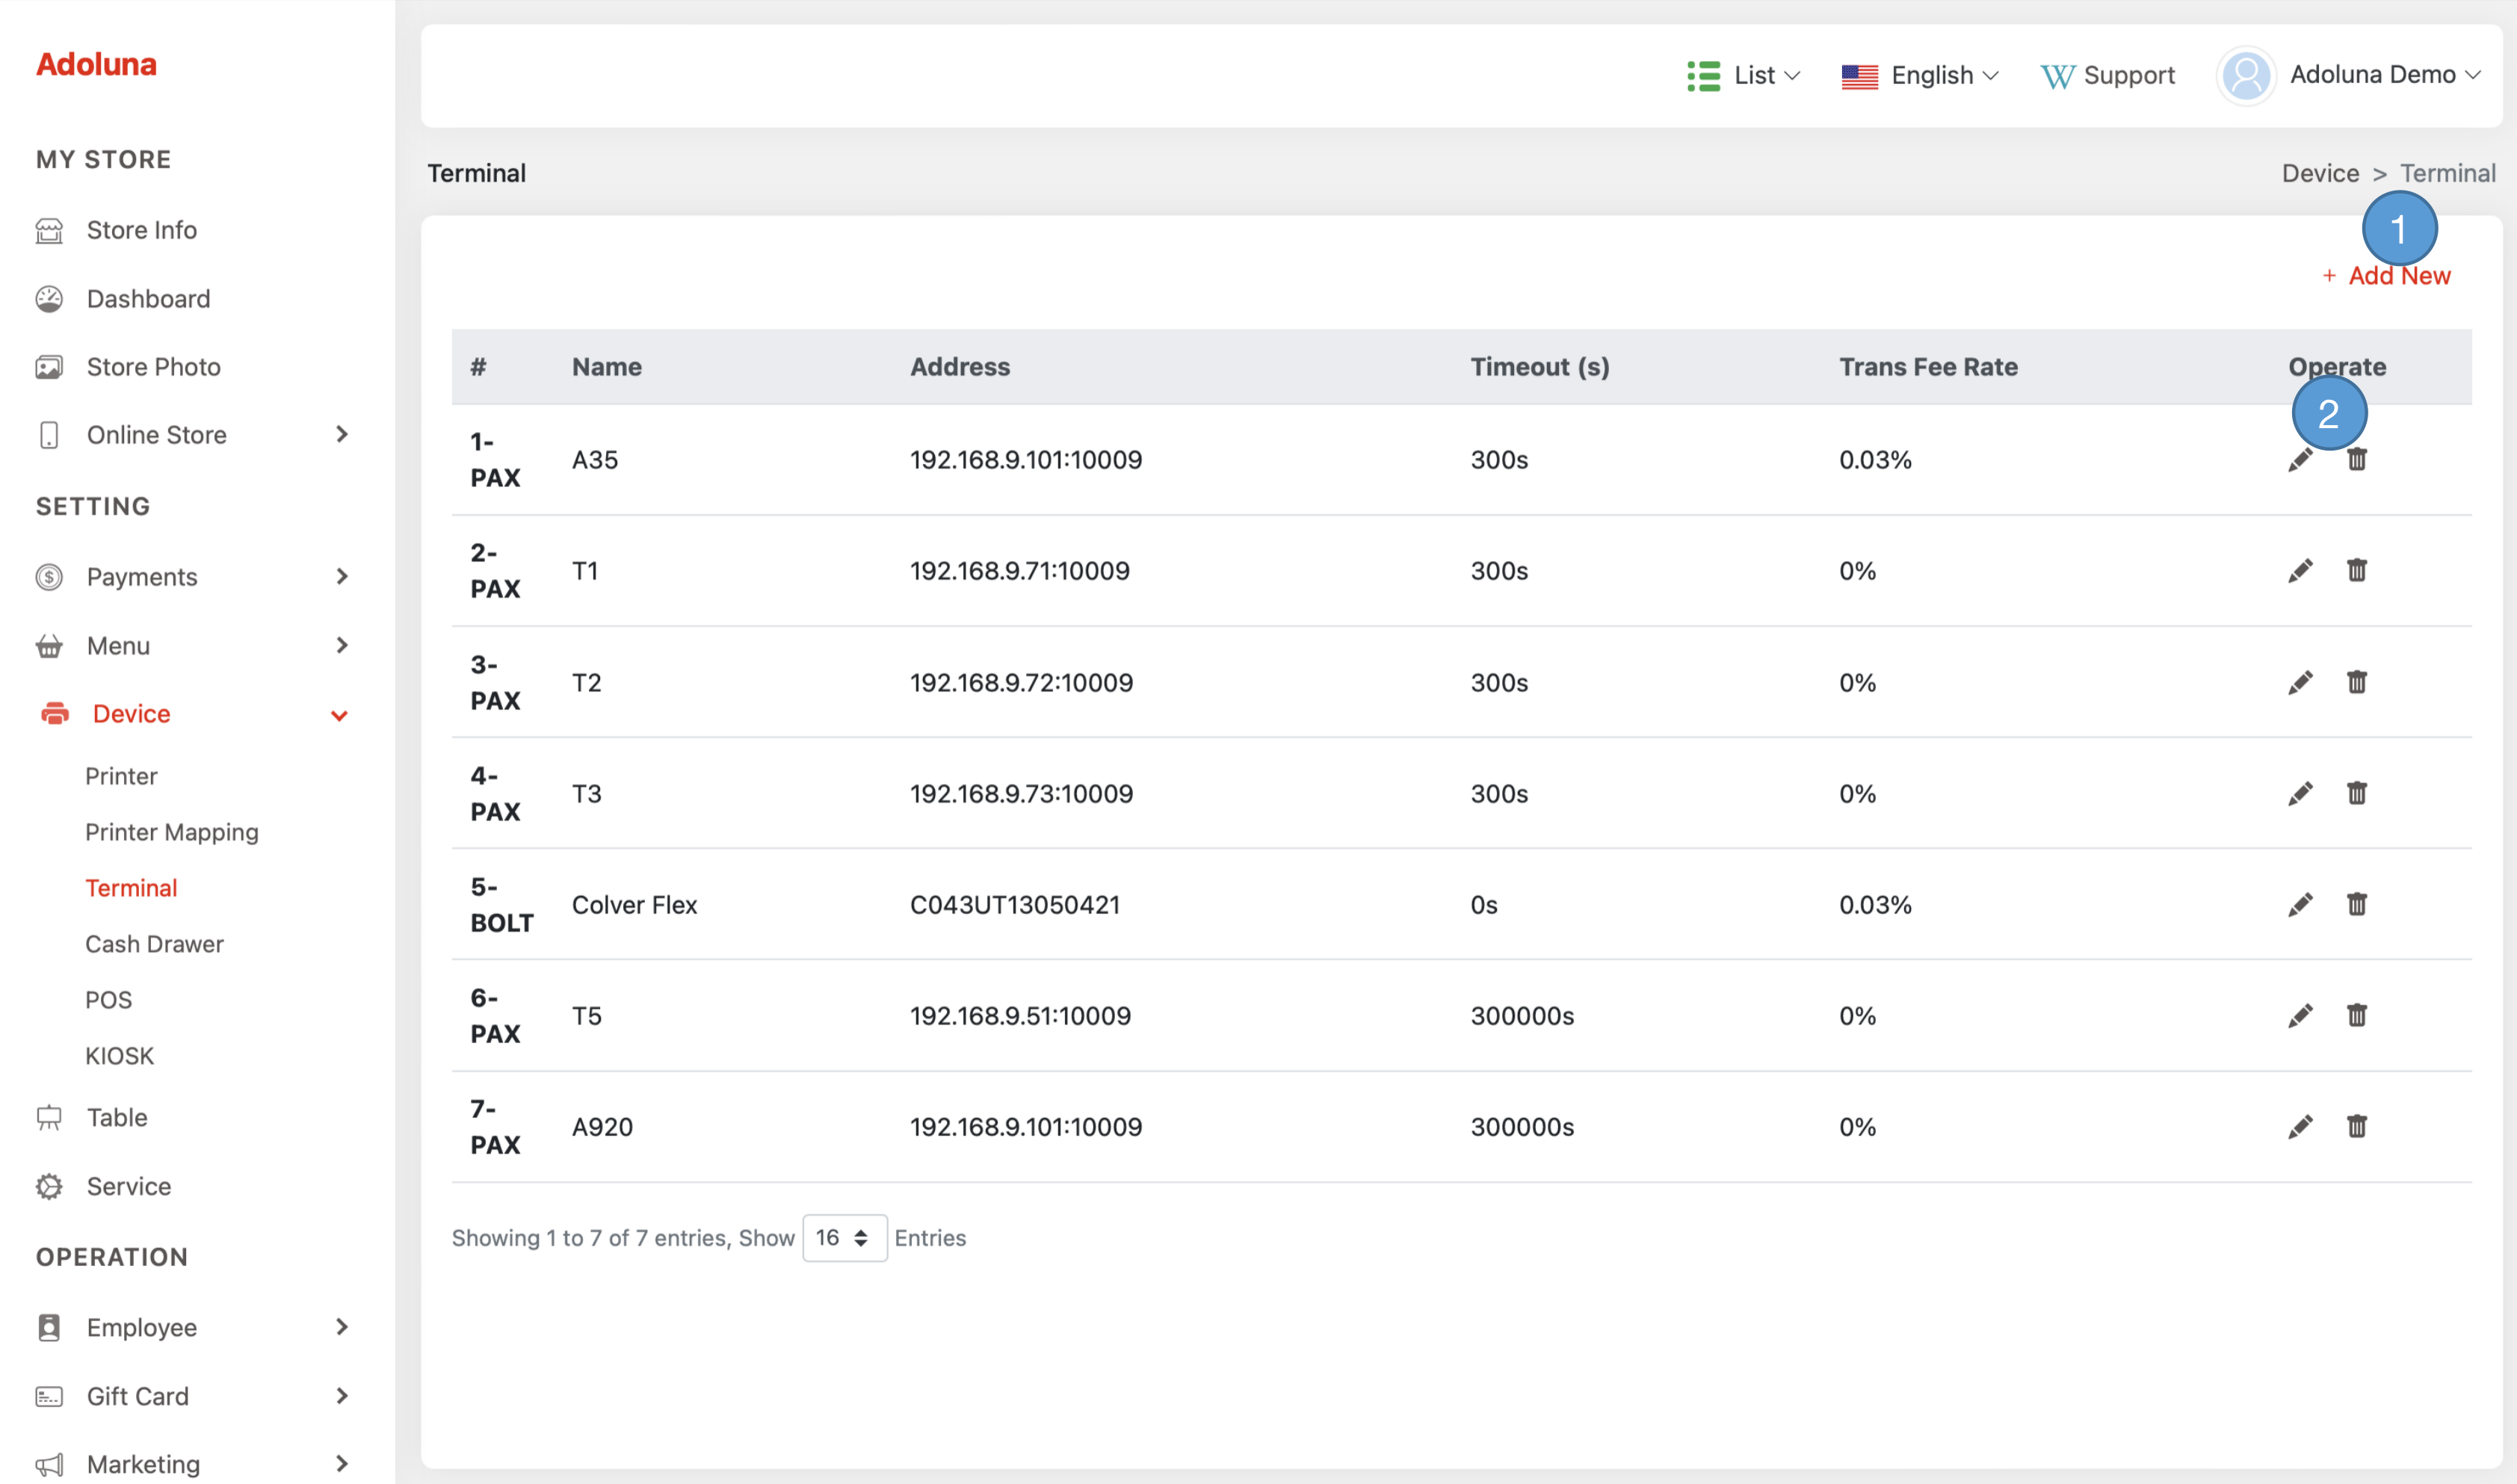
- Click +Add New to create a new credit card terminal.
- Click the
 icon to edit the credit card terminal, and
  to delete the credit card terminal.

- Type: Choose a type for this credit card terminal. Selecting an appropriate type helps define the functionality and purpose of the terminal within your POS system.
- Name: Assign a name to this terminal.
- Protocol: Choose the protocol for this terminal; the default is TCP.
- IP Address: Assign an IP address to this terminal.
- Port: Assign the port to this terminal; 10009 is the default value for PAX devices.
- Timeout: Set the duration in seconds for transaction request timeouts for this terminal.
- Transaction Fee Rate (%): Set the percentage rate used to calculate transaction fees for credit card tips on the server’s report for this terminal.
- Signature Requirement ($): Set the minimum dollar amount for which a customer’s signature is required for credit card transactions for this terminal.
- Printer: Select the printer connected to this terminal.
- Printer Language: Choose the printout language.
- Setting: All other settings for this terminal.
- Click Save to apply the change.
Cash Drawer #
The Cash Drawer section allows you to create and manage the link between the cash drawer and your POS system. This feature ensures proper coordination between the POS system and the cash drawer, facilitating smooth and secure cash transactions in your establishment.
Click Cash Drawer under Device in the menu bar to configure the cash drawer.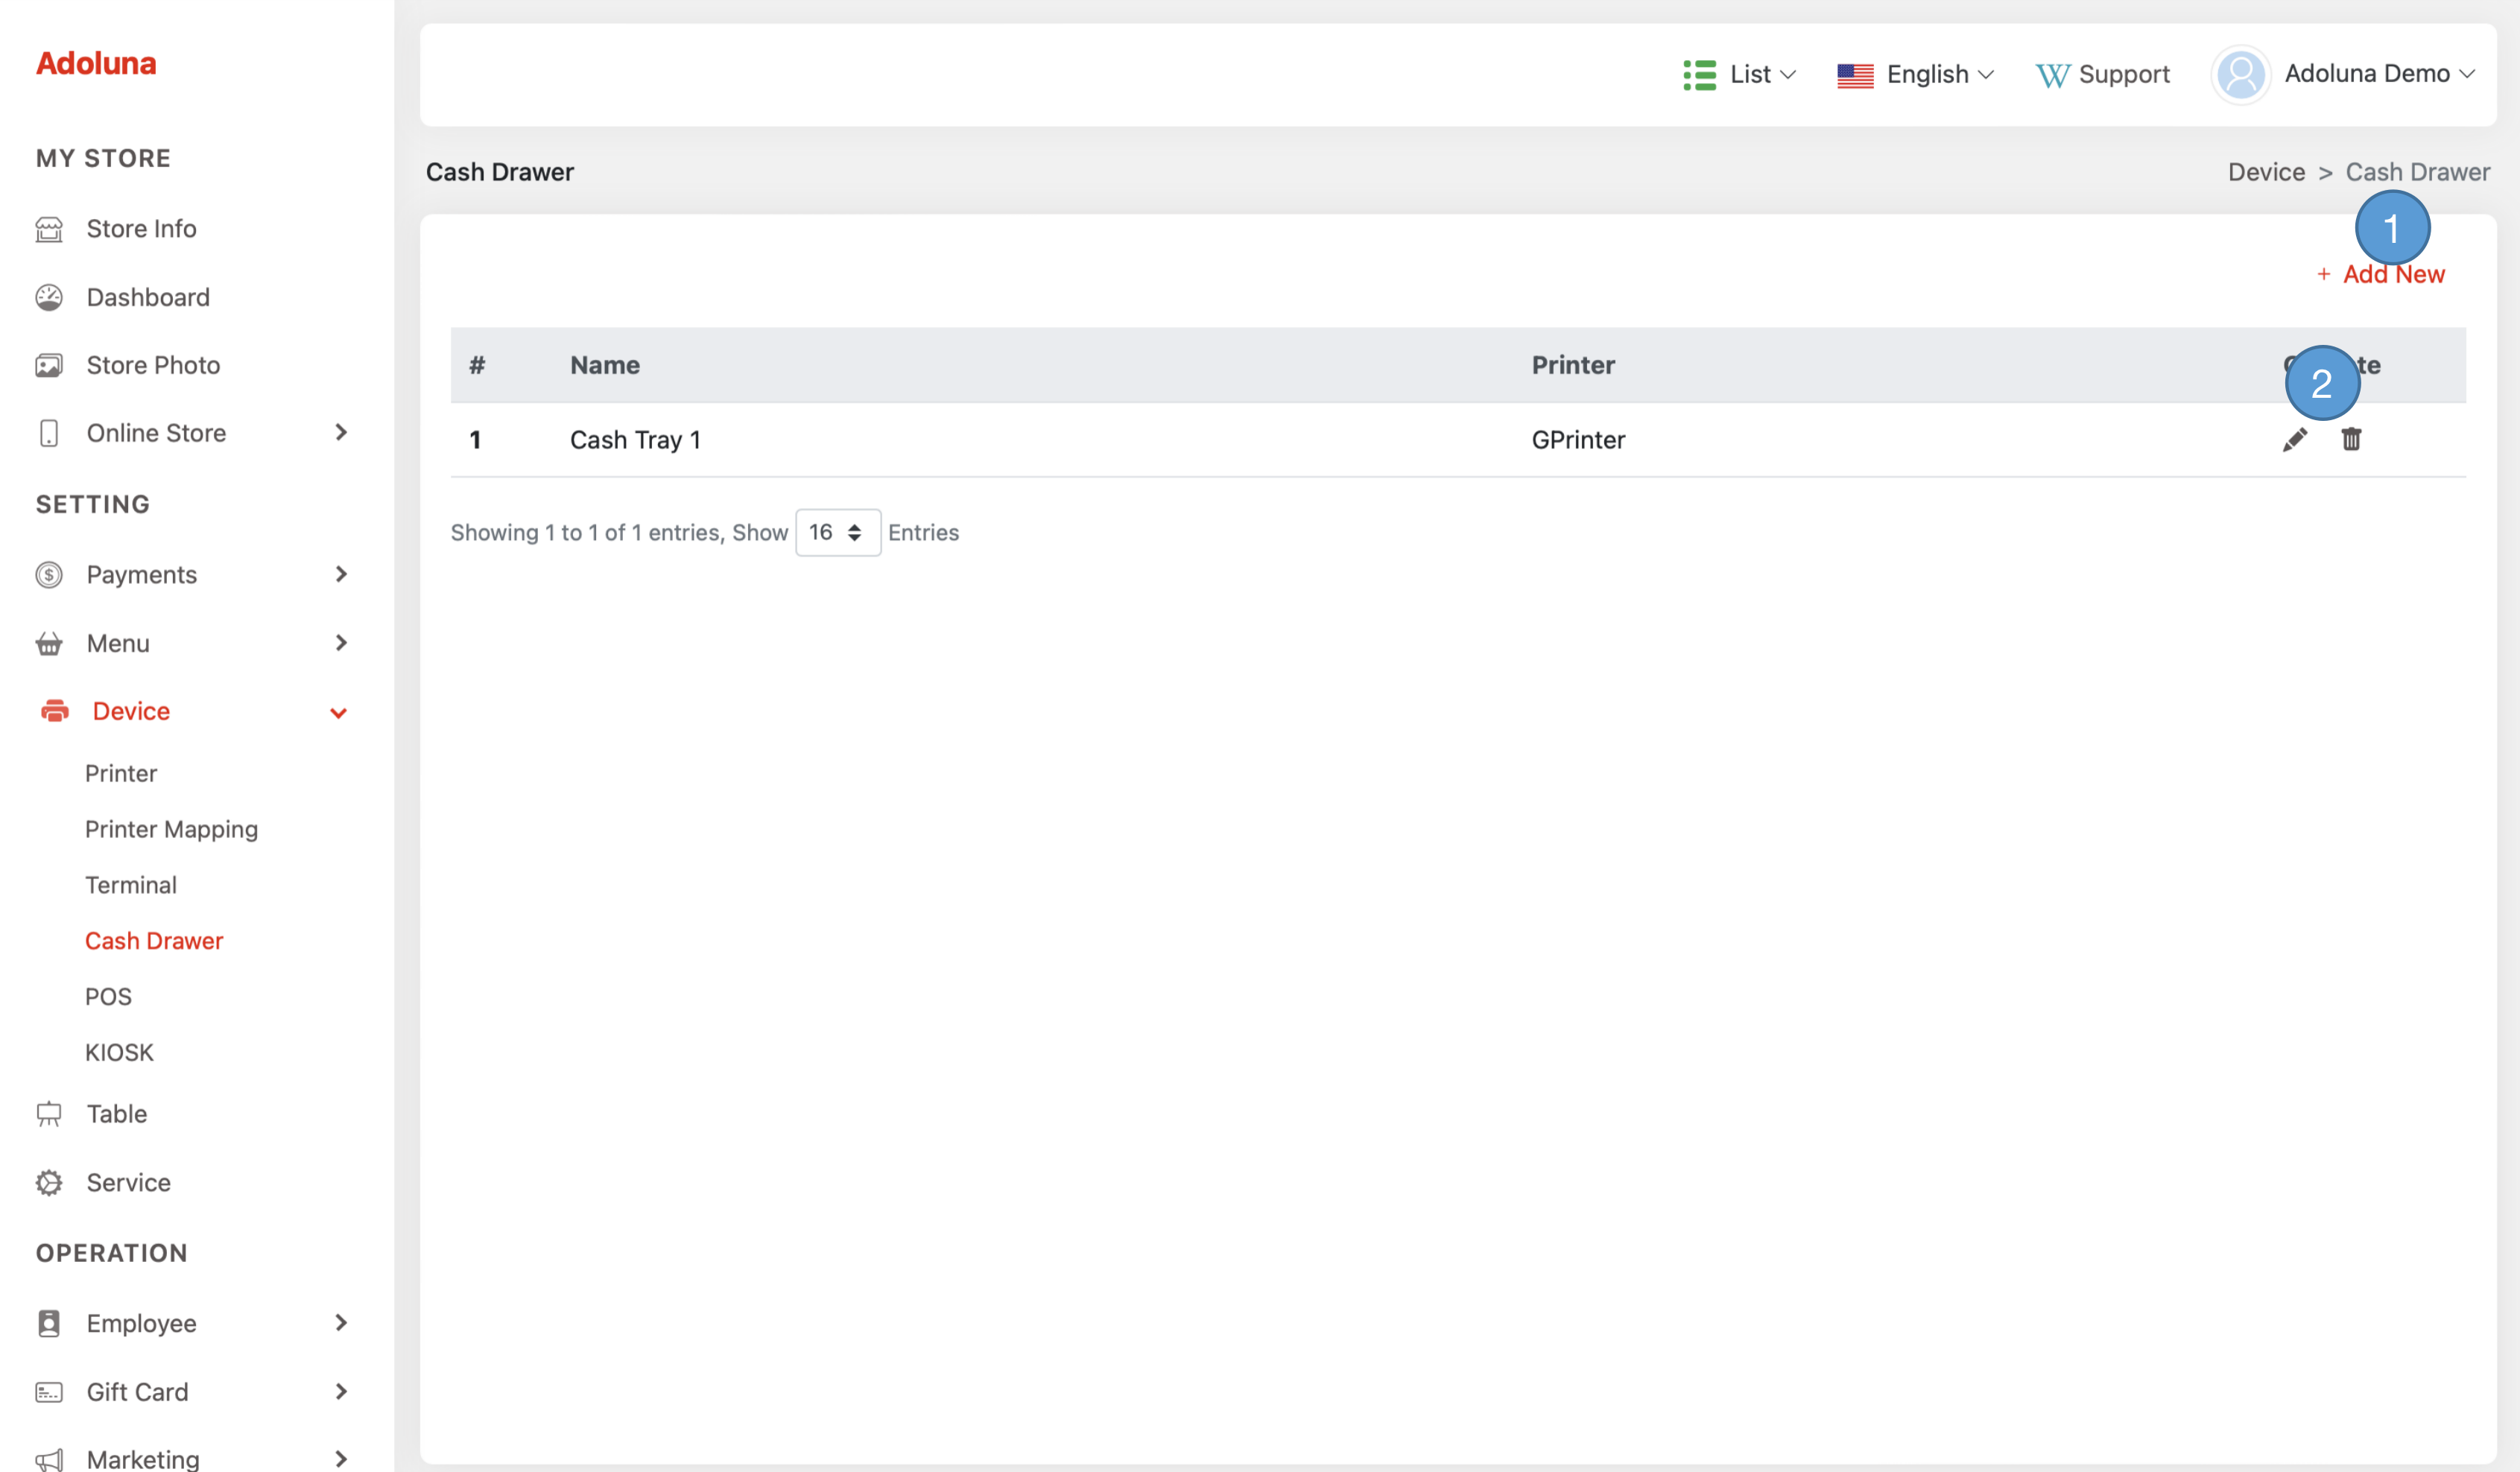
- Click +Add New to create a new cash drawer.
- Click the
 icon to edit the cash drawer, and
  to delete the cash drawer.
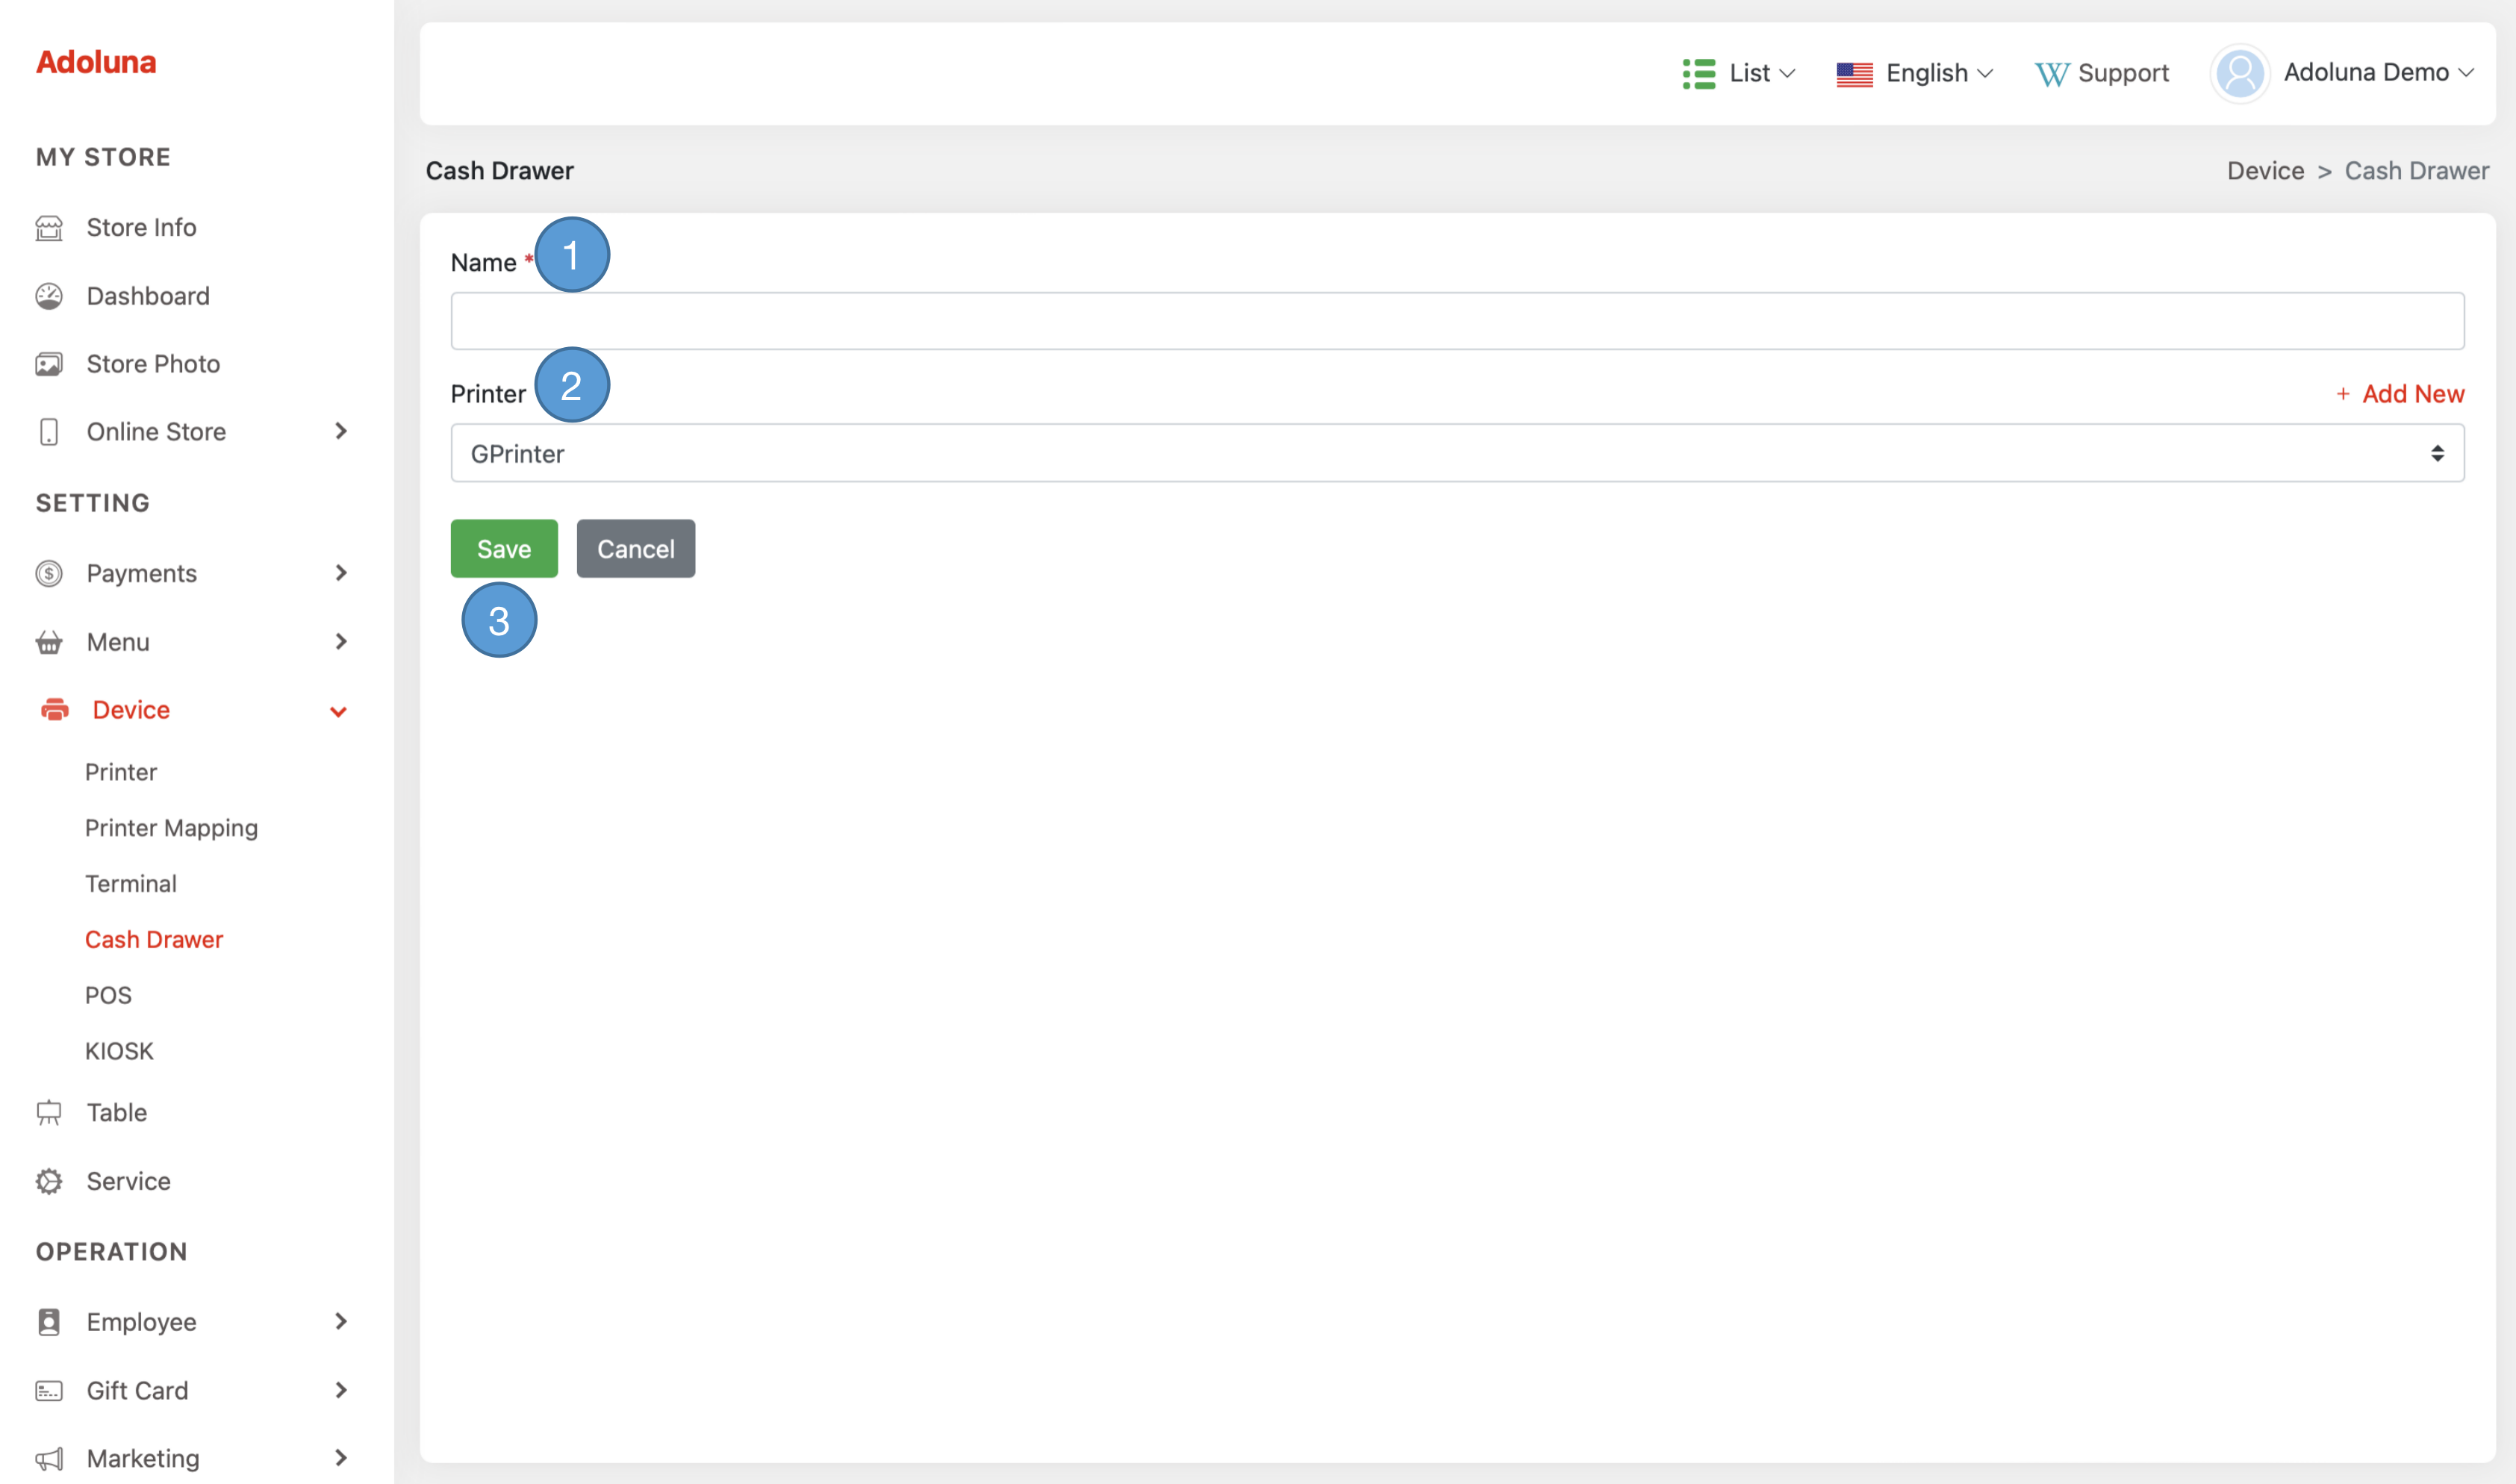
- Name: Assign a name to this cash drawer.
- Printer: Choose the printer connected to this cash drawer.
- Click Save to apply the change.
POS #
The POS section enables you to configure settings for your POS device. This feature provides flexibility in tailoring your POS device to meet the specific needs and preferences of your business operations, ensuring a seamless and customized point-of-sale experience.
Click POS under Device in the menu bar to configure the POS. Please contact Adoluna Sales if you require additional POS licenses.
- Click the
 icon to configure POS settings, and the
  icon to detach the POS from a bonded device.
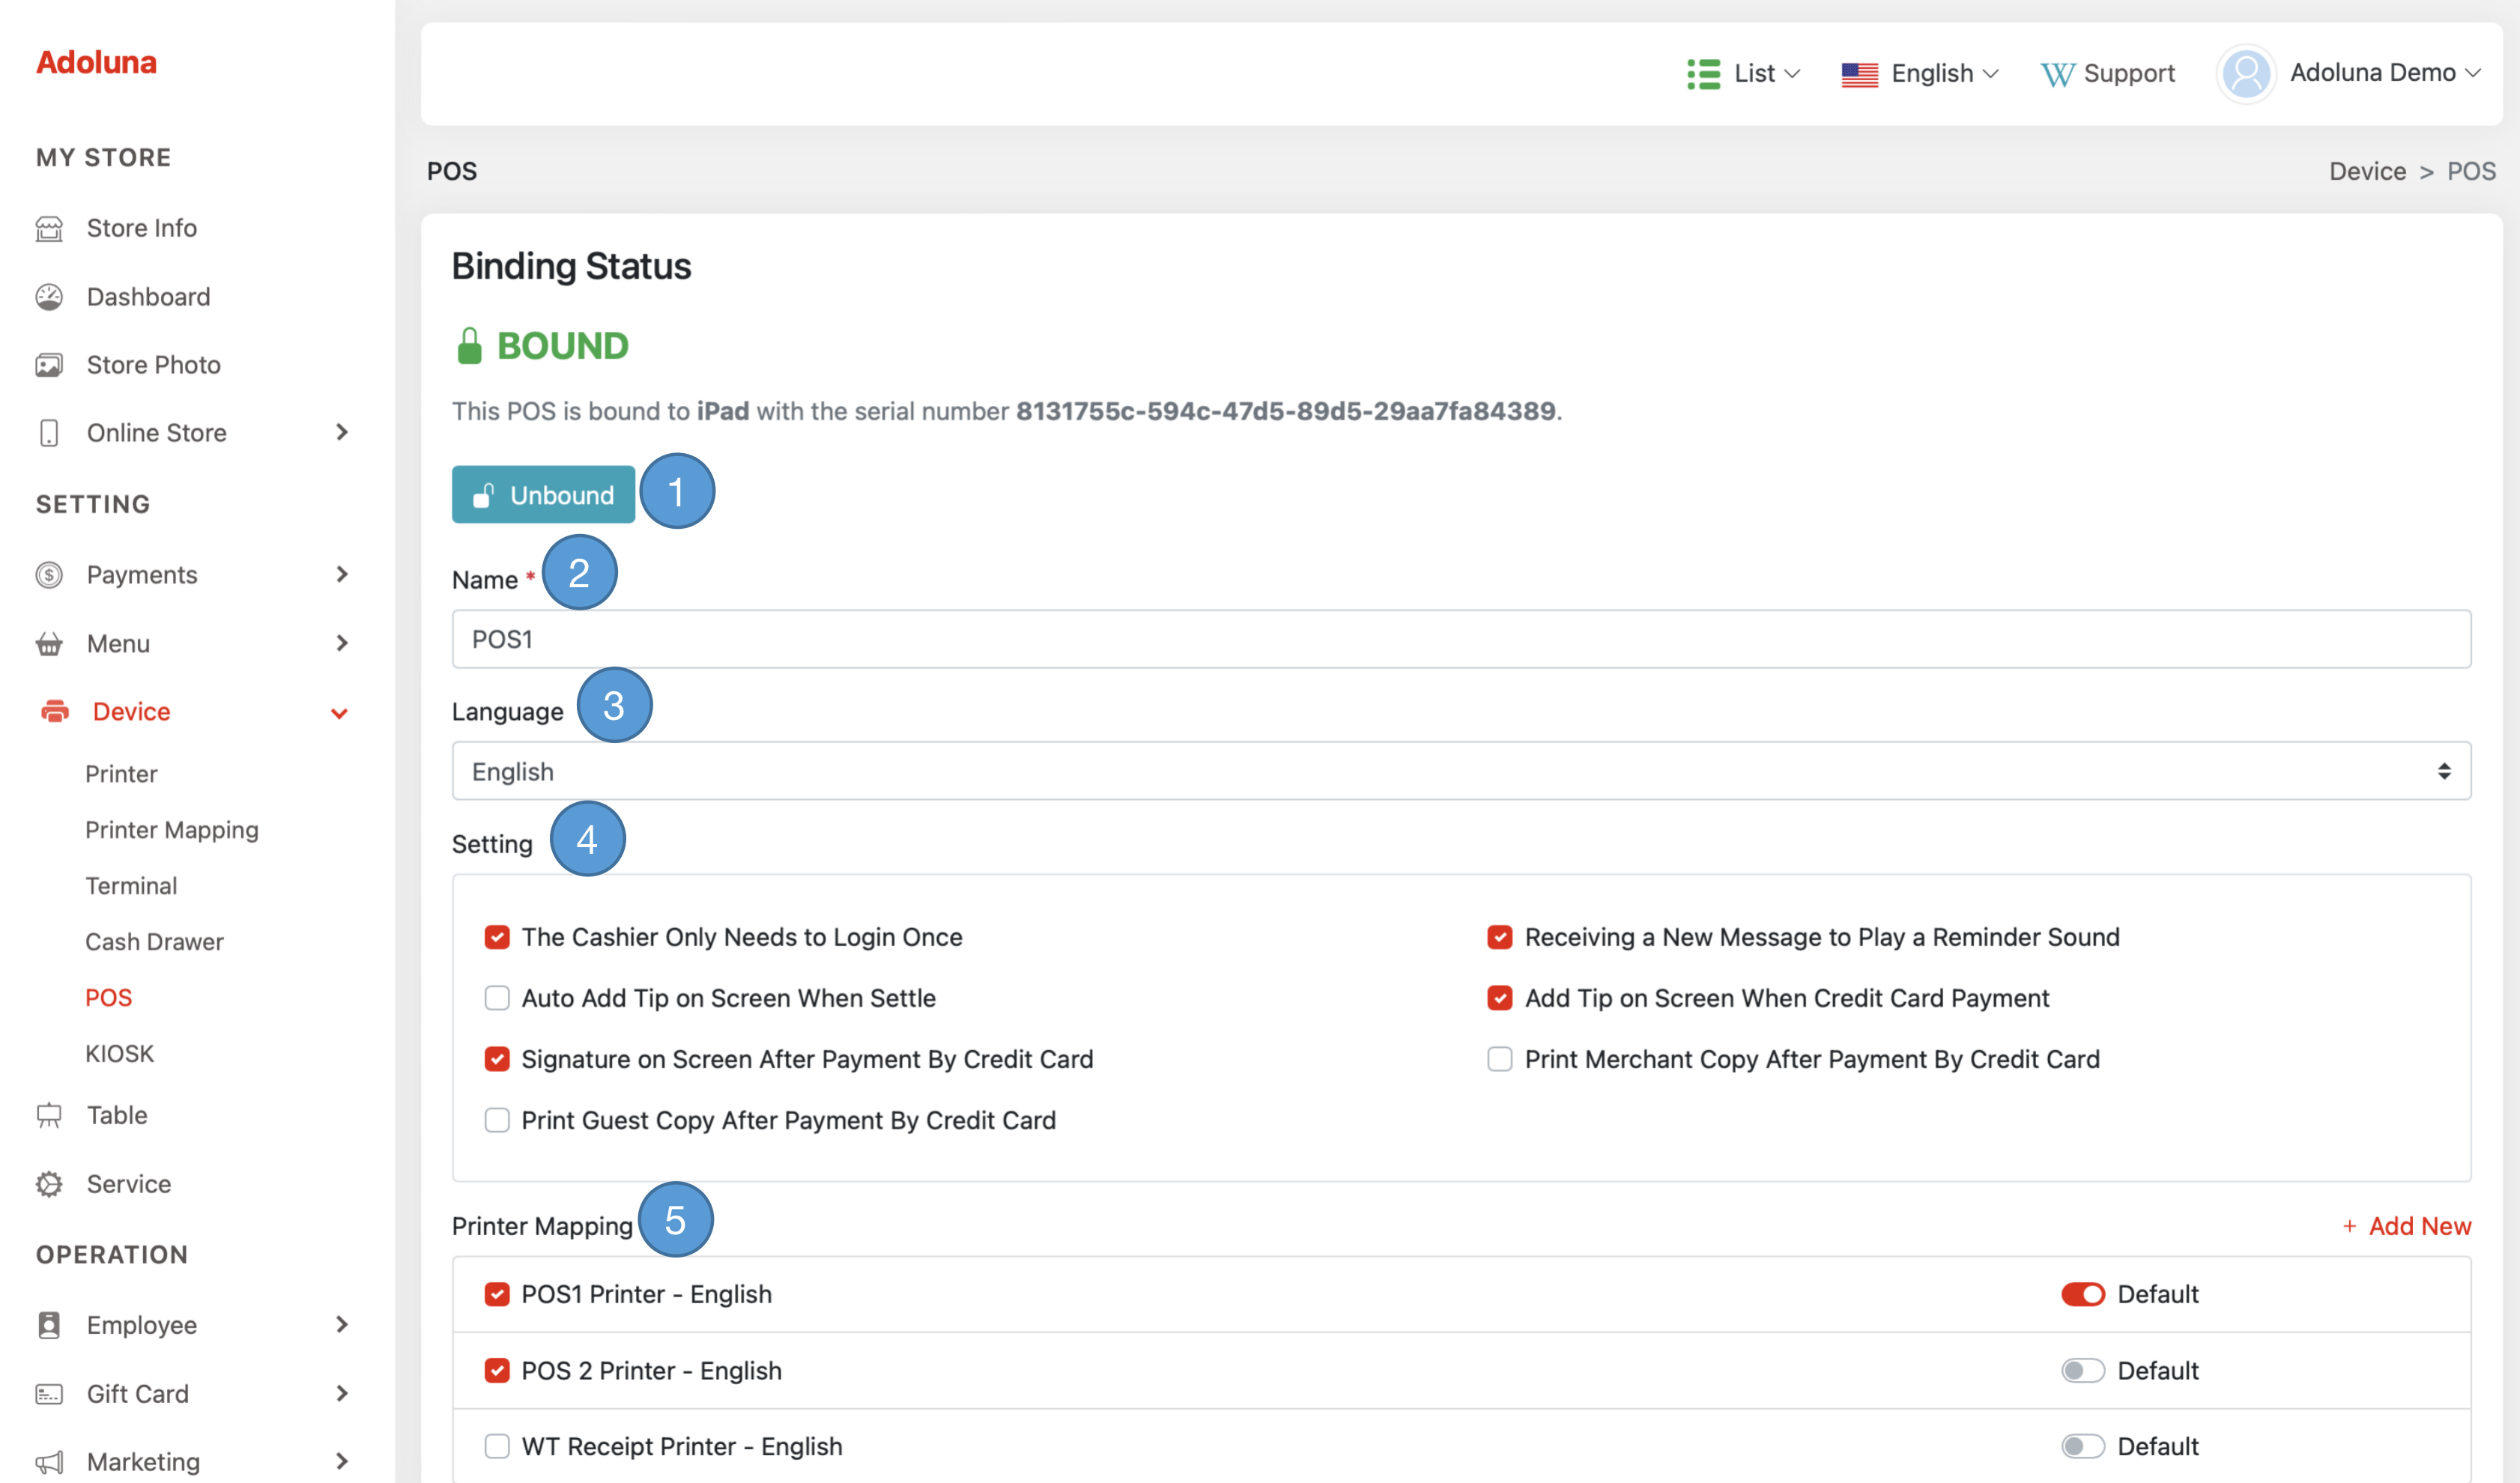

- Click Unbound to detach the POS from a bonded device
- POS Name: Specify the POS device name.
- POS Language: Select the default language for the POS device.
- Setting: Other settings for this POS device.
- Printer Mapping: Select the printer connected to the POS. If a default printer is set, print jobs will be sent automatically to it. Otherwise, the system will prompt you to select a printer from the available options.
- Terminal: Select the terminals connected to this POS. If a default terminal is set, it will be automatically selected when requesting a credit card transaction. Otherwise, the system will prompt you to select a terminal from the available options.
- Turn Customer Display On/Off.
- Click Unbound to detach the Customer Display from a bonded device
- Click Save to apply the change.
Kiosk #
The Kiosk section allows you to configure settings for your kiosk device, specifically catering to kiosk functionalities. This feature empowers you to customize and optimize your POS device settings to align with the unique requirements of kiosk-based operations, ensuring a streamlined and efficient self-service experience for your customers.
Click Kiosk under Device in the menu bar to configure the Kisok. Please contact Adoluna sales if you require additional Kiosk licenses.
- Click the
 icon to configure Kiosk settings, and the
  icon to detach the Kiosk from a bonded device.

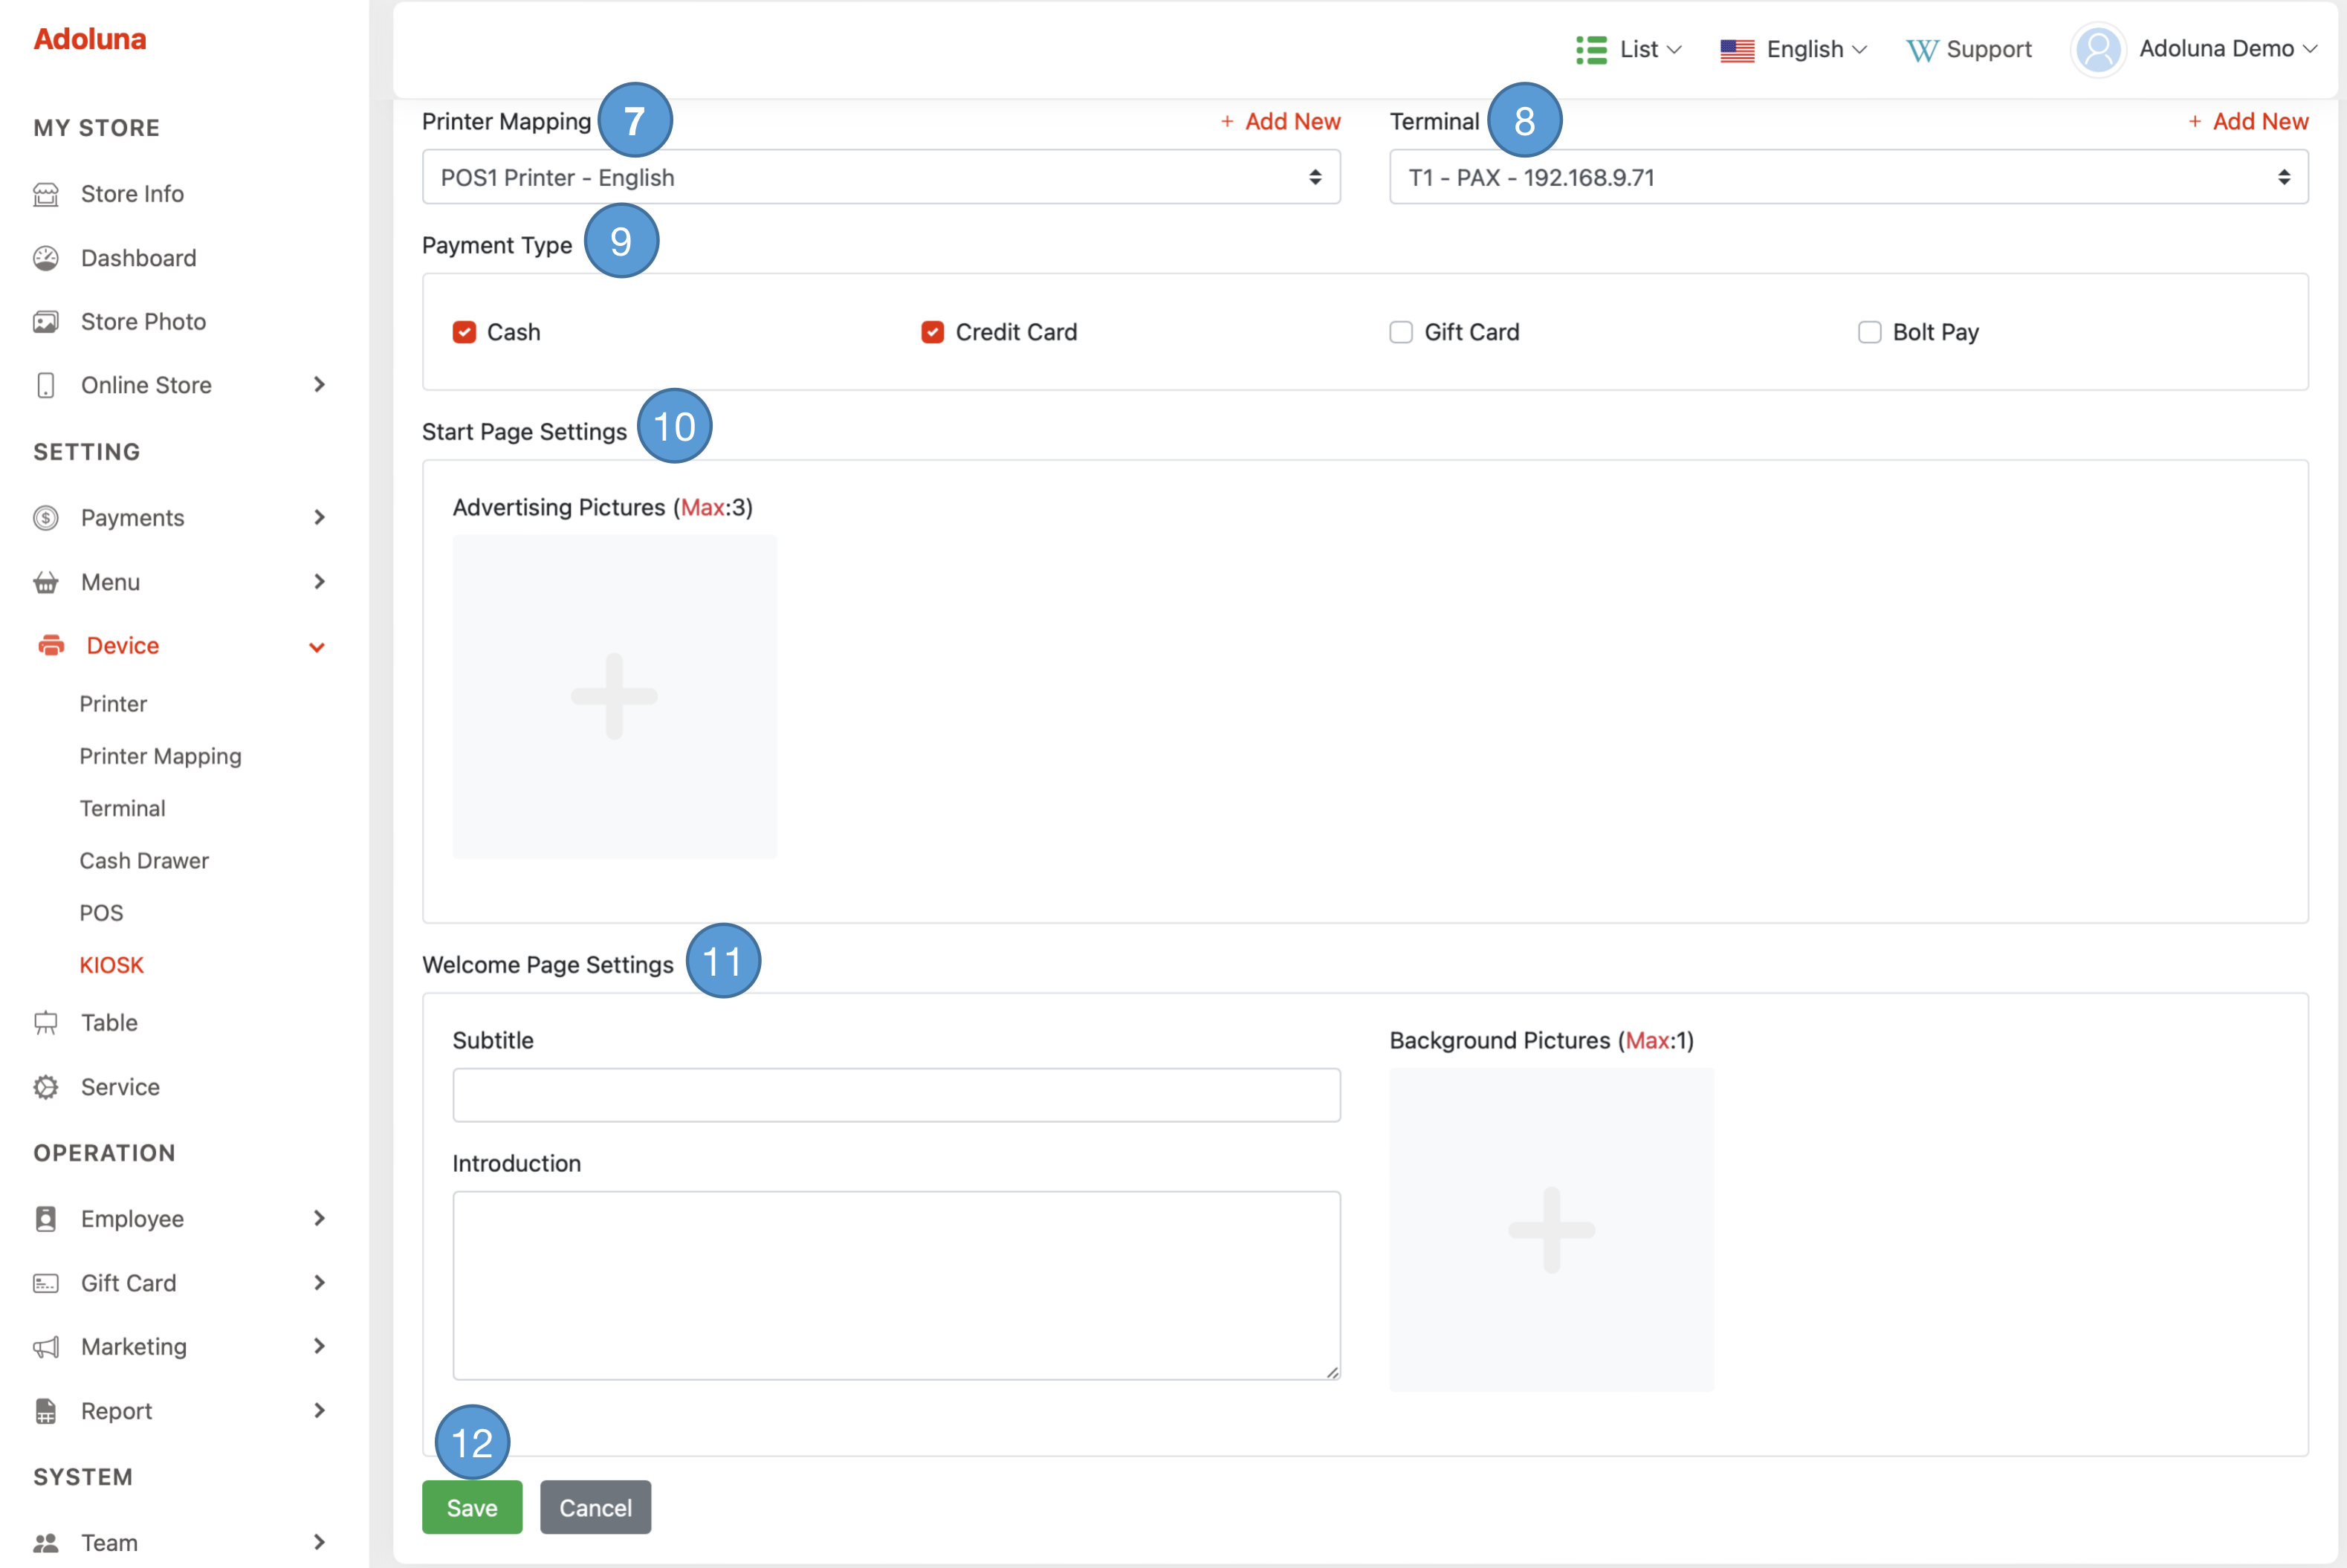
- Click Unbound to detach the Kiosk from a bonded device
- Kiosk Name: Specify the Kiosk device name.
- Kiosk Language: Select the default language for the Kiosk device.
- Auto Exit After Timeout: Set the timeout duration, measured in seconds, for the kiosk device to exit if no customer is using it.
- Kiosk Mode: Choose a kiosk mode for this kiosk device.
- Self Help: Customers can initiate orders independently.
- Dine In: Customers can start ordering once a server initiates the table.
- Setting: Other settings for this kiosk device.
- Printer Mapping: Select the printer connected to this kiosk device.
- Terminal: Select the credit card terminal connected to this kiosk device.
- Payment Type: Select the available payment options for this kiosk device.
- Start Page Setting: Choose up to 3 pictures for the initial screen of this kiosk device.
- Welcome Page Setting: Configure the welcome page for this kiosk device.
- Click Save to apply the change.
