Price Type #
The price type provides the available price type options for menu items.
Navigate to the Price Type under Menu from the menu bar to create and manage the price type for your store.
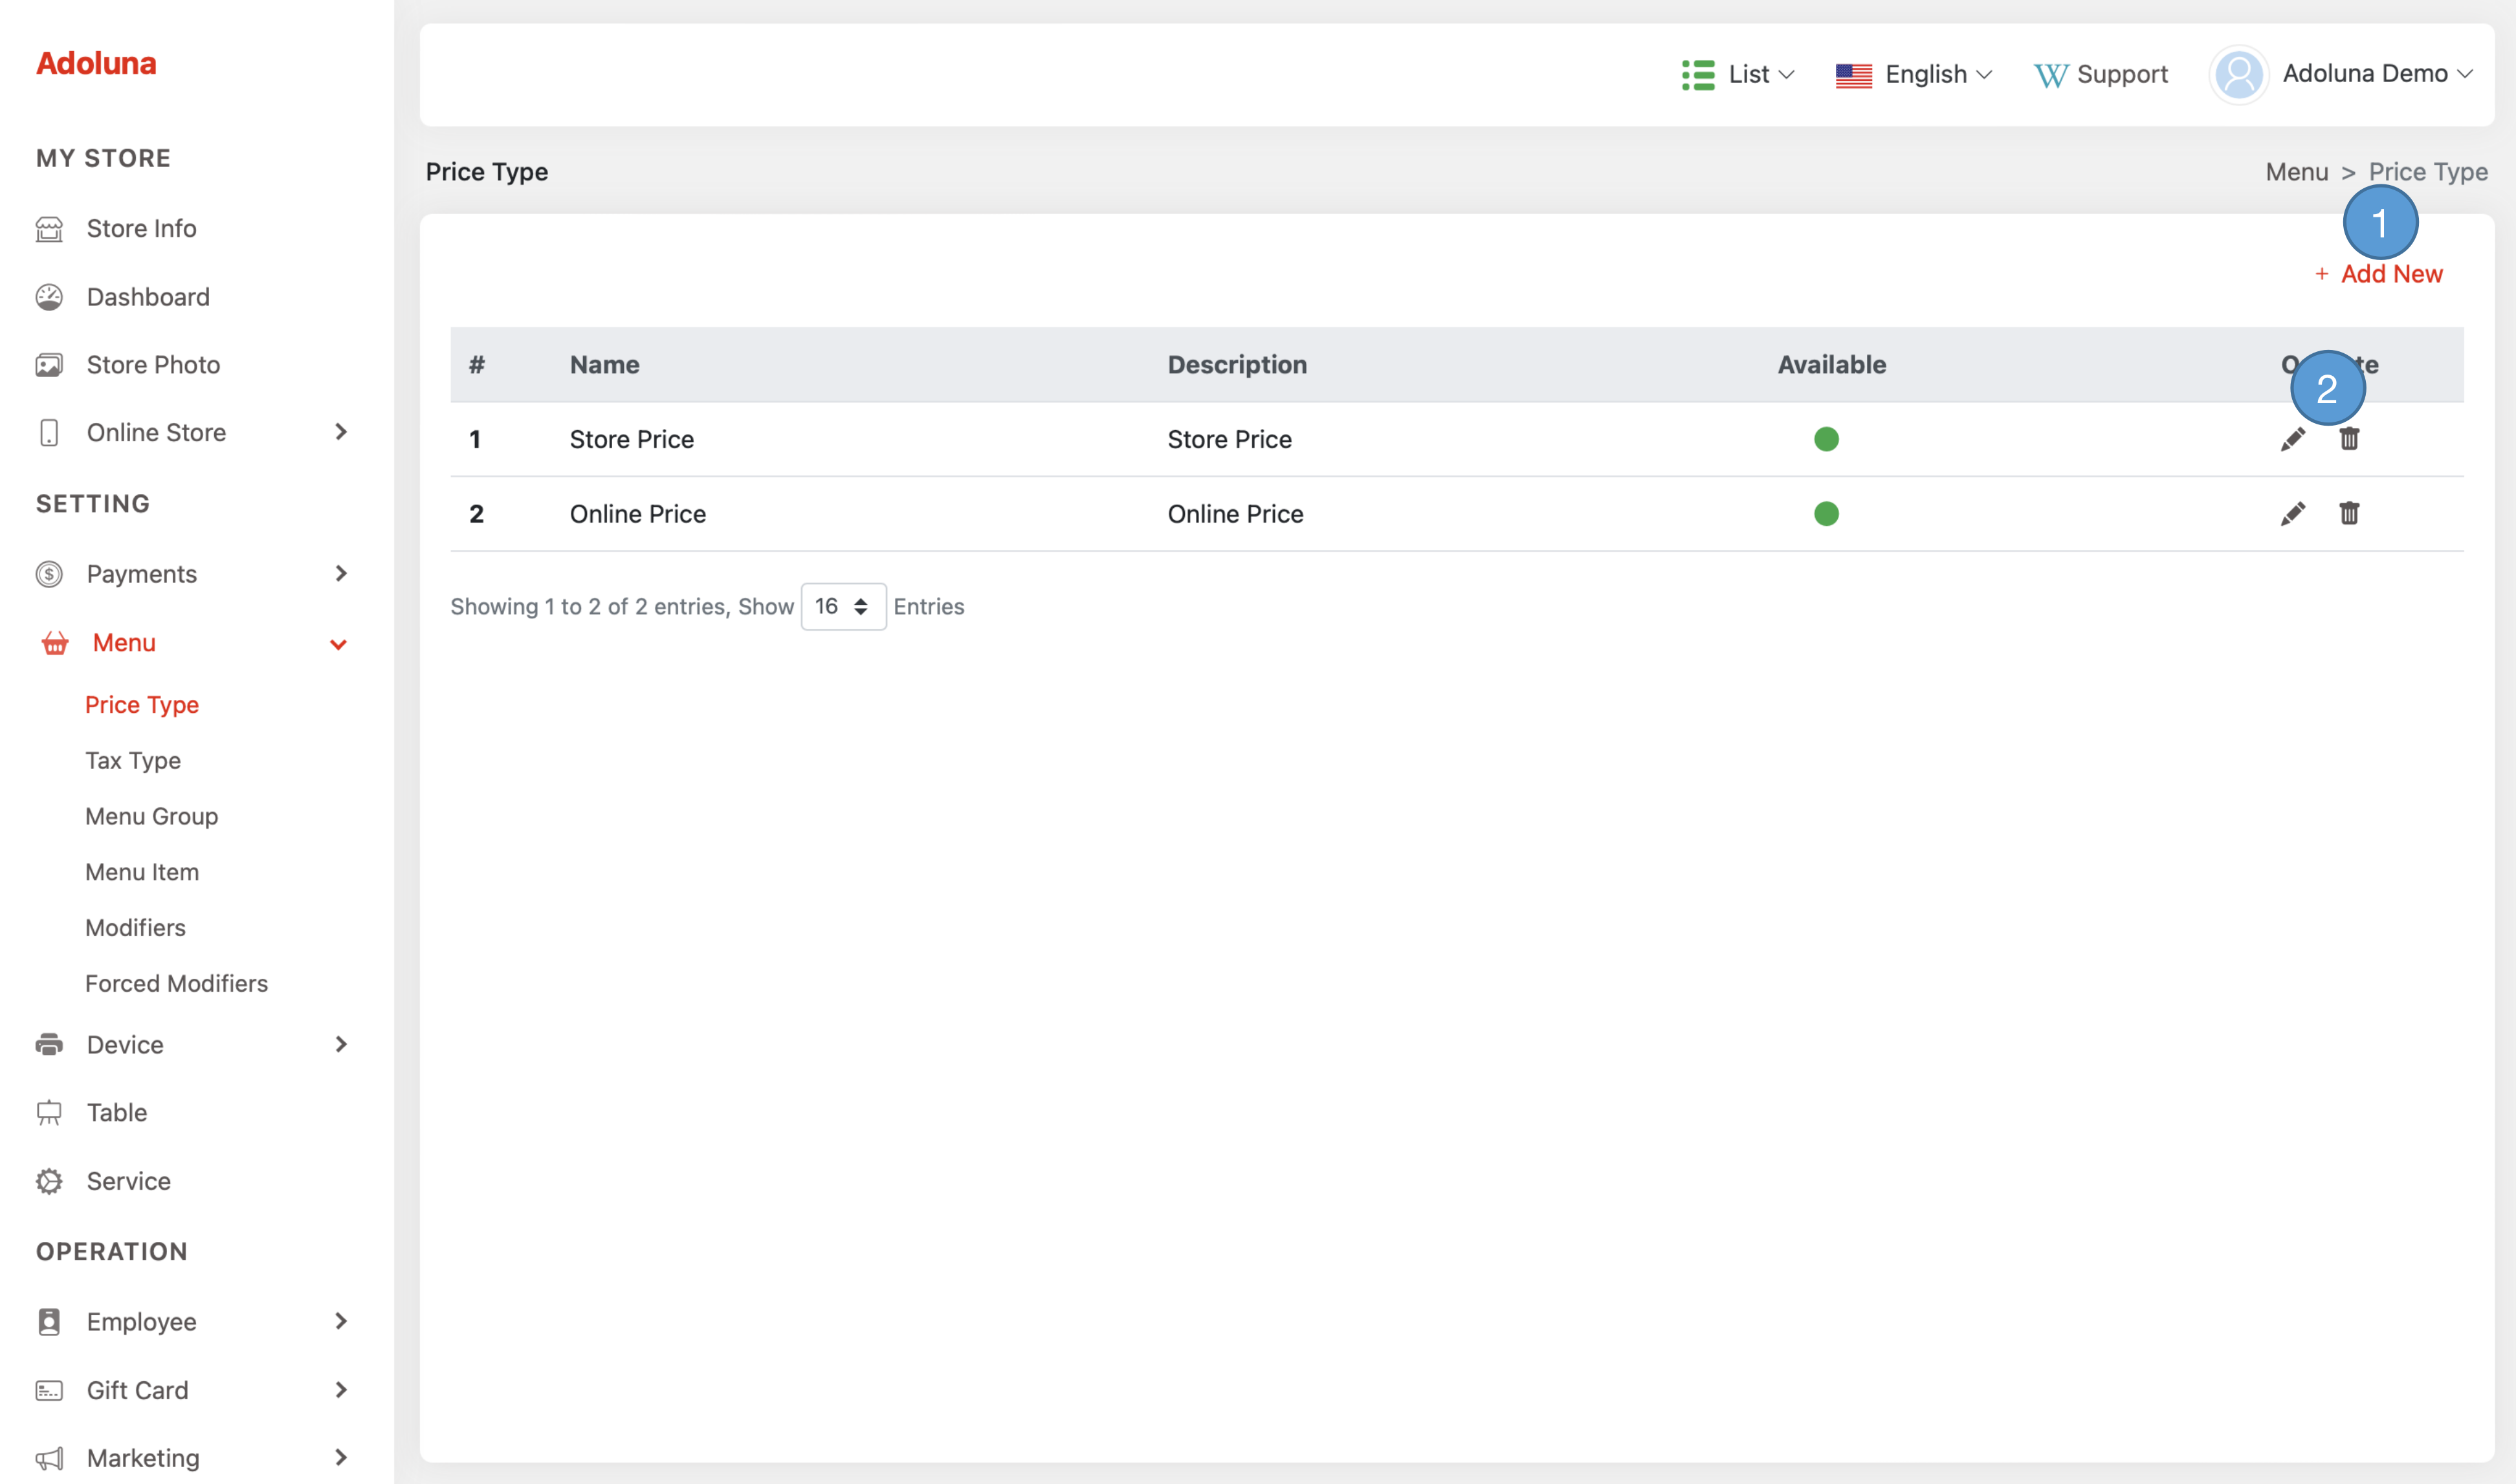
- Click +Add New to create a new price type.
- Click the
 icon to edit the price type, and
  to delete the price type.
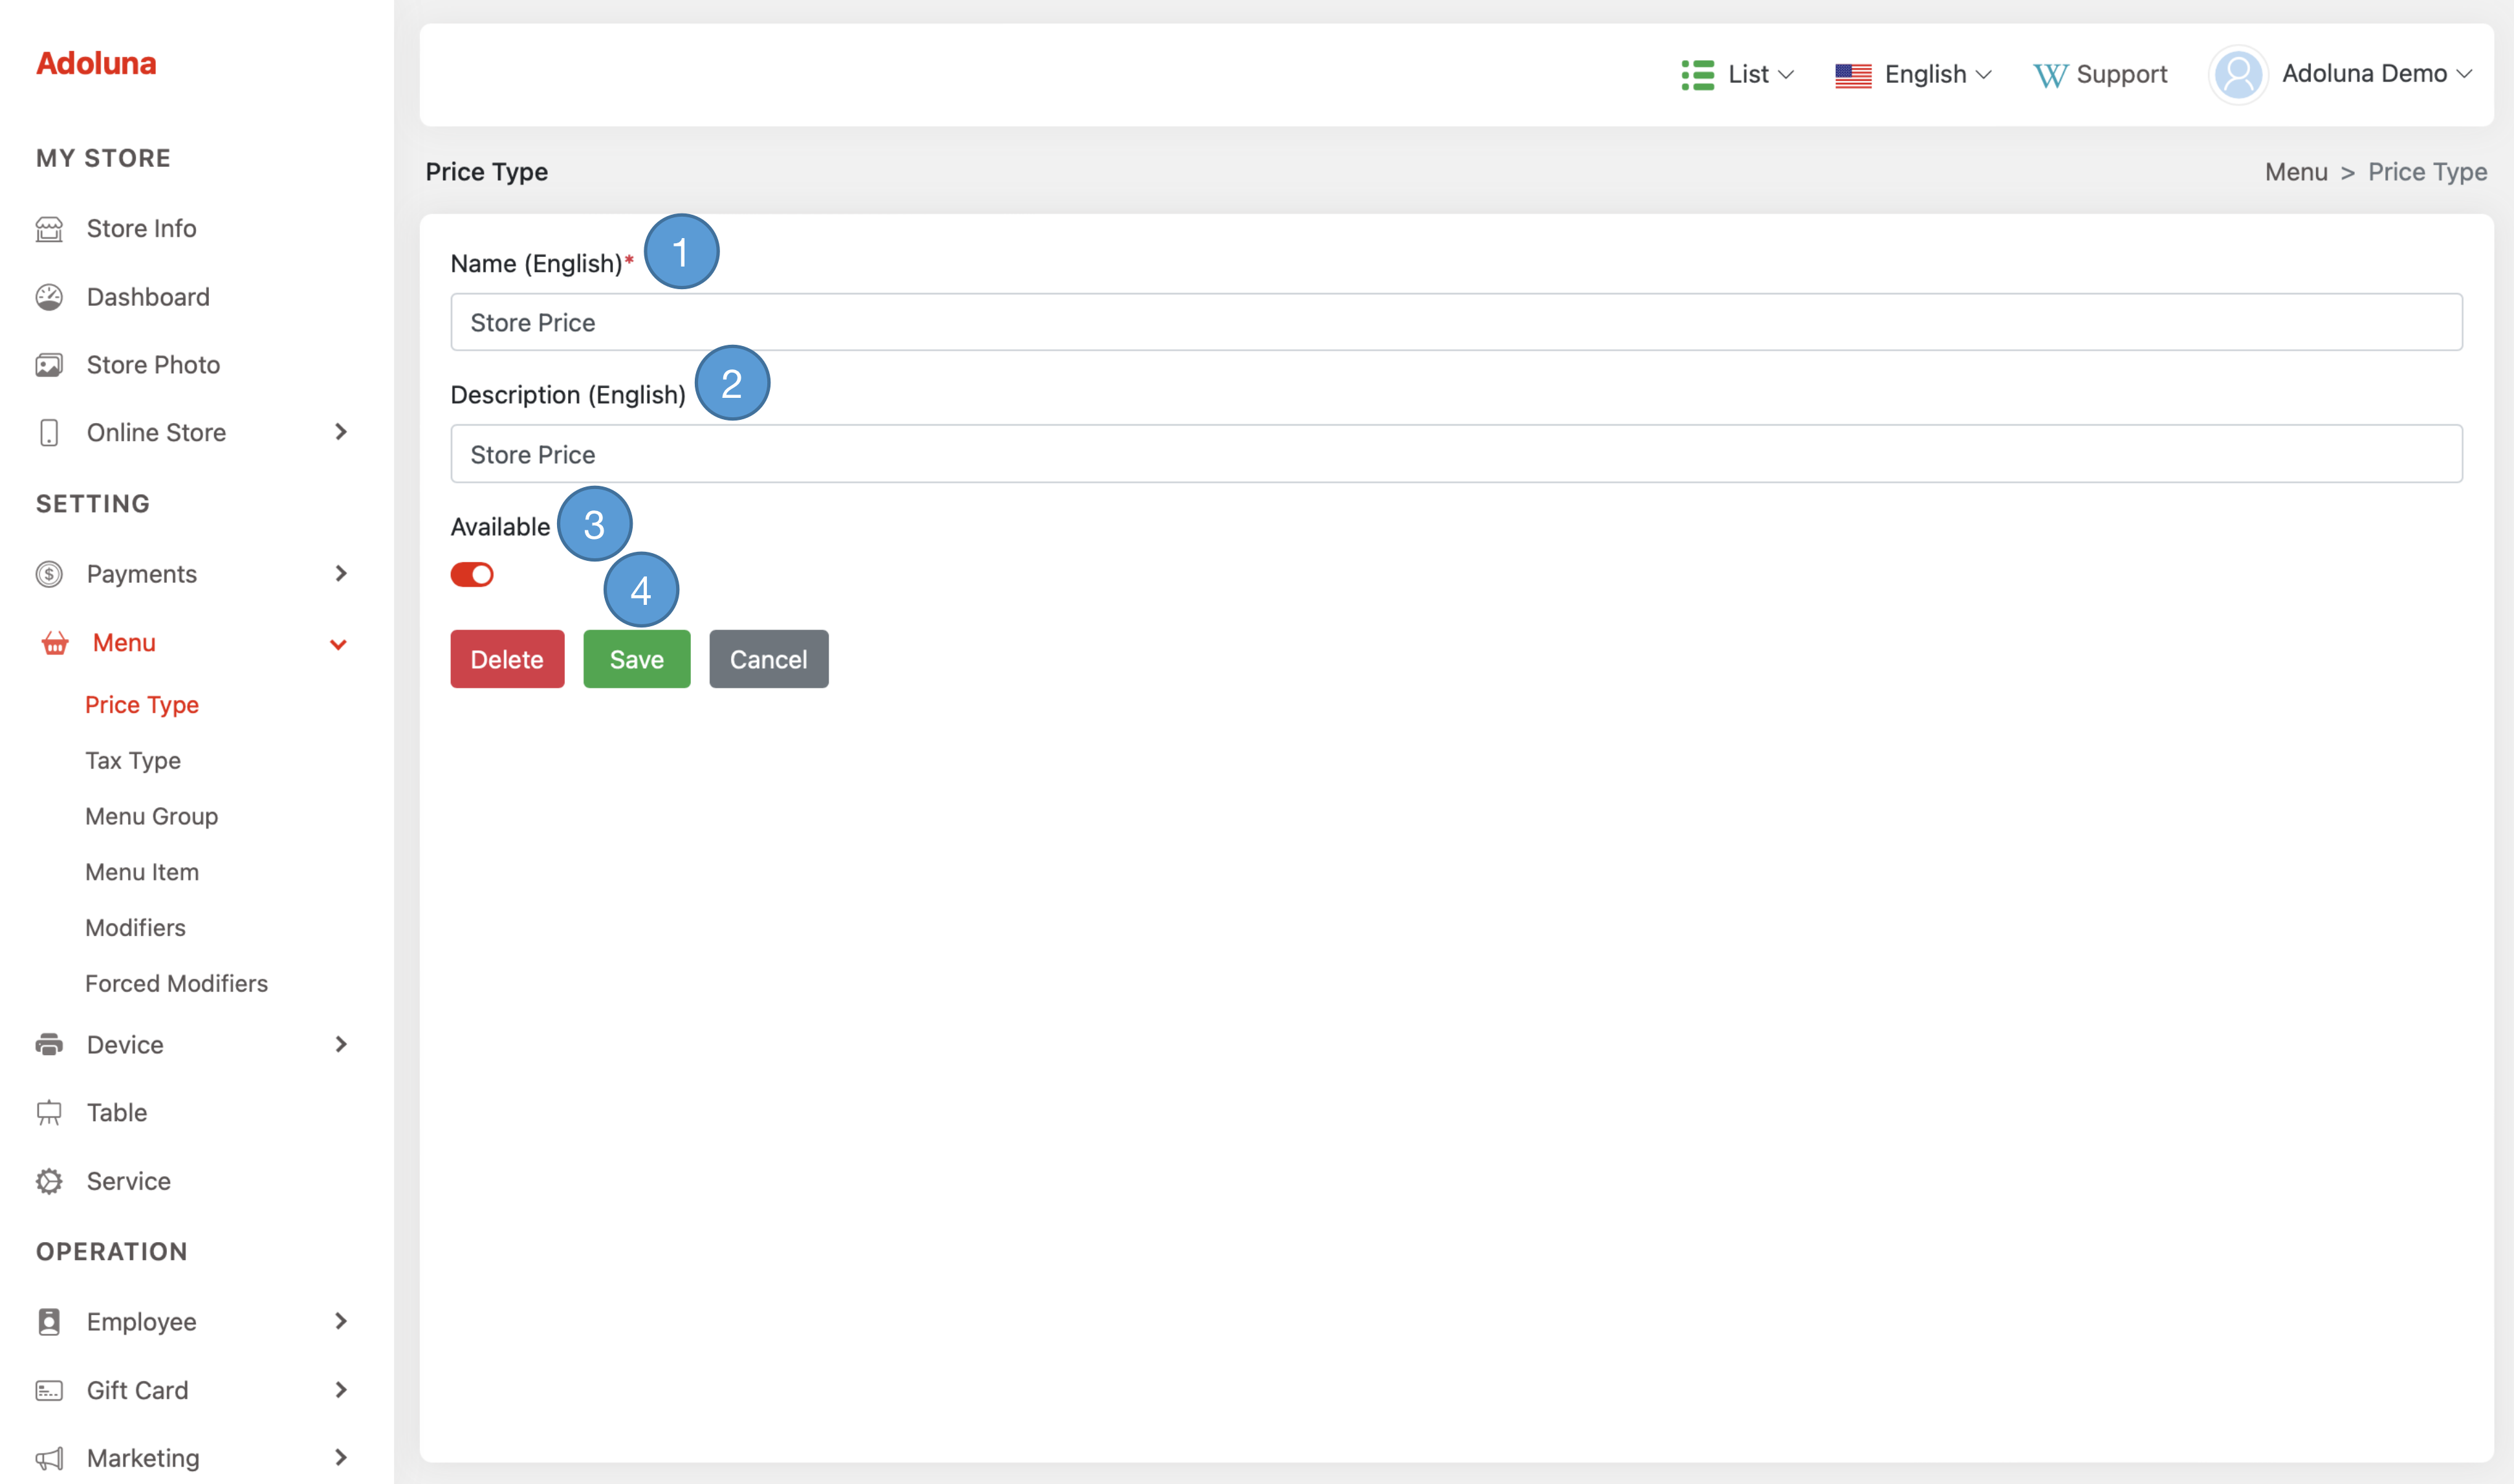
- Name: Assign a name to this price type.
- Description: Provide a detailed description for this price type.
- Available: Enables or disables this price type.
- Click Save to apply the change.
Tax Type #
The tax type provides the available tax options for menu items.
Navigate to the Tax Type under Menu from the menu bar to create and manage the tax for your store.
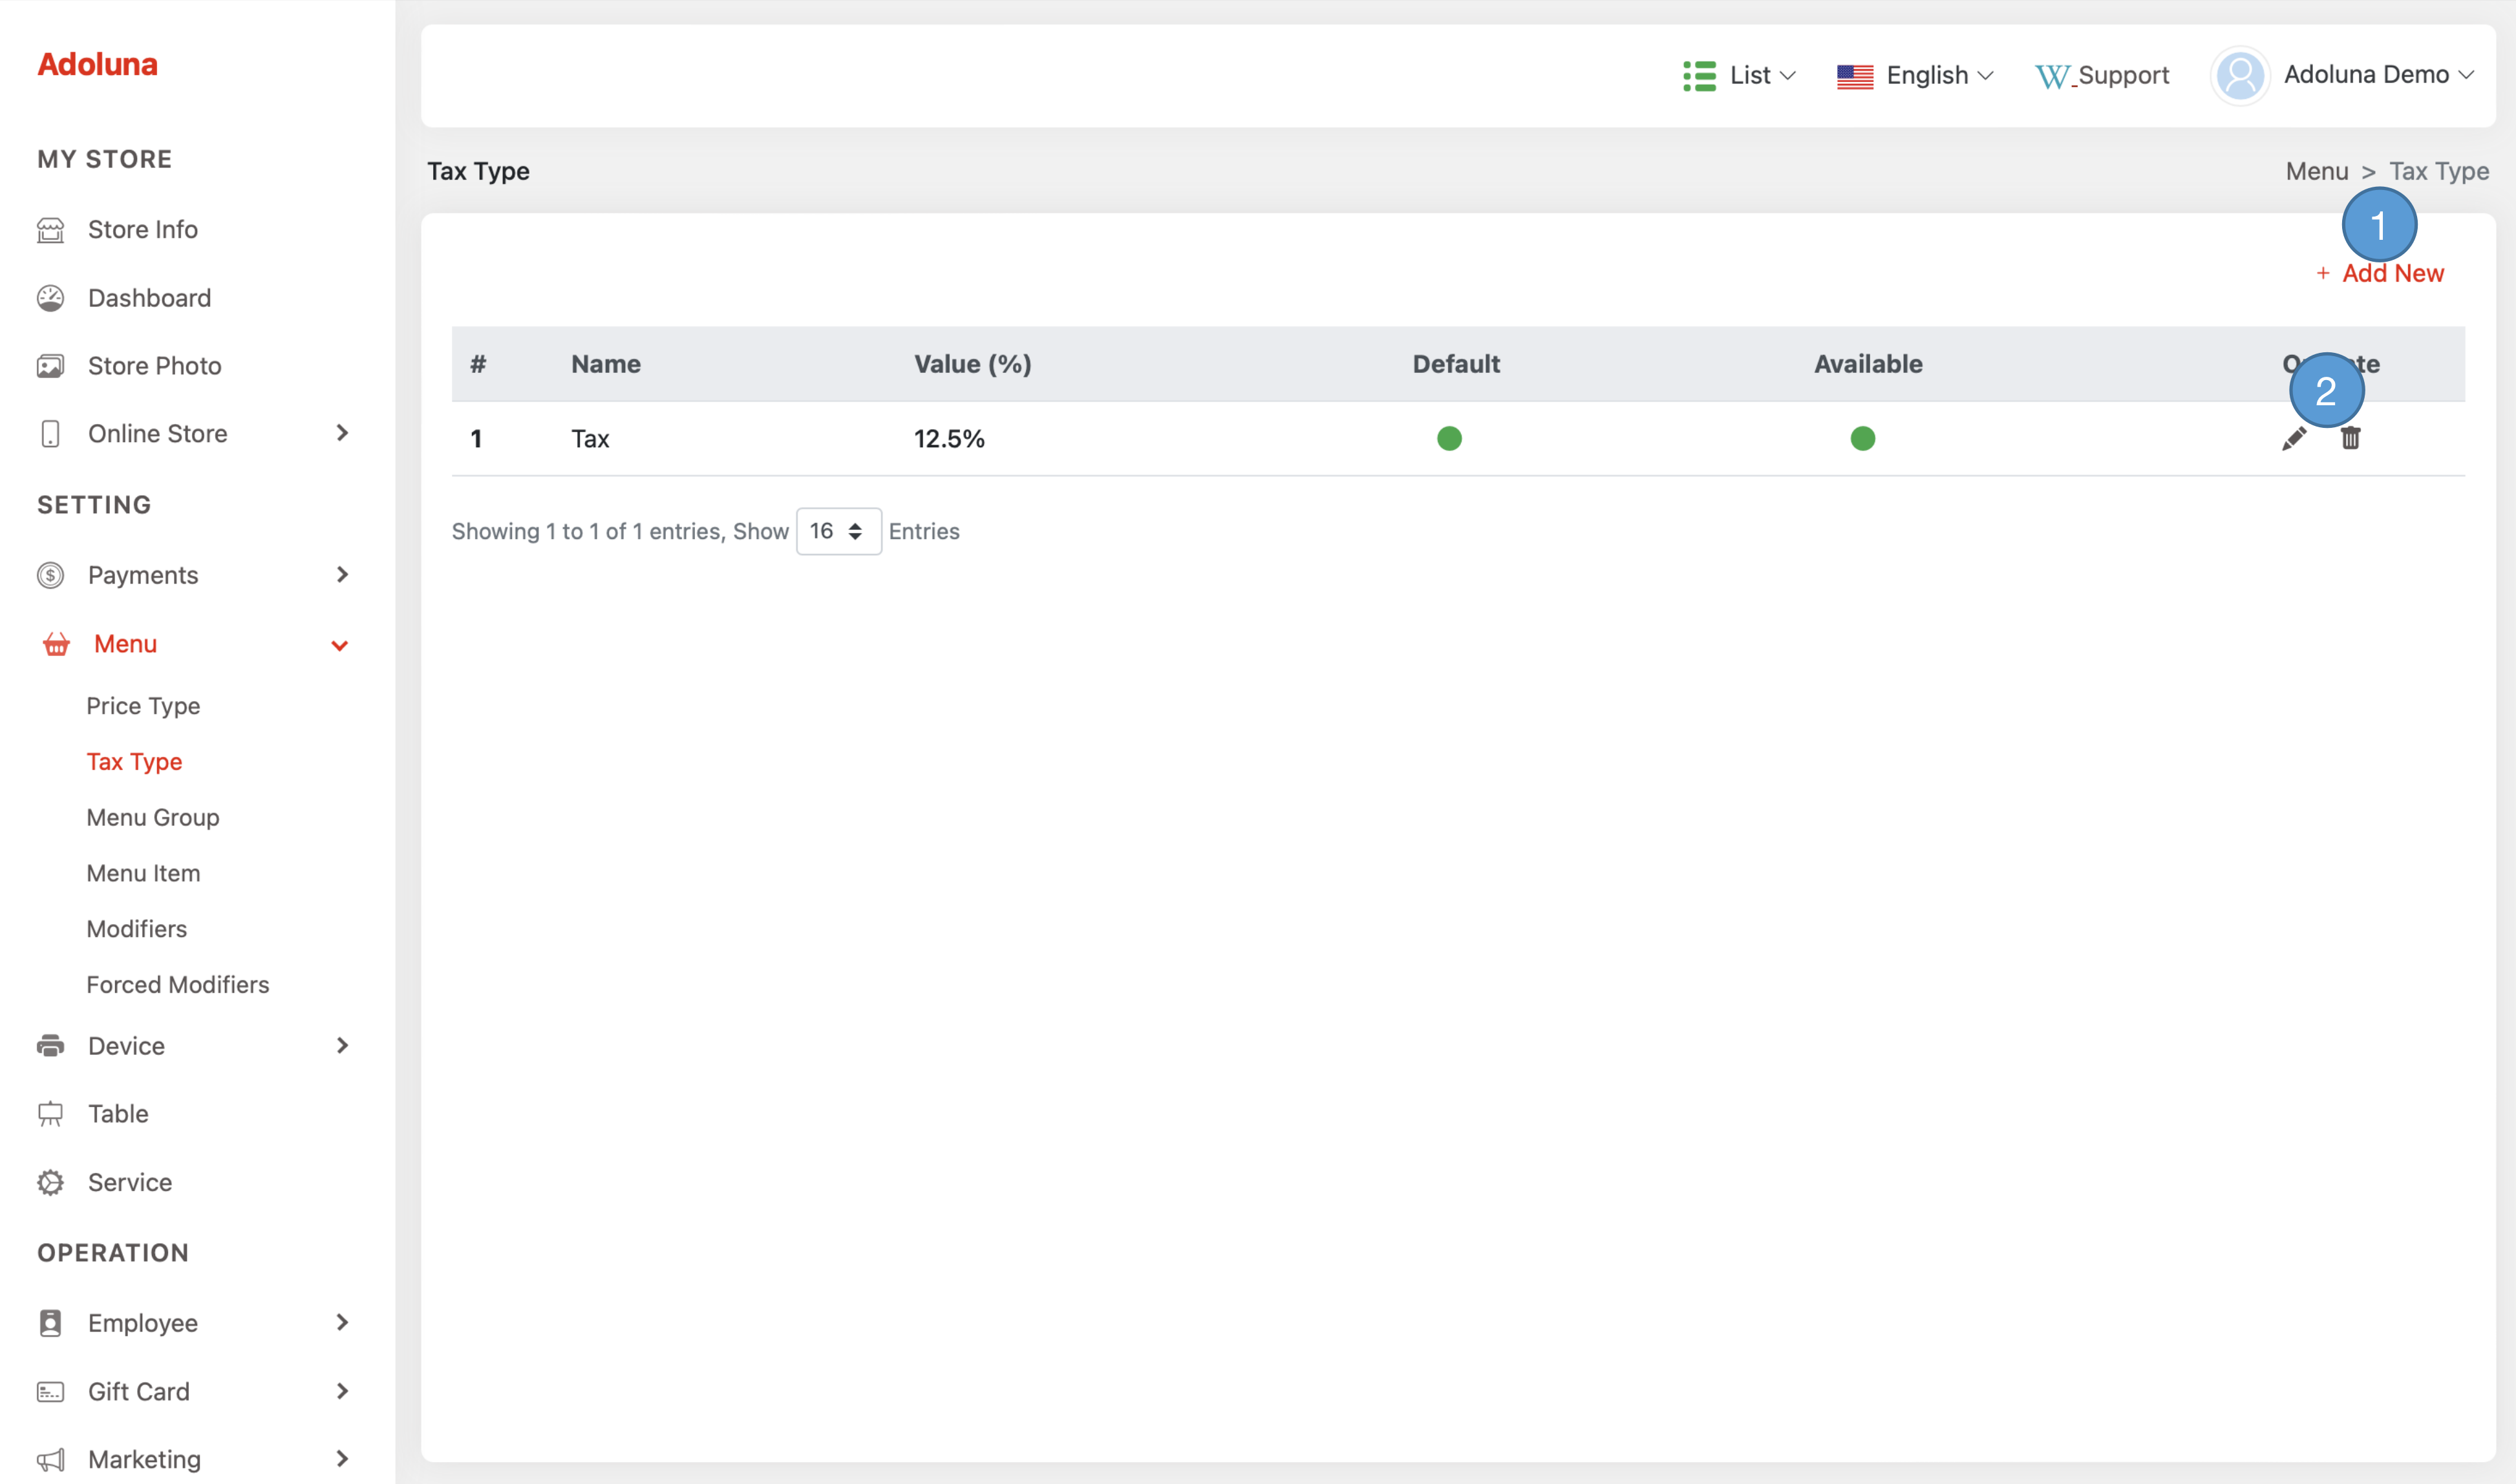
- Click +Add New to create a new tax.
- Click the
 icon to edit the tax, and
  to delete the tax.

- Name: Assign a name to this price type.
- Value: Specify the tax value in percentage.
- Default: This option enables this tax will apply to a custom menu item during ordering.
- Available: This Enables or disables this tax type.
- Click Save to apply the change.
Menu Group #
Menu group are utilized for reporting purposes exclusively and do not impact the visual presentation of the menu in the Order Entry screen. Each menu item should be assigned to a specific menu group, visible when generating sales reports to analyze the sales distribution across categories. For instance, consolidating all Beer and Wine items into a group labeled “Beverages” allows the Sales By Group Report to provide a comprehensive summary of beverage category sales.
Navigate to the Menu Group under Menu from the menu bar to create and manage the menu group for your store.
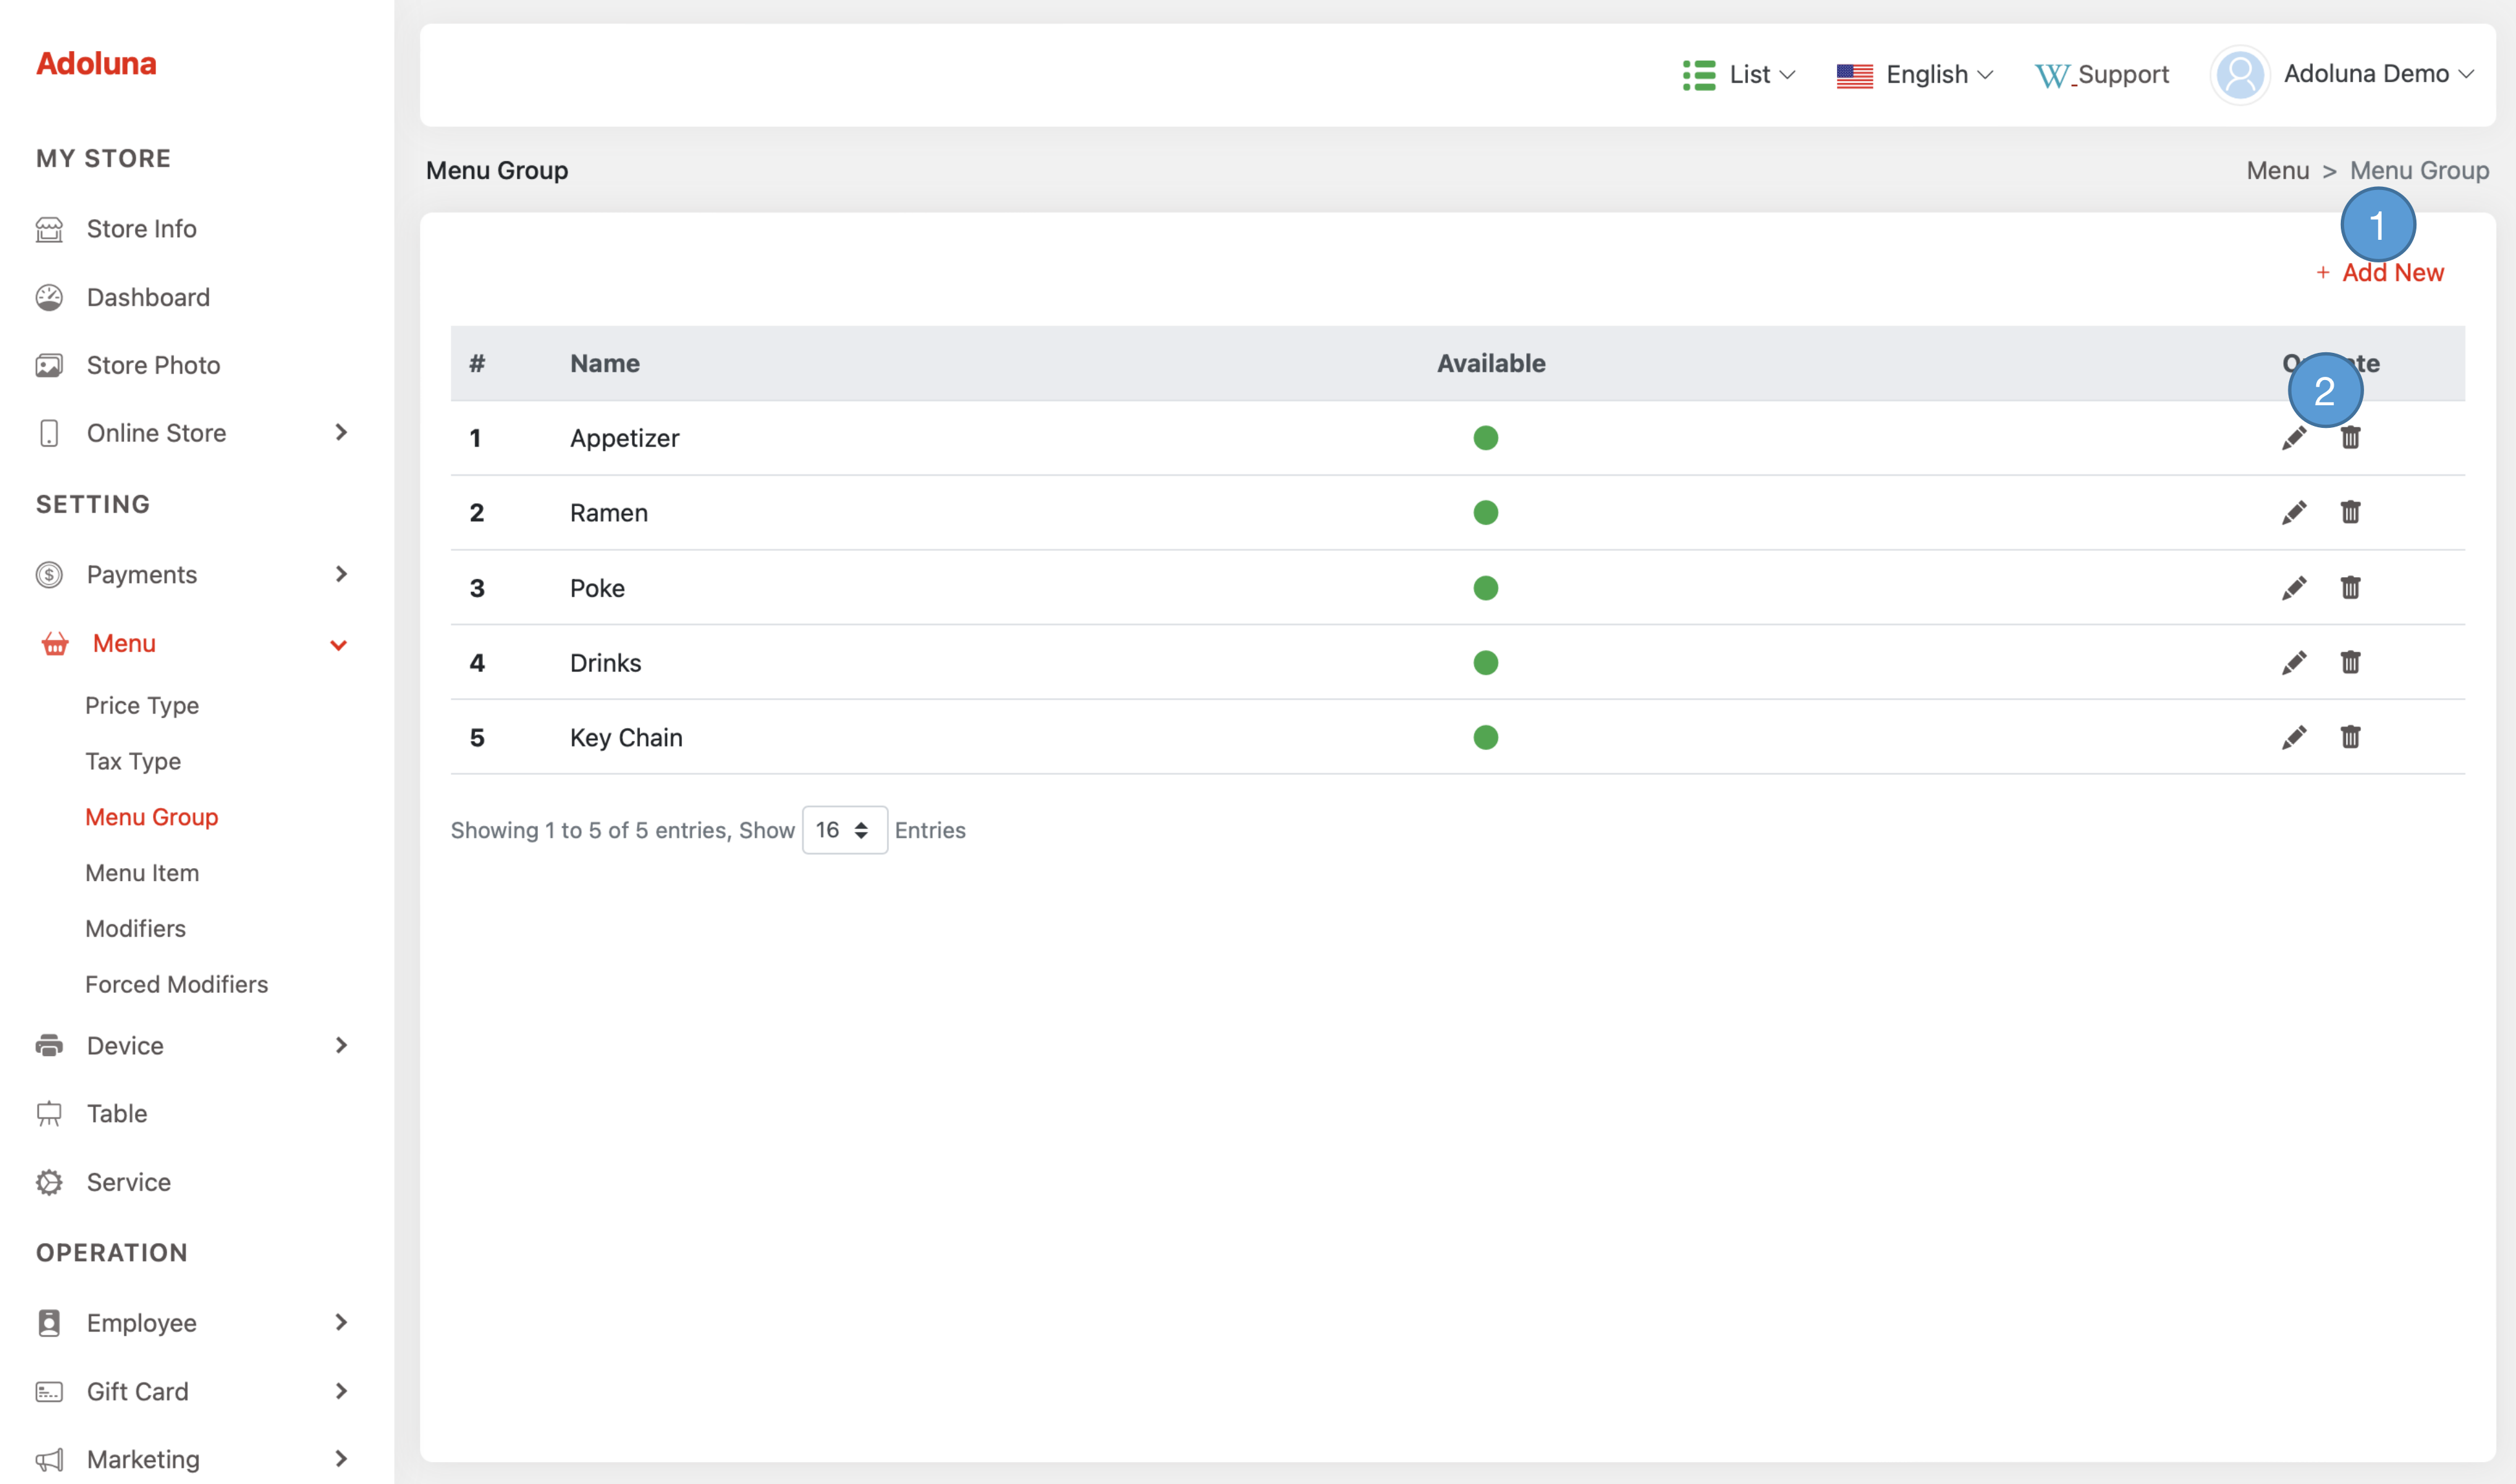
- Click +Add New to create a new menu group.
- Click the
 icon to edit the menu group, and
  to delete the menu group.
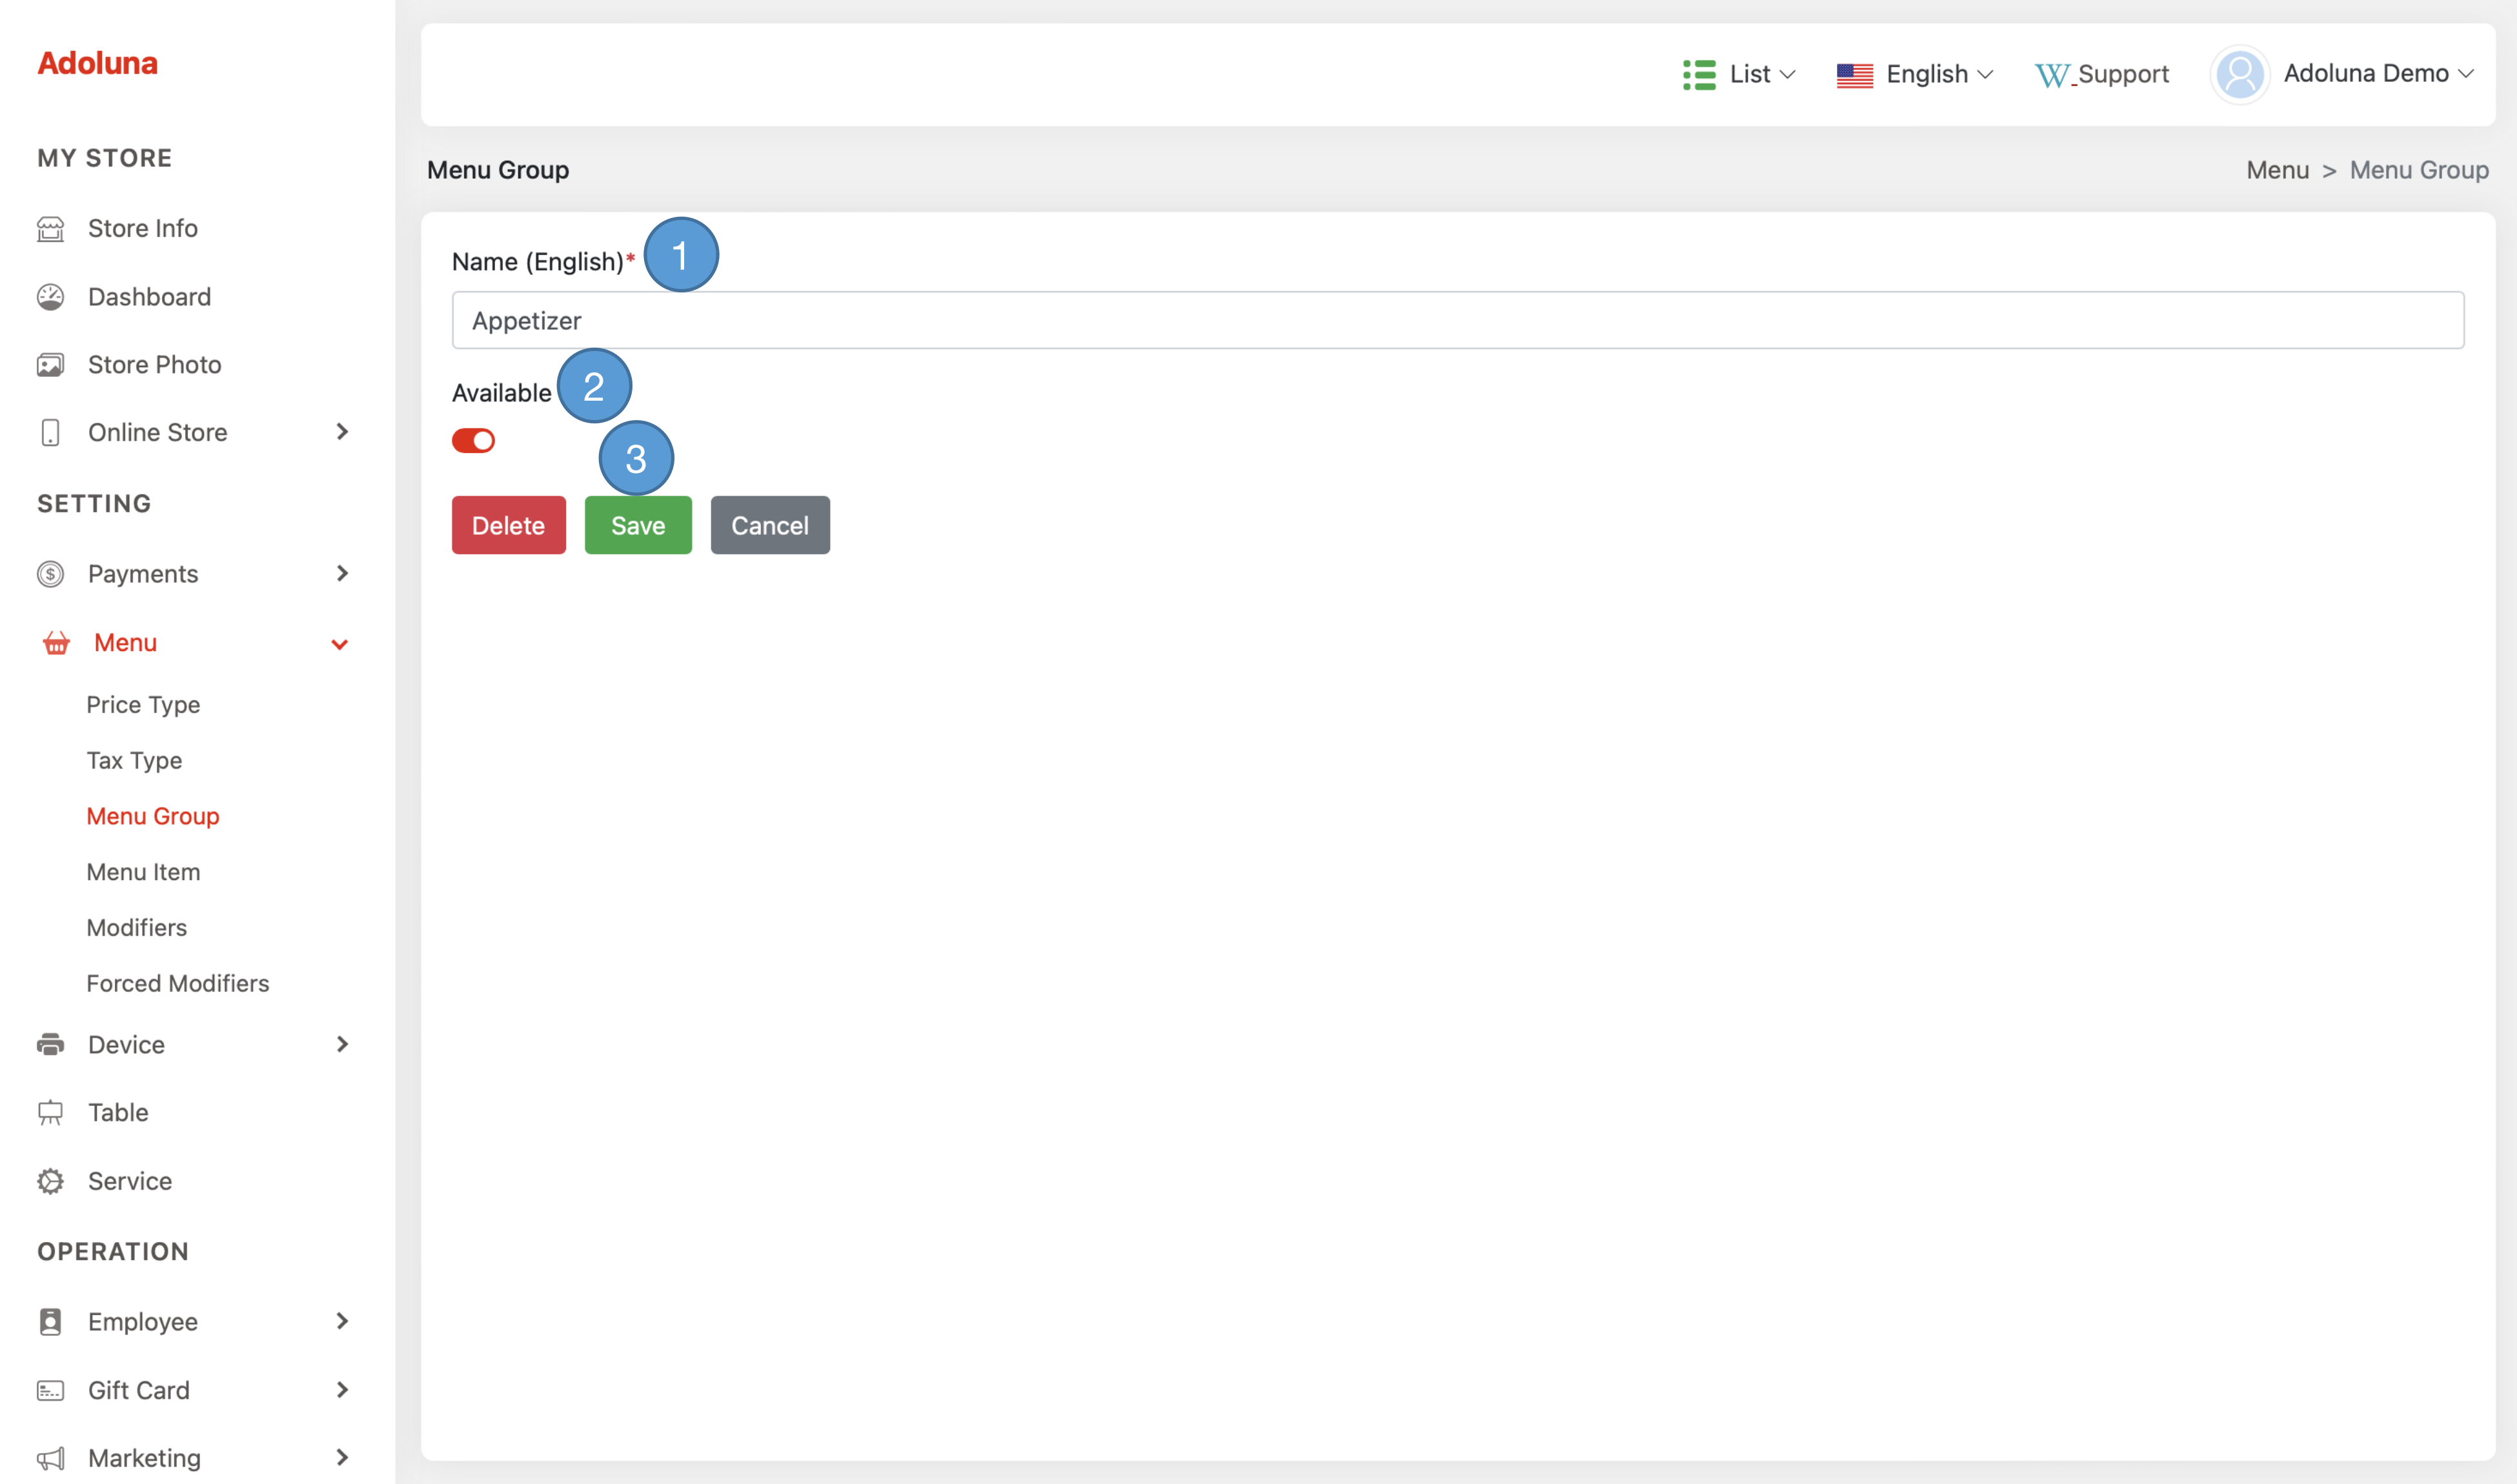
- Name: Assign a name to this menu group.
- Available: Enables or disables this menu group.
- Click Save to apply the change.
Menu #
Navigate to the Menu Item under Menu from the menu bar to create and manage the menu for your store. On the left side, you will find the menu categories. Click on a menu category to display the corresponding menu items on the right side of the page.
Manage Menu Categories #
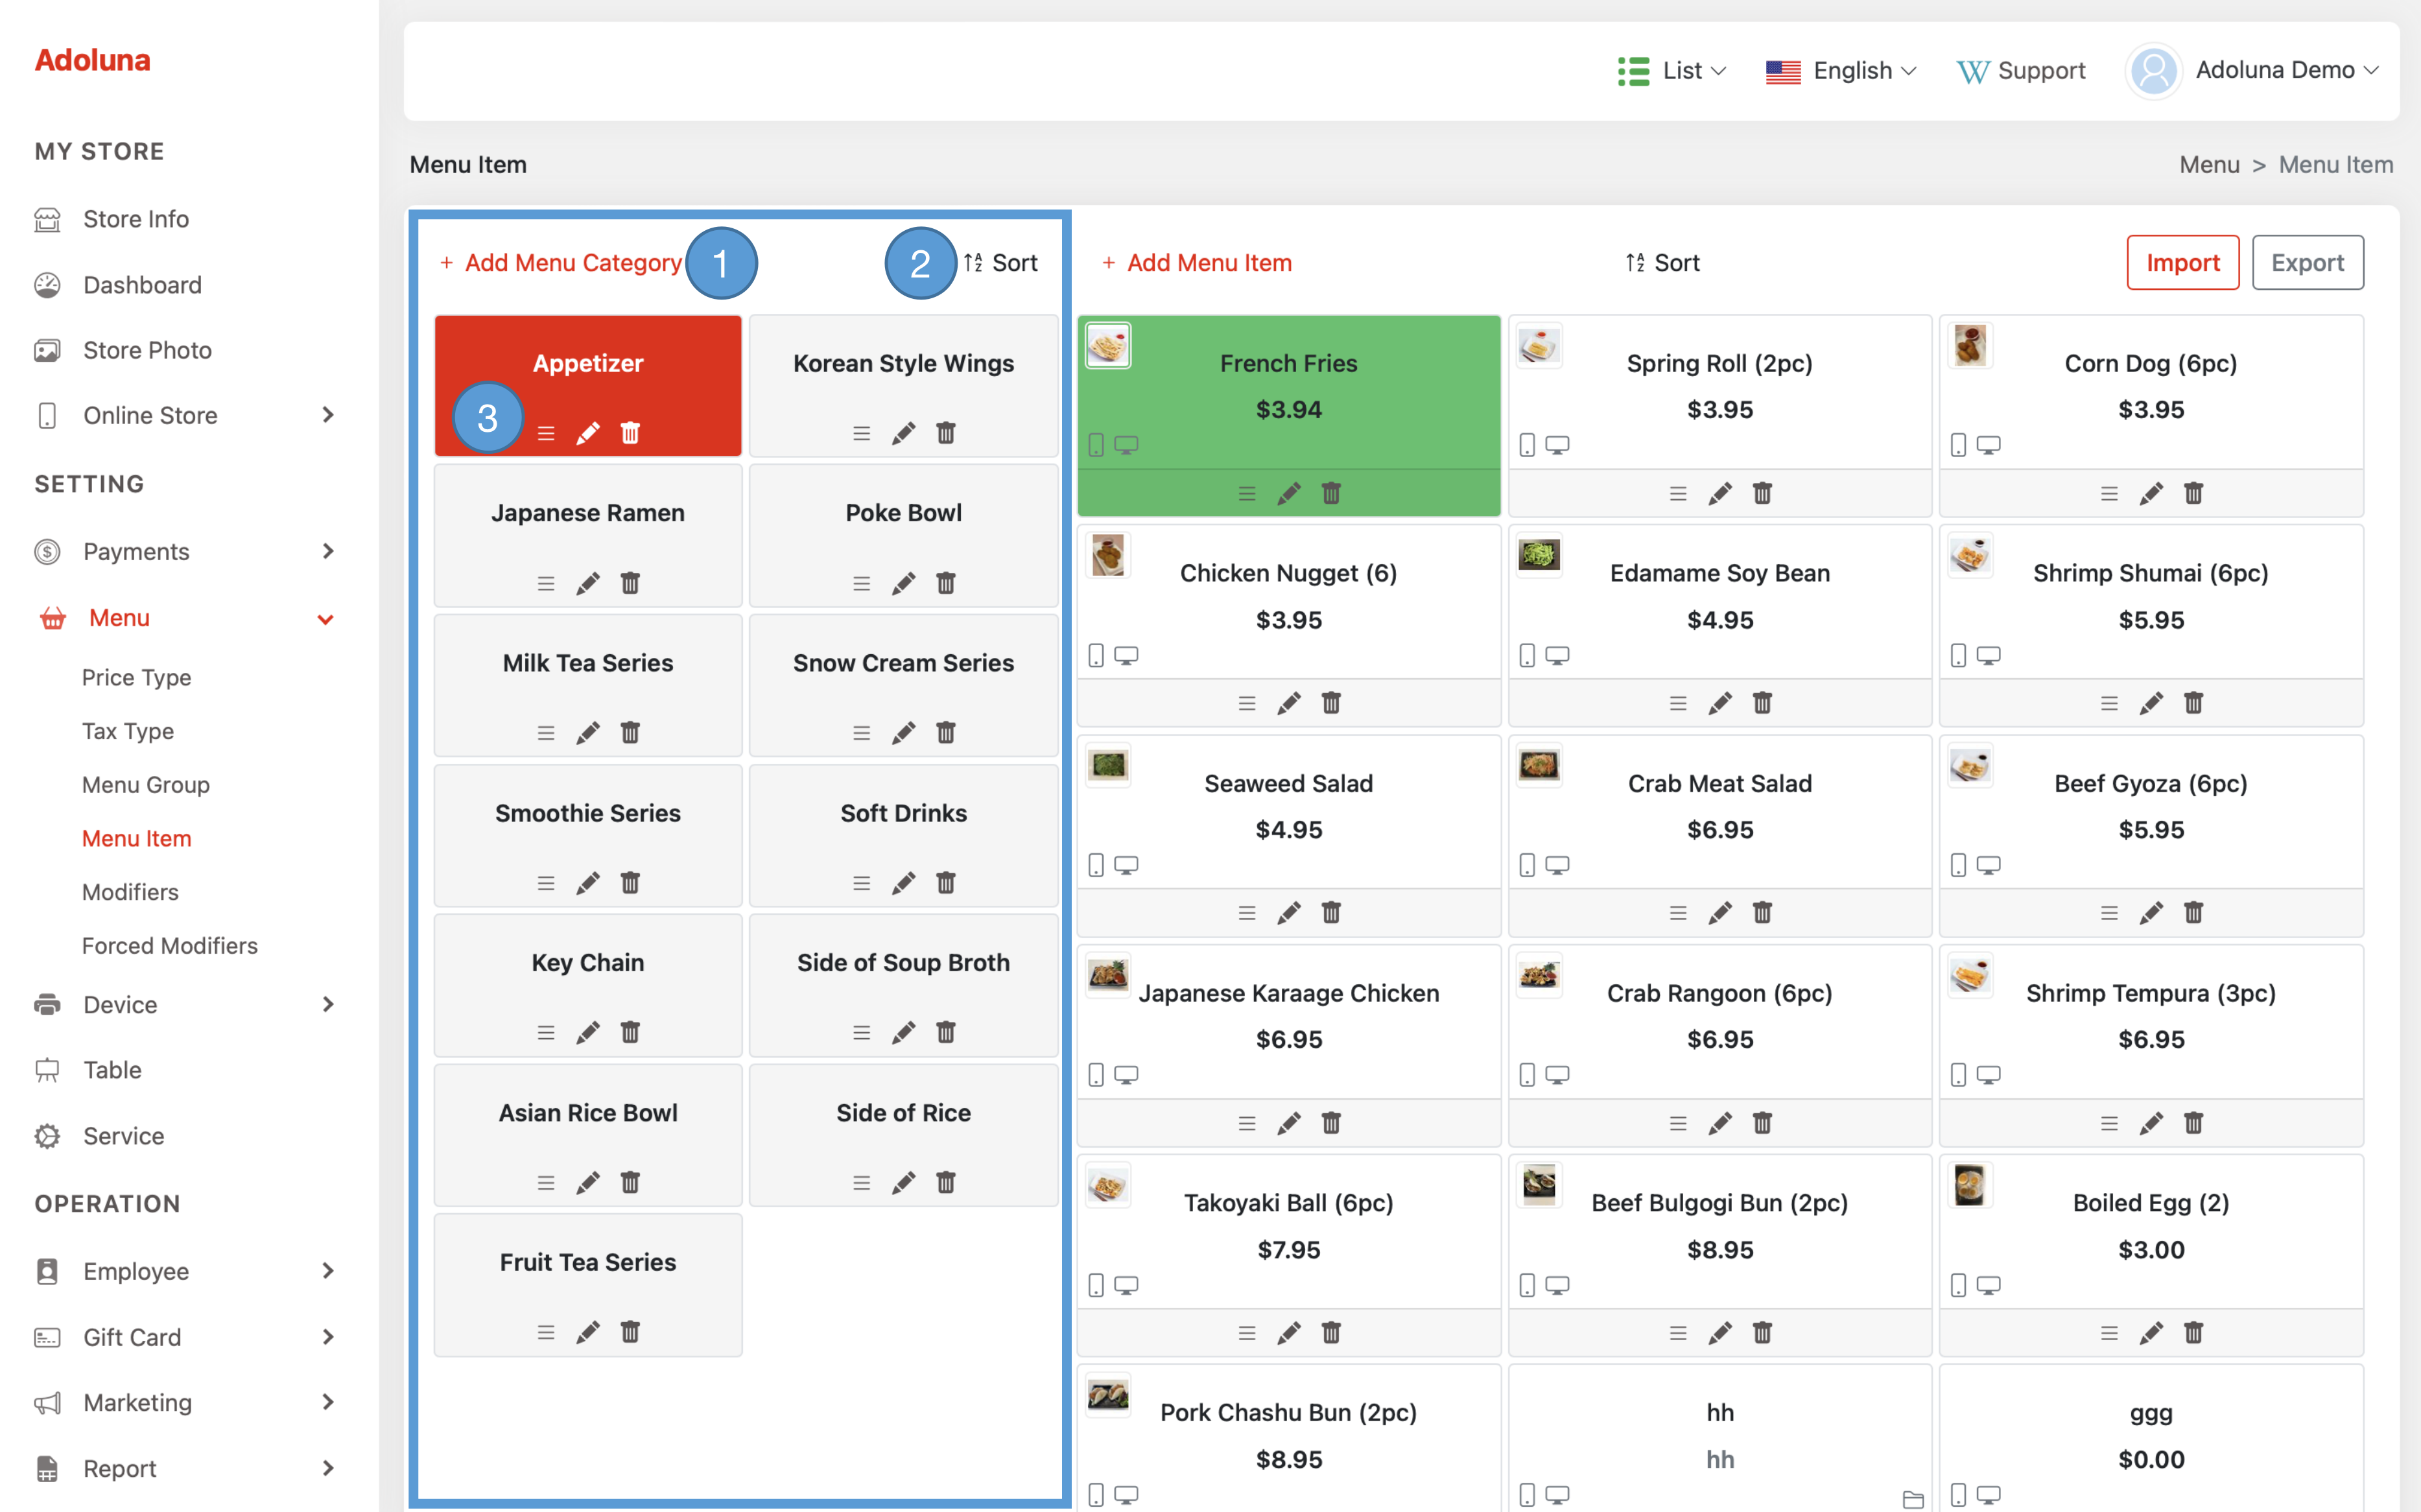
- Click +Add Menu Category to create a new menu category.
- Click Sort option to arrange the menu category in alphabetical order.
- Hold and drag the
 icon to arrange the menu category position, click the
  icon to edit and
  to delete.
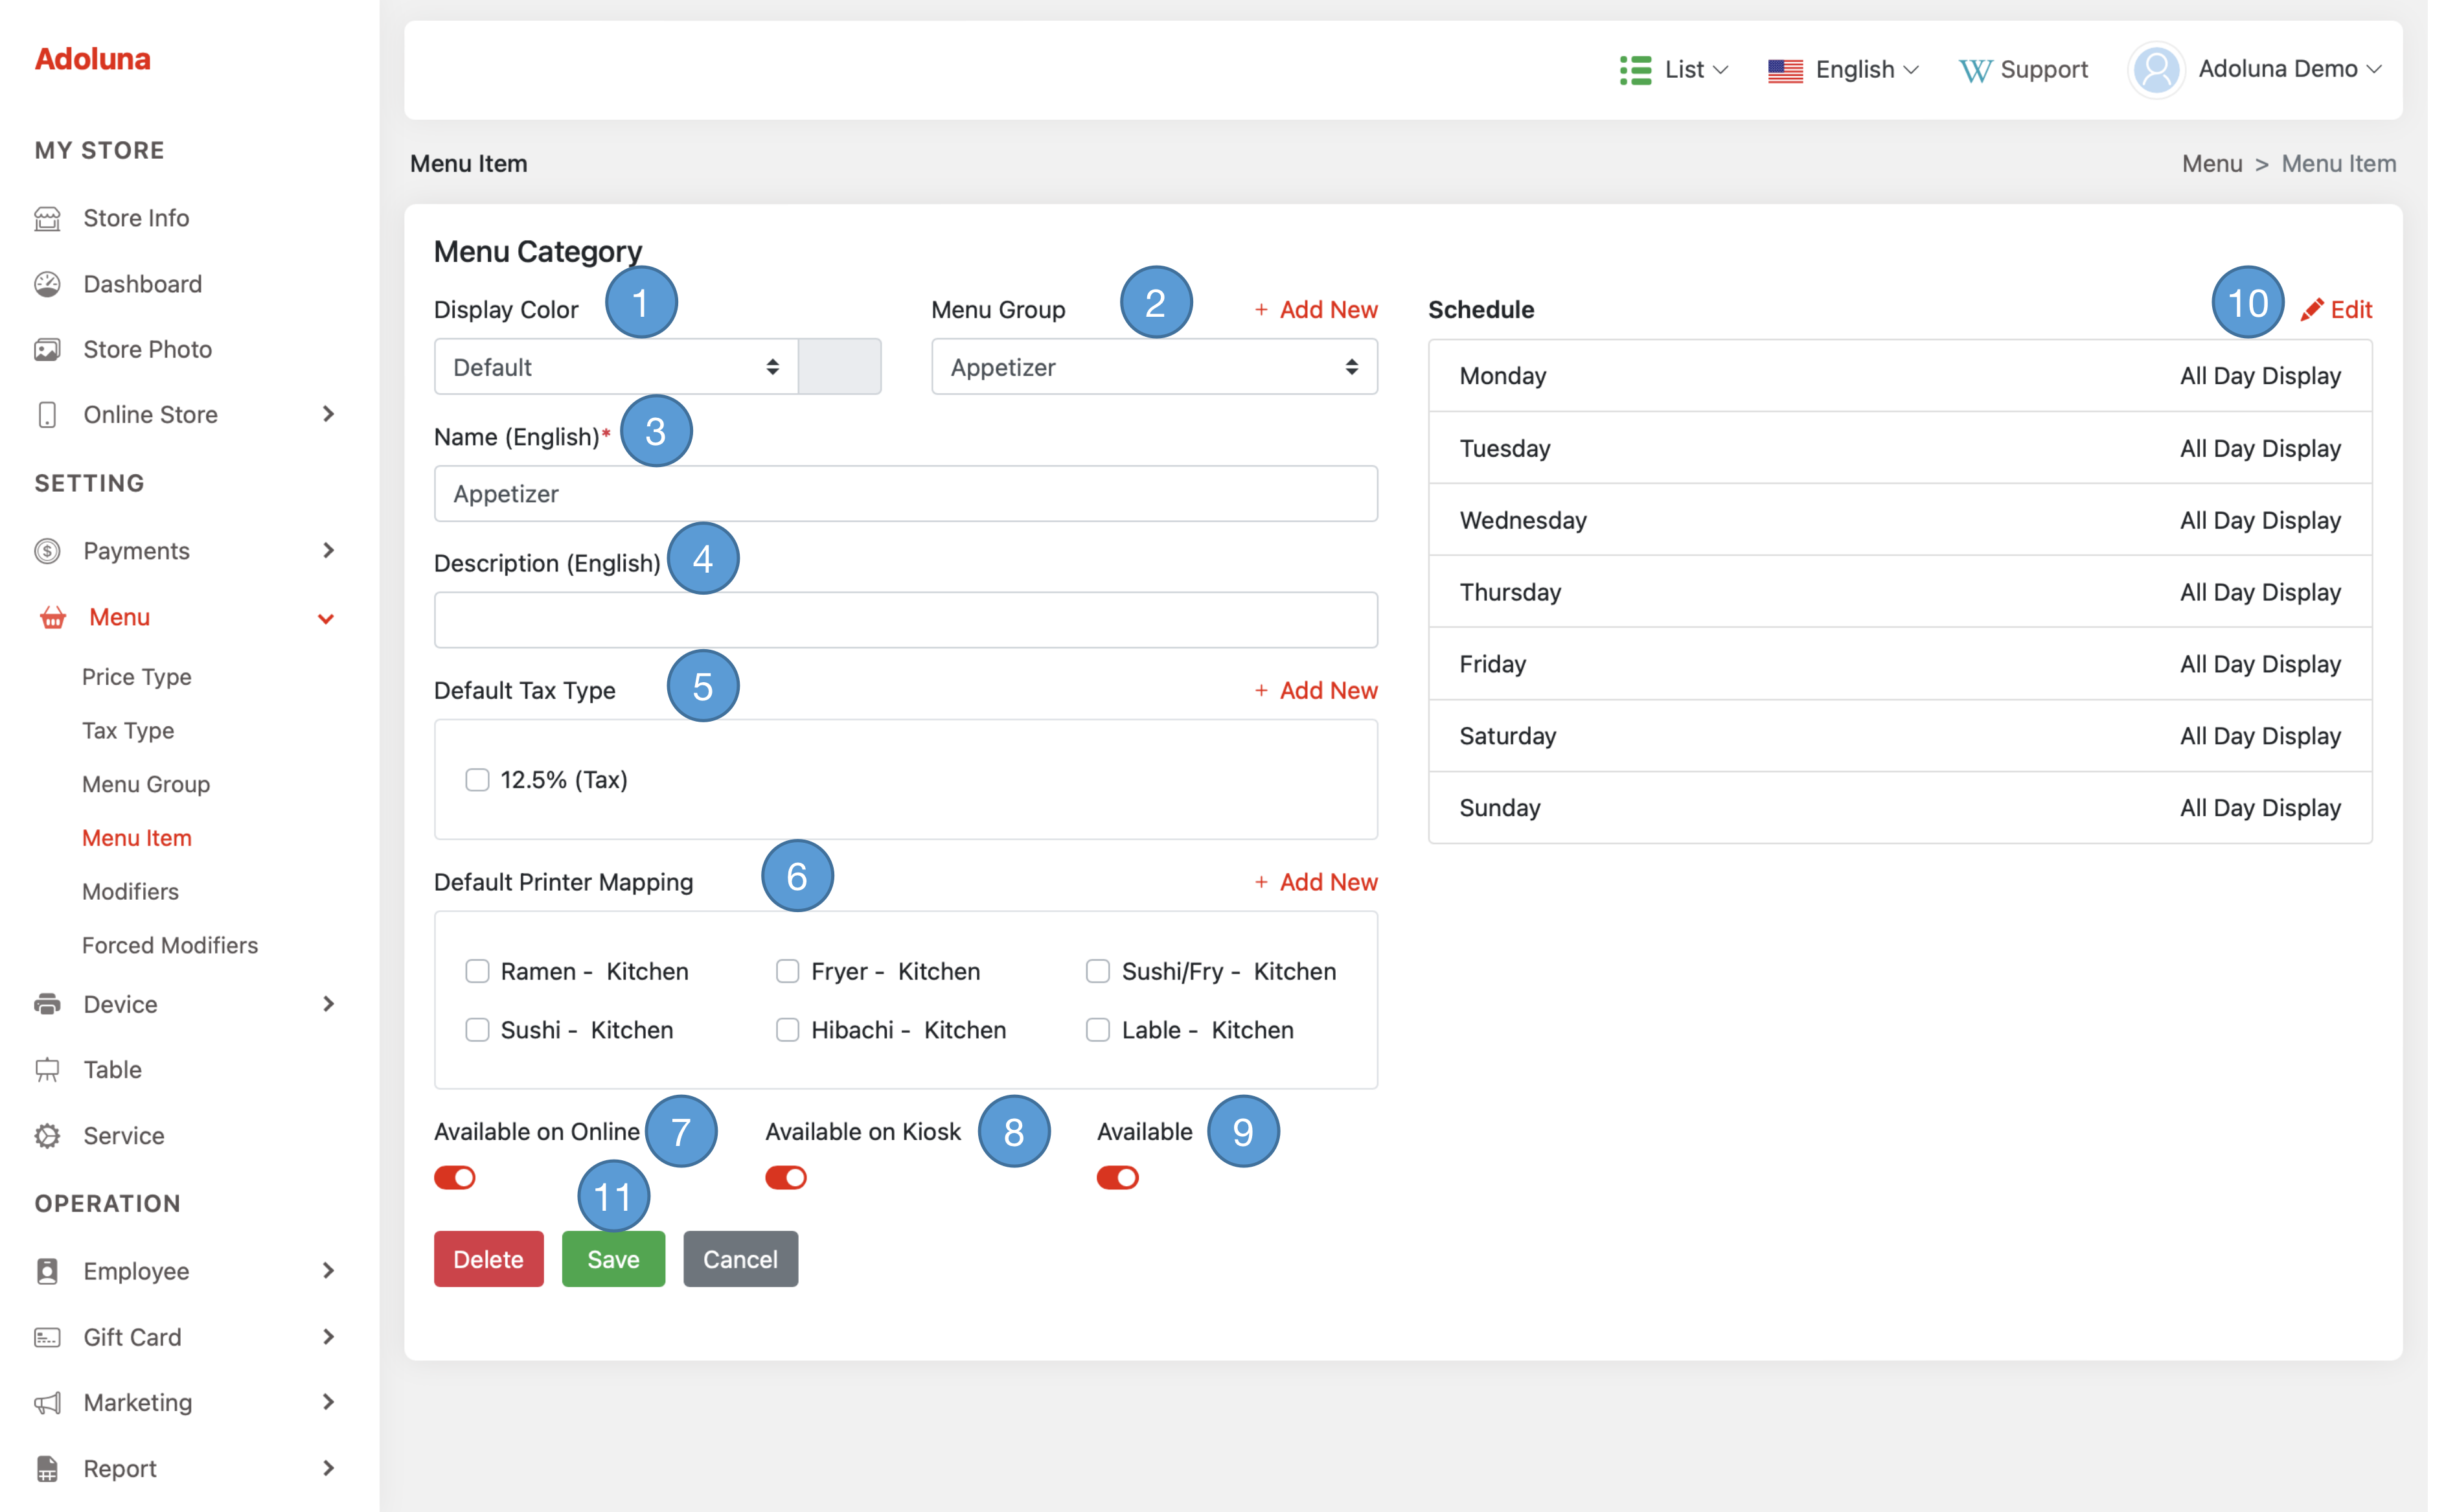
- Display Color: Choose a color for this menu category. Please note that the color selection is applicable only on the POS platform
- Menu Group: Choose Menu Group for this menu category. Menu Group is utilized for reporting purposes only.
- Name: Assign a name to this menu category.
- Description: Provide a detailed description for this menu category. This information will be displayed on kiosks and online ordering platforms.
- Default Tax Type: Choose the tax types that will apply to items created under this menu category. This ensures that the appropriate taxes are automatically associated with the items within this category.
- Default Printer Mapping: Choose the printer mapping configuration that will be applied to items created under this menu category. This ensures that the printing job is appropriately assigned based on the chosen configuration.
- Available on Online: Enables or disables this menu category to be displayed on the online platform.
- Available on Kiosk: Enables or disables this menu category to be displayed on the kiosk platform.
- Available: Enables or disables this menu category to be displayed on all platforms.
- Schedule: Set the availability schedule for this menu category. Click the
 Edit icon to modify the schedule.
 - Click Save to apply the change.
Manage Menu Item #
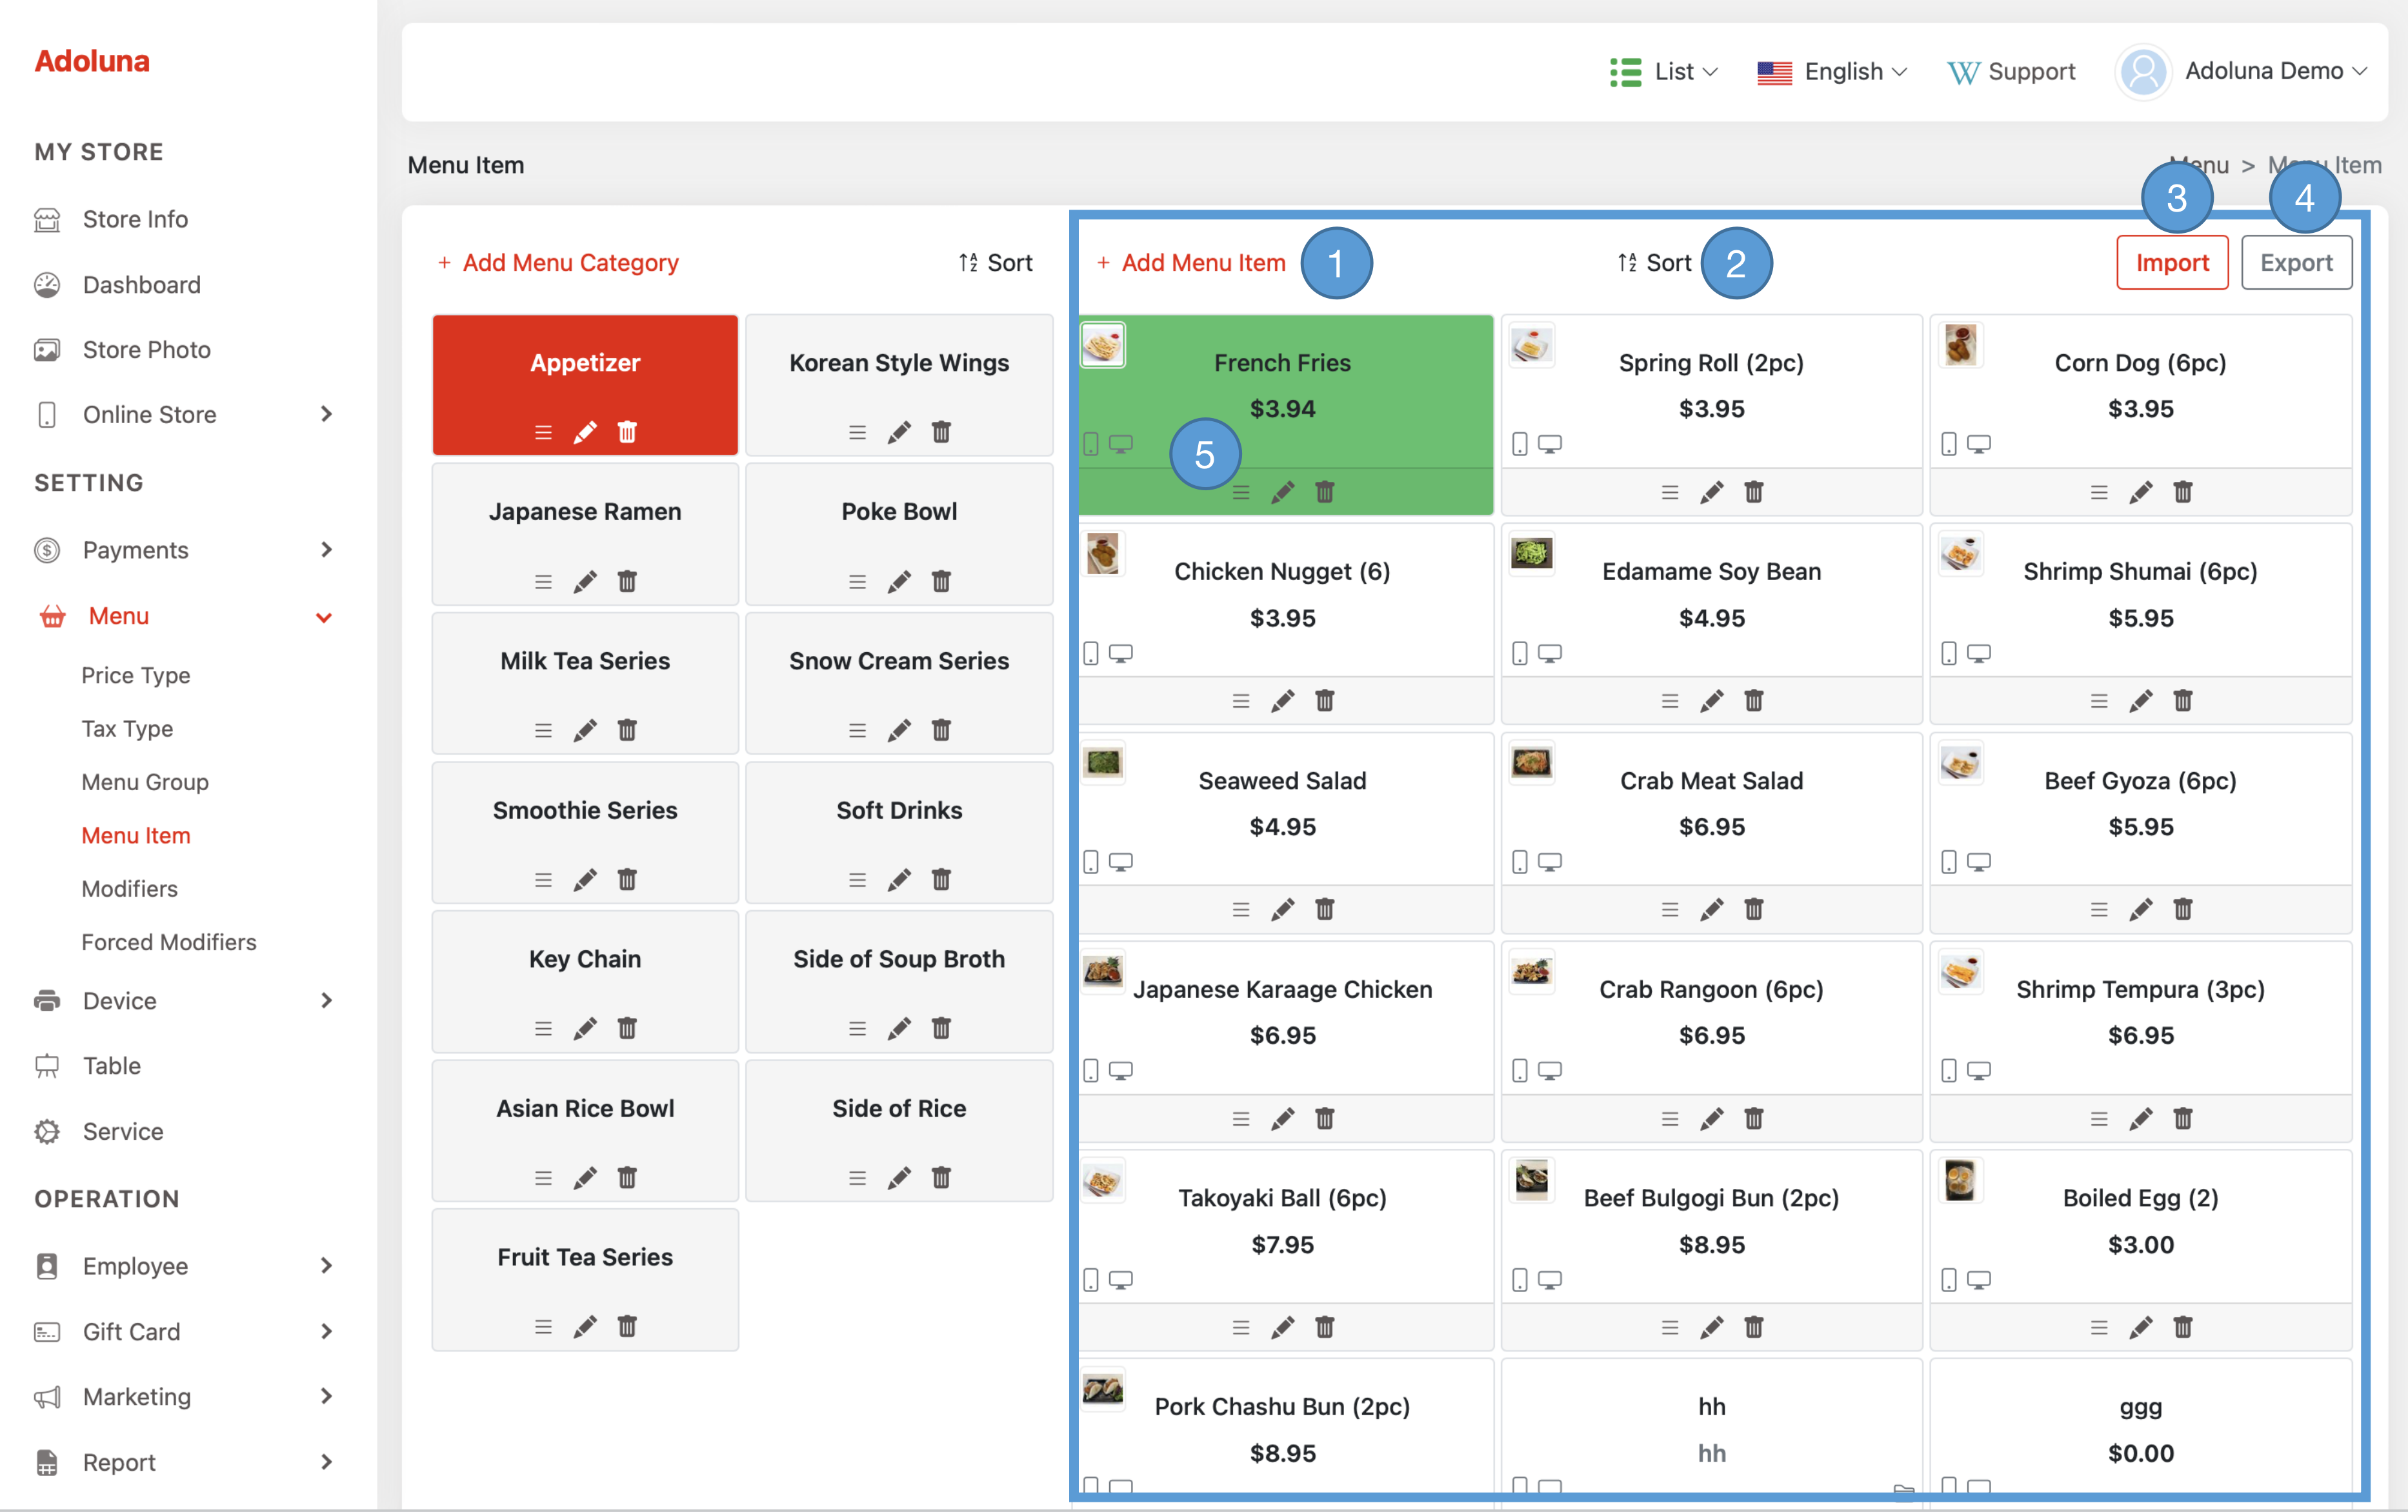
- Click +Add Menu Item to create a new menu item.
- Click Sort option to arrange the menu item in alphabetical order.
- Click Import to import the menu from an Excel file.
- Click Export to export the menu to an Excel file.
- Hold and drag the
 icon to arrange the menu item position, click the
  icon to edit and
  icon to delete.
- Photo: Select an image to represent this menu item. The chosen picture will be showcased on kiosks and online platforms.
- Menu Item Type: Choose a menu item type for this menu item, menu item type cannot be remodified.
- Normal Item: A regular menu item.
- Parent Item: A parent item is a sub-menu category that can contain sub-menu items.
- Sub Item: A sub-item is a menu item within a parent item.
- Display Color: Choose a color for this menu item. Please note that the color selection is applicable only on the POS platform
- Menu Group: Choose Menu Group for this menu item. Menu Group is utilized for reporting purposes only.
- Menu Category: Choose Menu Category for this menu item.
- Name: Assign a name to this menu item.
- Description: Provide a detailed description for this menu item. This information will be displayed on kiosks and online ordering platforms.
- Price: Enter the price for this menu item.
- Tax: Choose the tax for this menu item.
- Printer Mapping: Choose the printer mapping configuration for this menu item. This ensures that the printing job is appropriately assigned based on the chosen configuration.
- Options:
- Available on Online: Enables or disables this menu item to be displayed on the online platform.
- Available on Kiosk: Enables or disables this menu item to be displayed on the kiosk platform.
- Available: Enables or disables this menu item on all platforms. If disabled, it will show as ‘out of stock’ to the user.
- Schedule: Set the availability schedule for this menu item. Click the
 Edit icon to modify the schedule.
 - Forced Modifiers: When ordering a menu item with forced modifiers attached, the system will prompt for all attached modifier options, allowing customers to customize their order according to their preferences.
- Click +Add New to create a new forced modifier template.
- Hold and drag the
 icon to arrange the forced modifier and click the
  icon to remove it.
 - Click +Attach Forced Modifier to create a forced modifier template.
- Click Save to apply the change.
Modifiers #
Navigate to the Modifiers under Menu from the menu bar to create and manage the menu modifiers for your store. On the left side, you will find the modifier categories. Click on a modifier category to display the corresponding modifier items on the right side of the page.
Manage Modifier Categories #
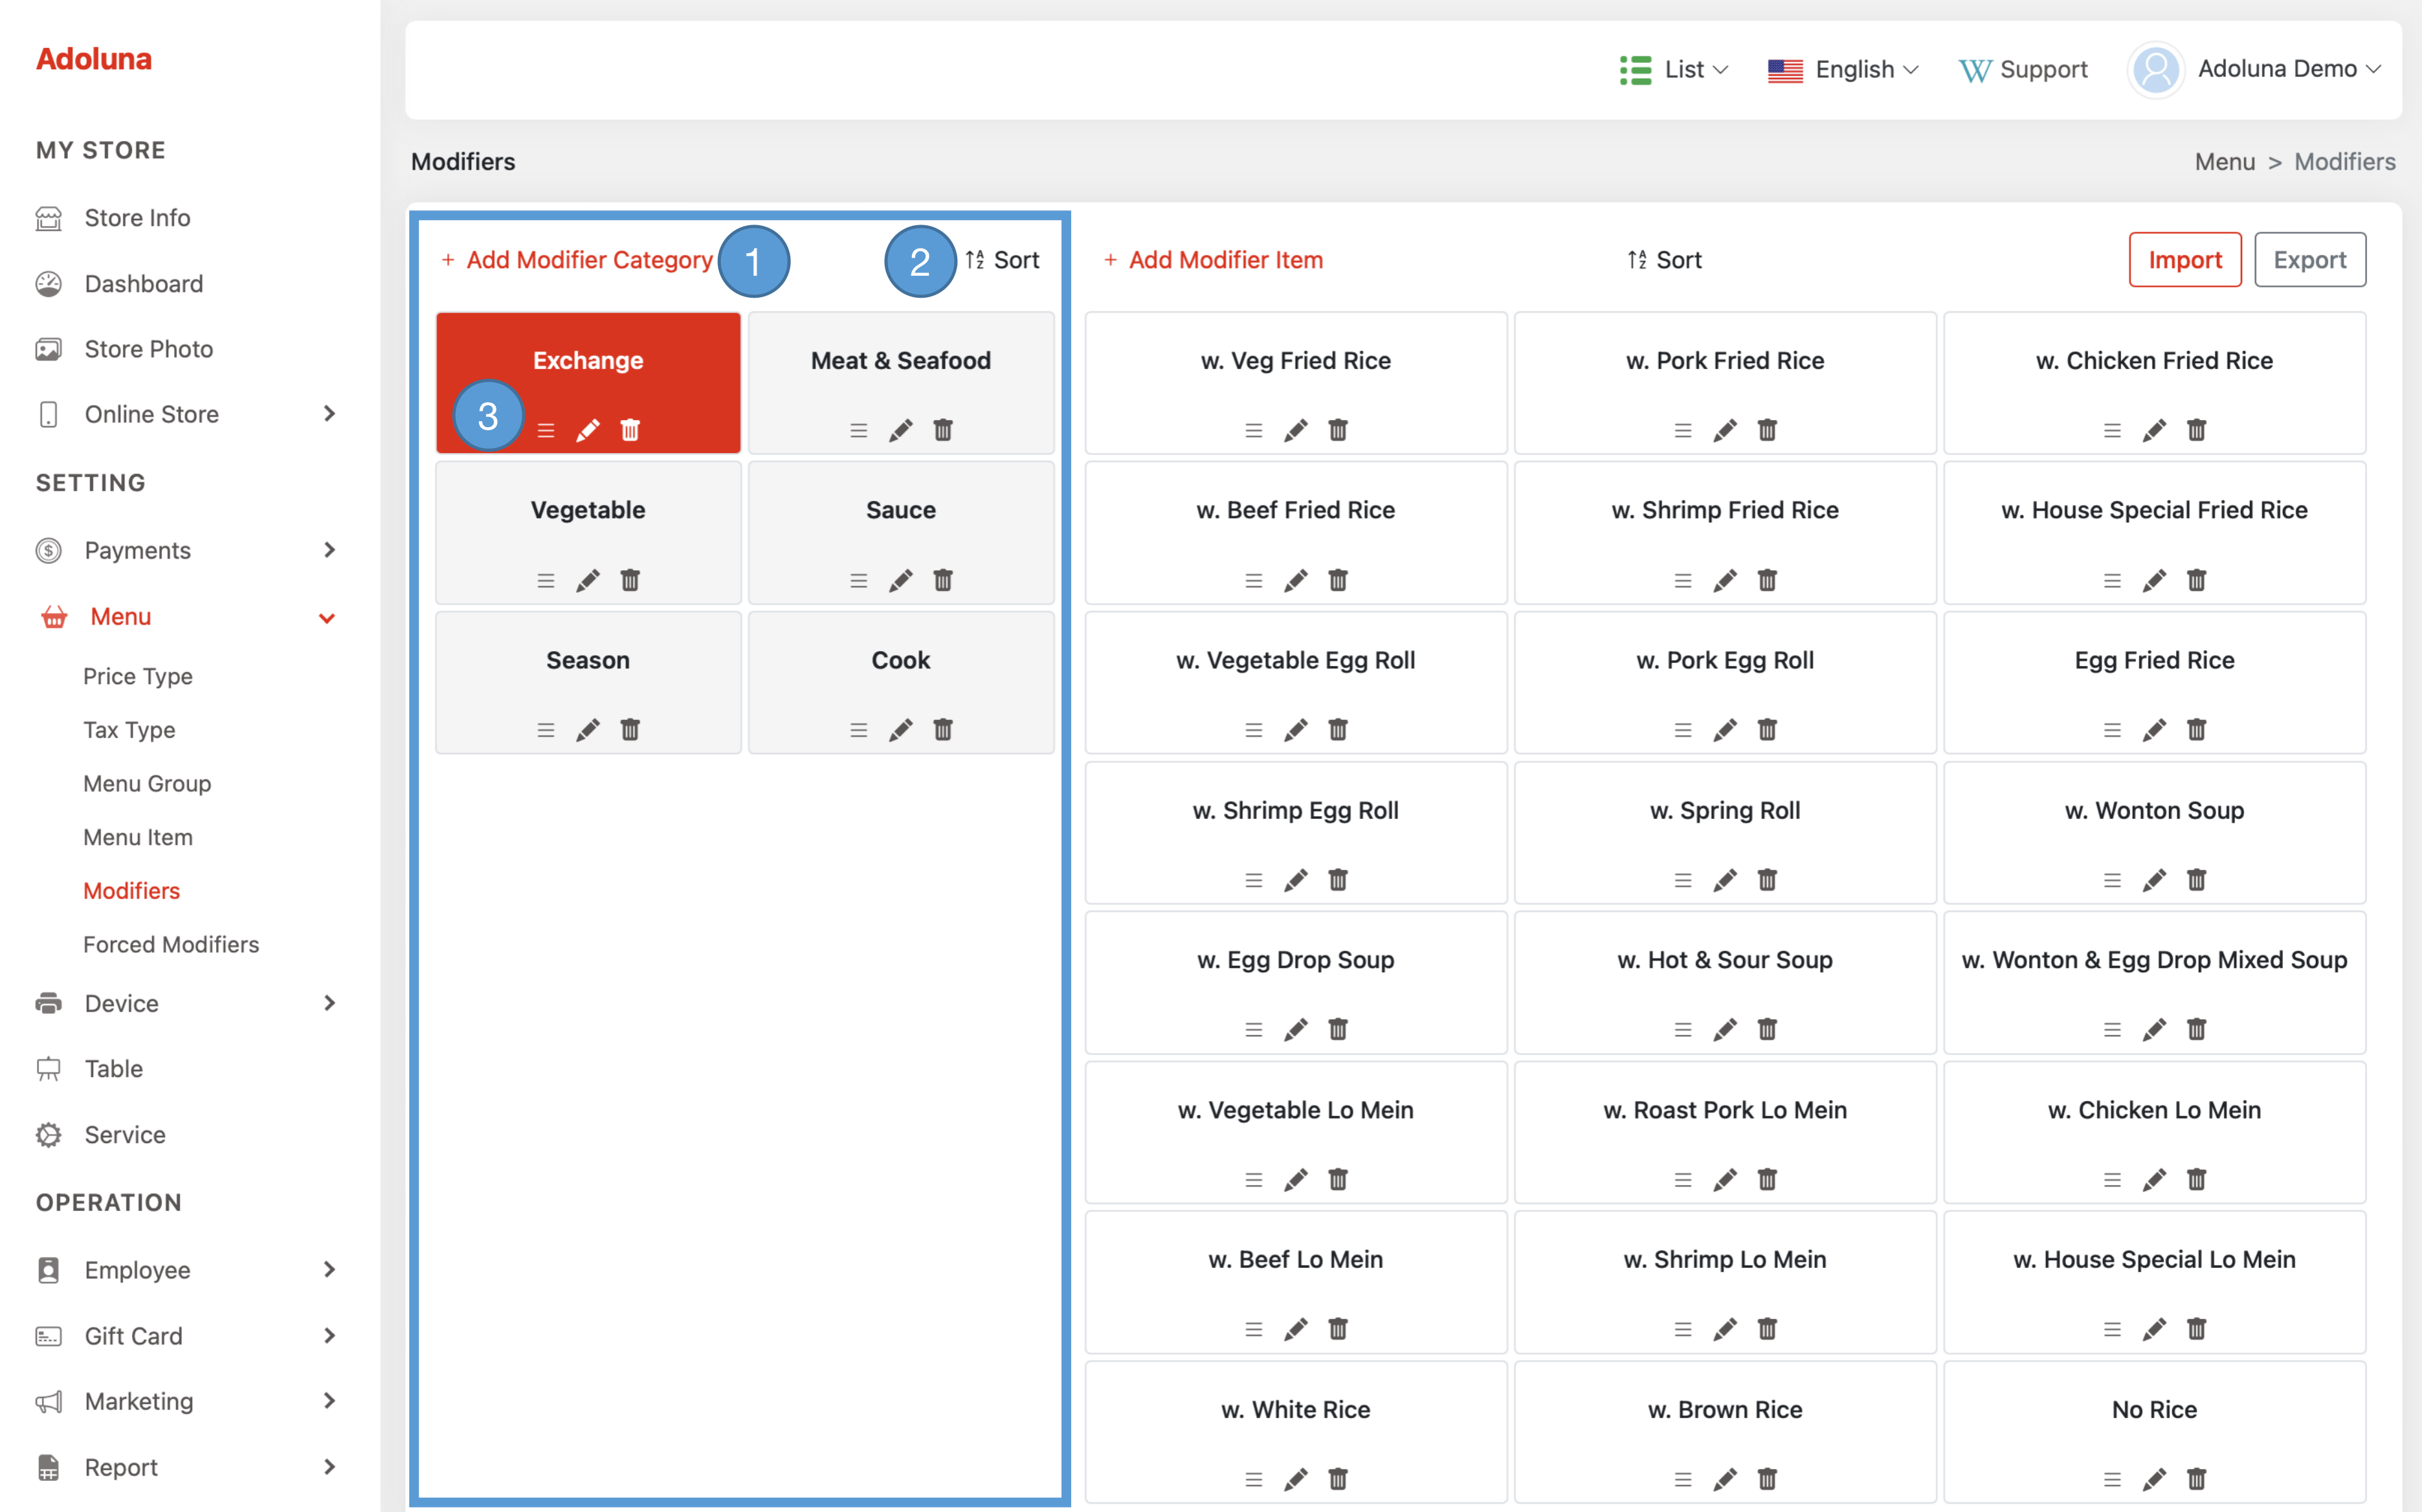
- Click +Add Modifier Category to create a new modifier category.
- Click Sort option to arrange the modifier category in alphabetical order.
- Hold and drag the
 icon to arrange the modifier category position, click the
  icon to edit and
  to delete.
- Name: Assign a name to this modifier category.
- Available: Enables or disables this modifier category.
- Click Save to apply the change.
Manage Modifier Item #

- Click +Add Modifier Item to create a new modifier item.
- Click Sort option to arrange the modifier item in alphabetical order.
- Click Import to import the modifier from an Excel file.
- Click Export to export the modifier to an Excel file.
- Hold and drag the
 icon to arrange the modifier item position, click the
  icon to edit and
  icon to delete.
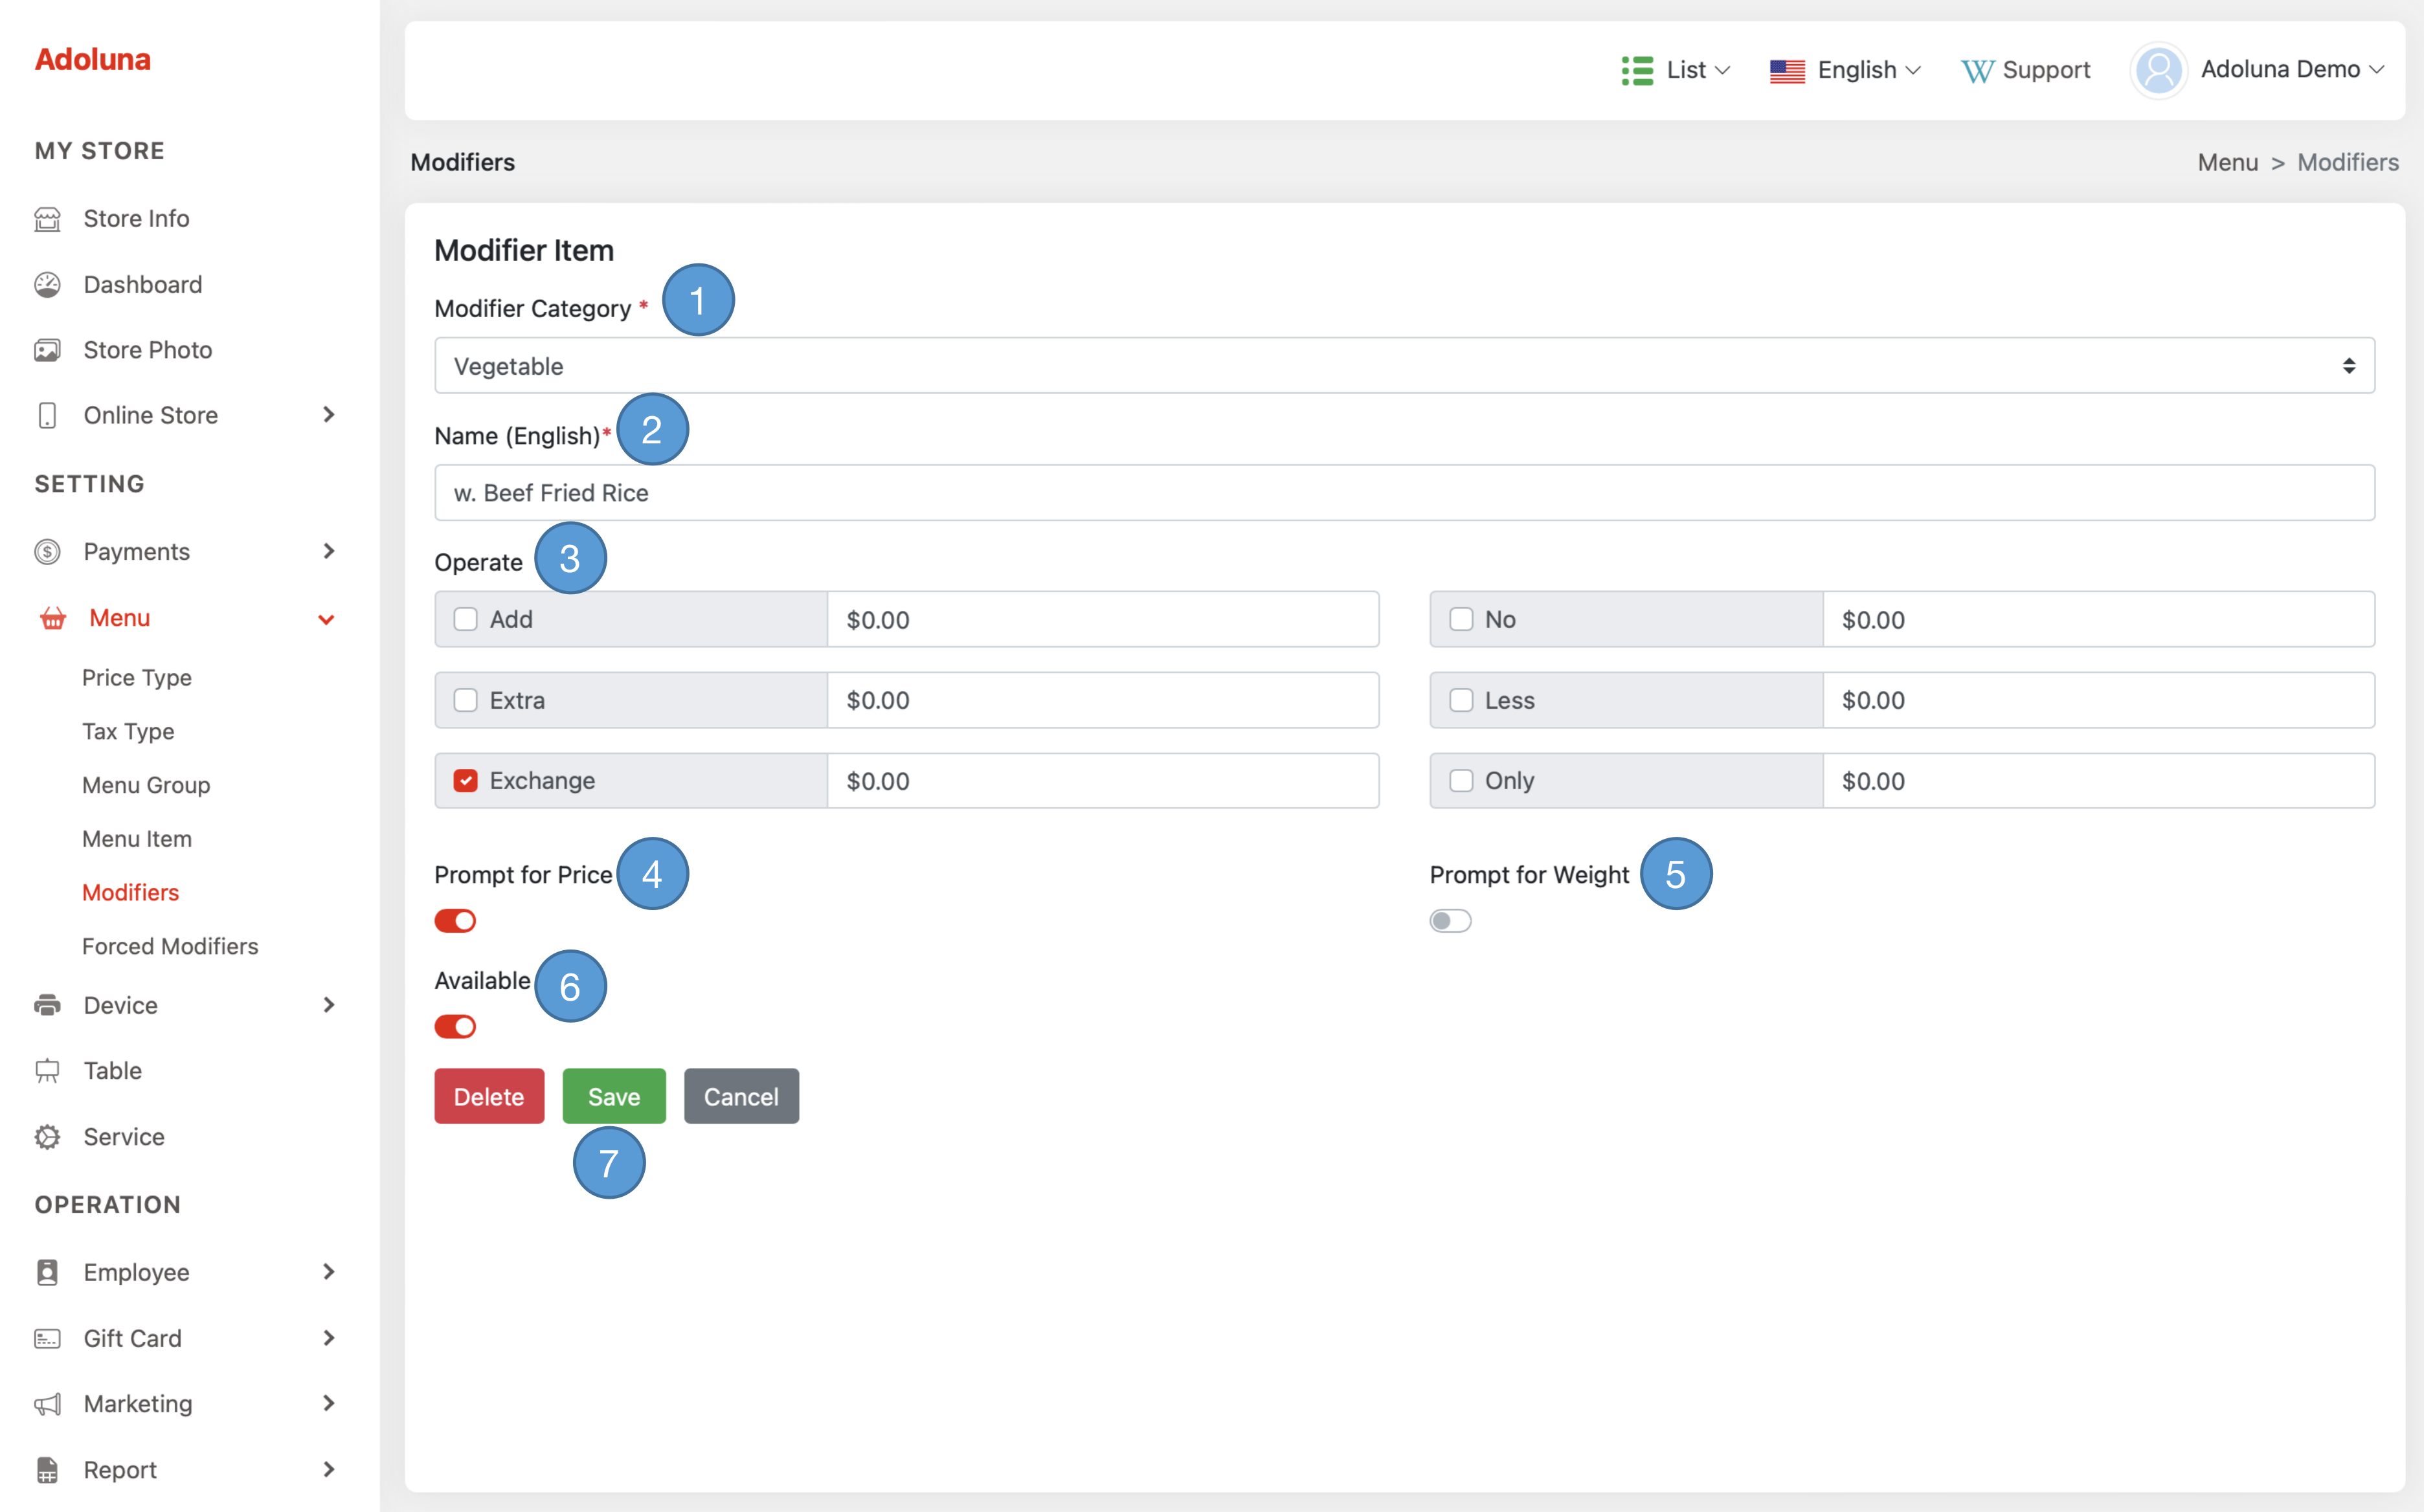
- Modifier Category: Choose a modifier category for this modifier item.
- Name: Assign a name to this modifier item.
- Operate: Select the desired options and set their respective prices as needed
- Prompt for Price: This option enables or disables the prompt for price when this modifier option is triggered.
- Prompt for Weight: This option enables or disables the prompt for weight when this modifier option is triggered.
- Available: Enables or disables this modifier item.
- Click Save to apply the change.
Forced Modifiers #
The forced modifier feature is particularly useful for menu items that require customers to select specific options, such as a pizza or a meal with multiple customizable components.
Navigate to the Forced Modifiers under Menu from the menu bar to create and manage the forced modifiers template.
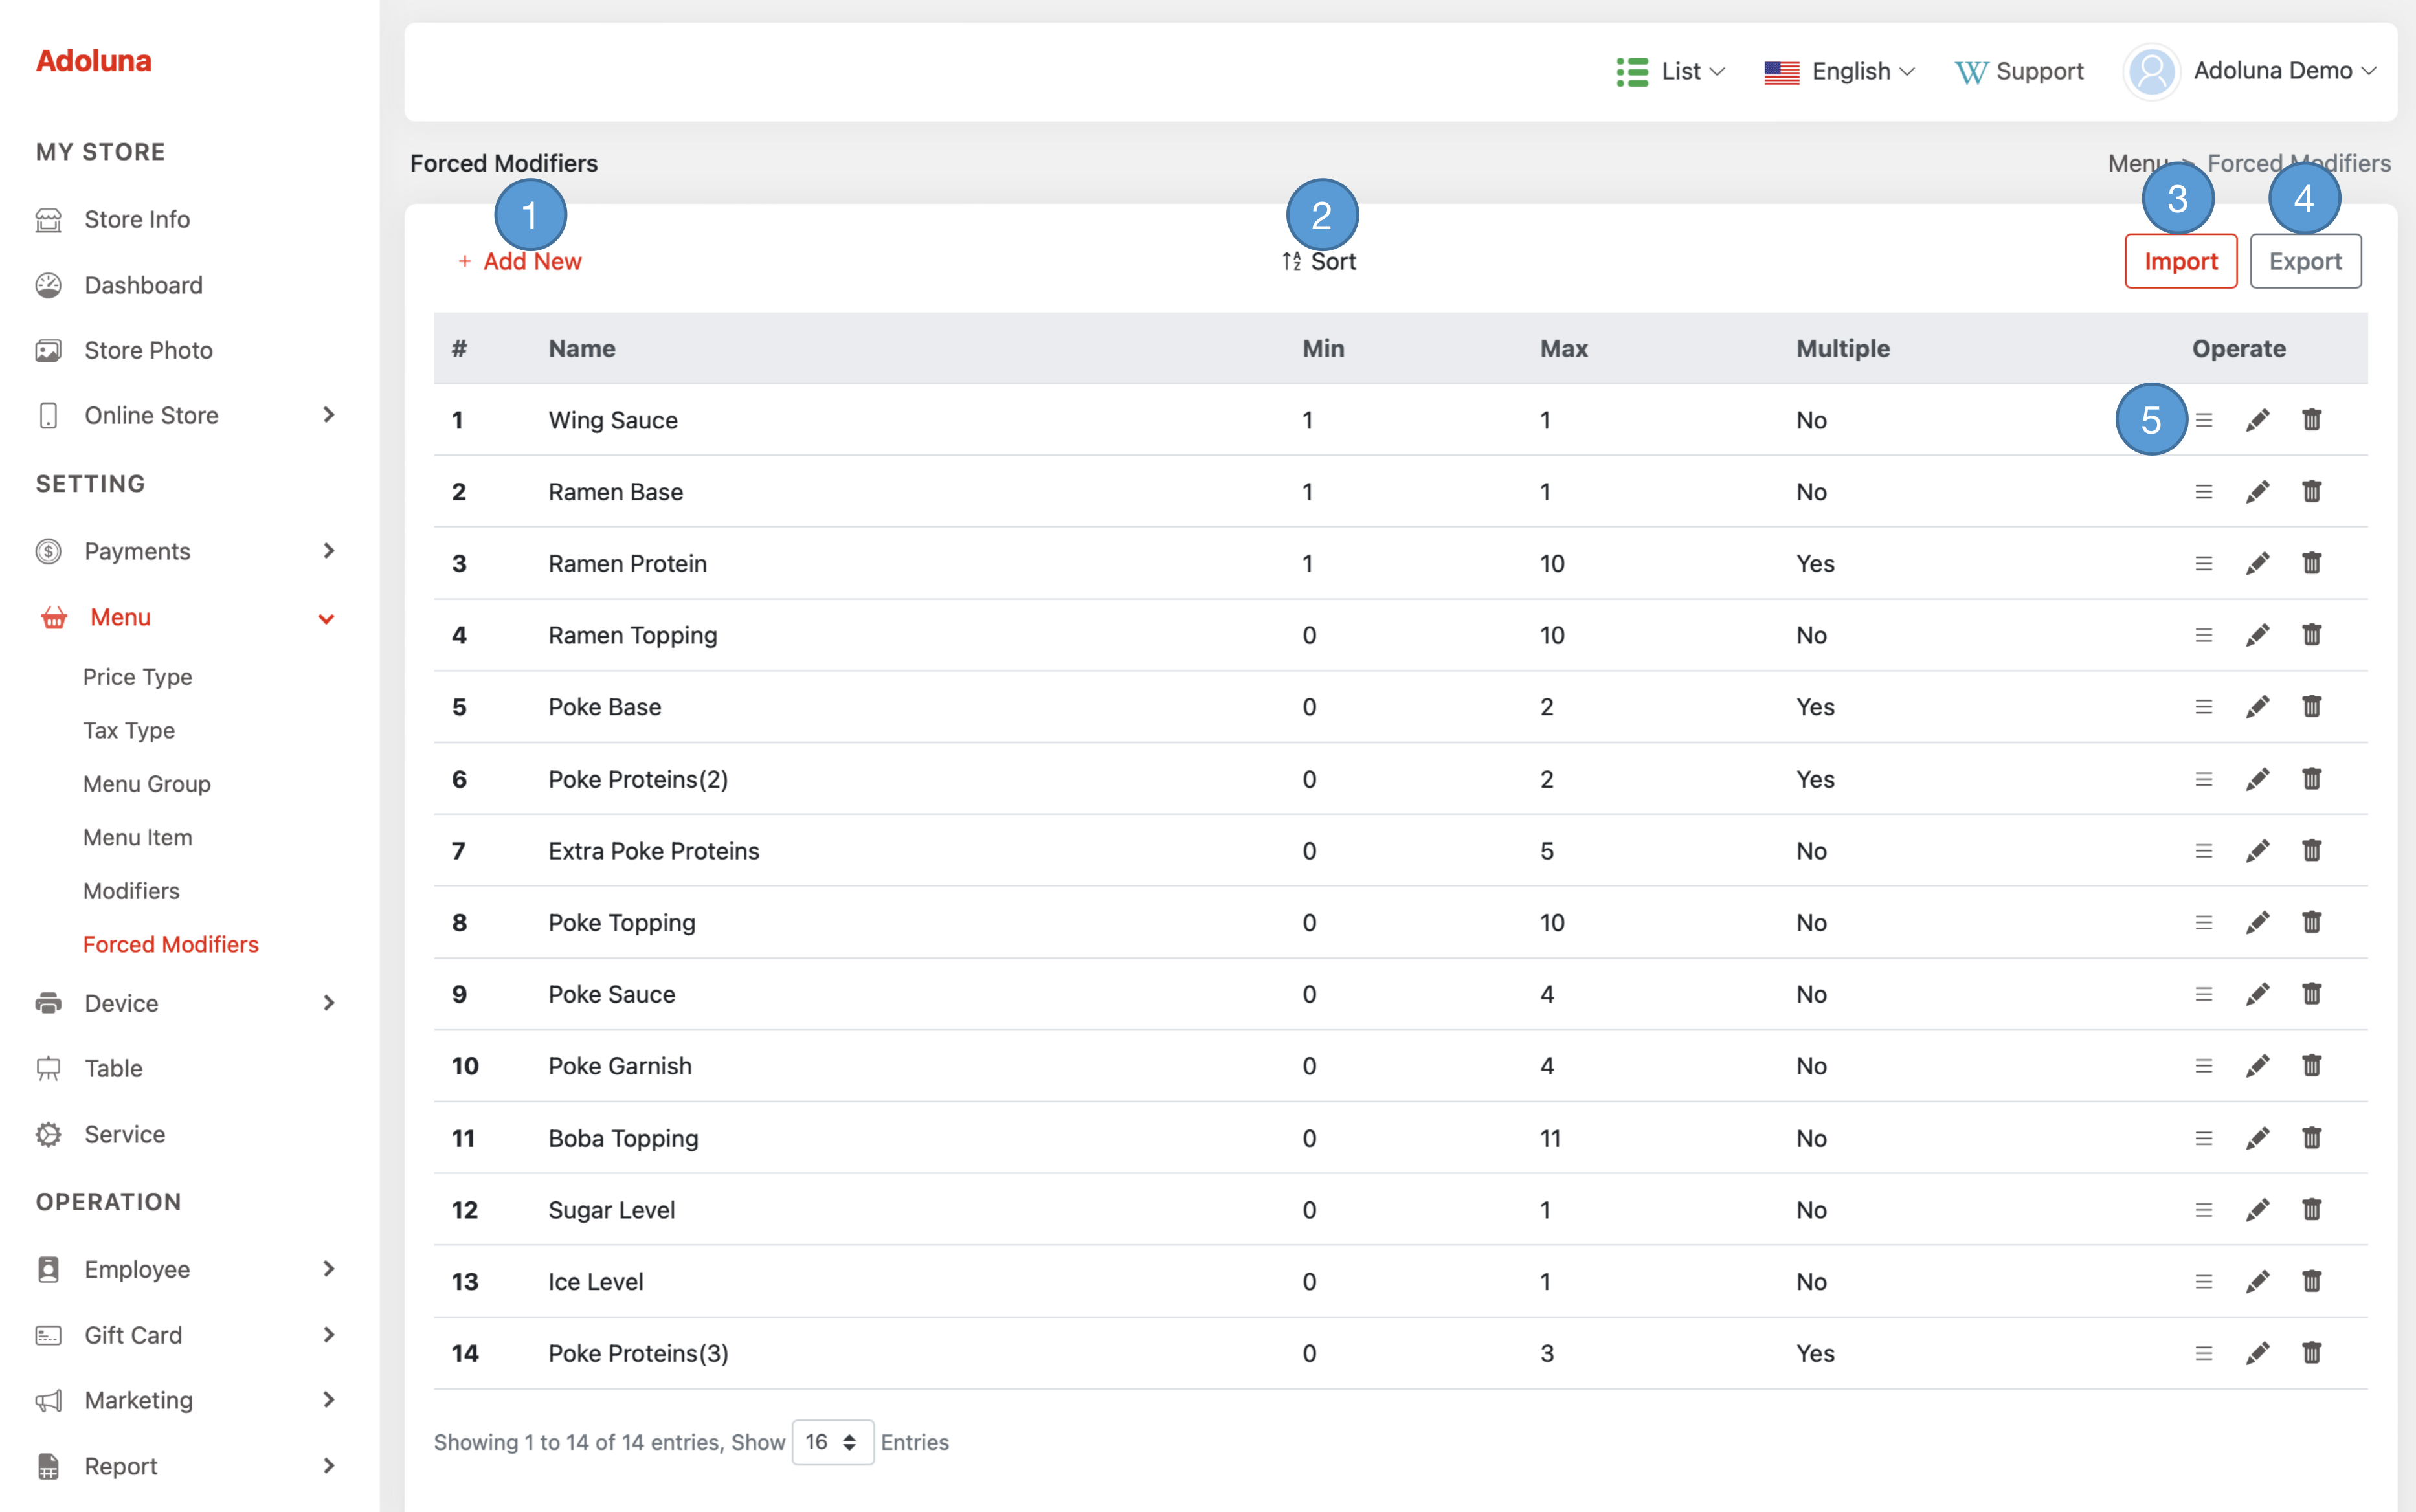
- Click +Add New to create a new forced modifier template.
- Click Sort option to arrange the forced modifier templates in alphabetical order.
- Click Import to import the forced modifier template from an Excel file.
- Click Export to export the forced modifier template to an Excel file.
- Hold and drag the
 icon to arrange the forced modifier template order, click the
  icon to edit and
  icon to delete.

- Name: Assign a name to this forced modifier template.
- Min: Set the minimum number of modifiers that can be chosen.
- Max: Set the maximum number of modifiers that can be chosen.
- Multiple: Enable or disable the ability to choose the same modifier multiple times.
- Modifiers
- Name: Assign a name to this modifier item.
- Price: Enter the price for this modifier item.
- Available: Enables or disables this modifier item. If disabled, it will show as ‘out of stock’ to the user.
- Hold and drag the
 icon to arrange the modifier item order.
 - Click the
 icon to add a new modifier item.
 - Click the
 icon to delete the modifier item.
- Click Save to apply the change.
