The Service Section serves as the command center for tailoring the myriad services your store offers. Seamlessly toggle between options such as Dine-In, To Go, Pick Up, and Delivery, customizing the available services to precisely match your business model. This section isn’t just about activation; it’s a comprehensive configuration hub. Dive into each service type’s settings, adjusting parameters to perfection.
Navigate to the Service option in the menu bar to configure store service settings.
Dine In #
The Dine In section provides comprehensive configurations tailored for dine-in ordering, allowing you to customize the settings according to your specific requirements and preferences.
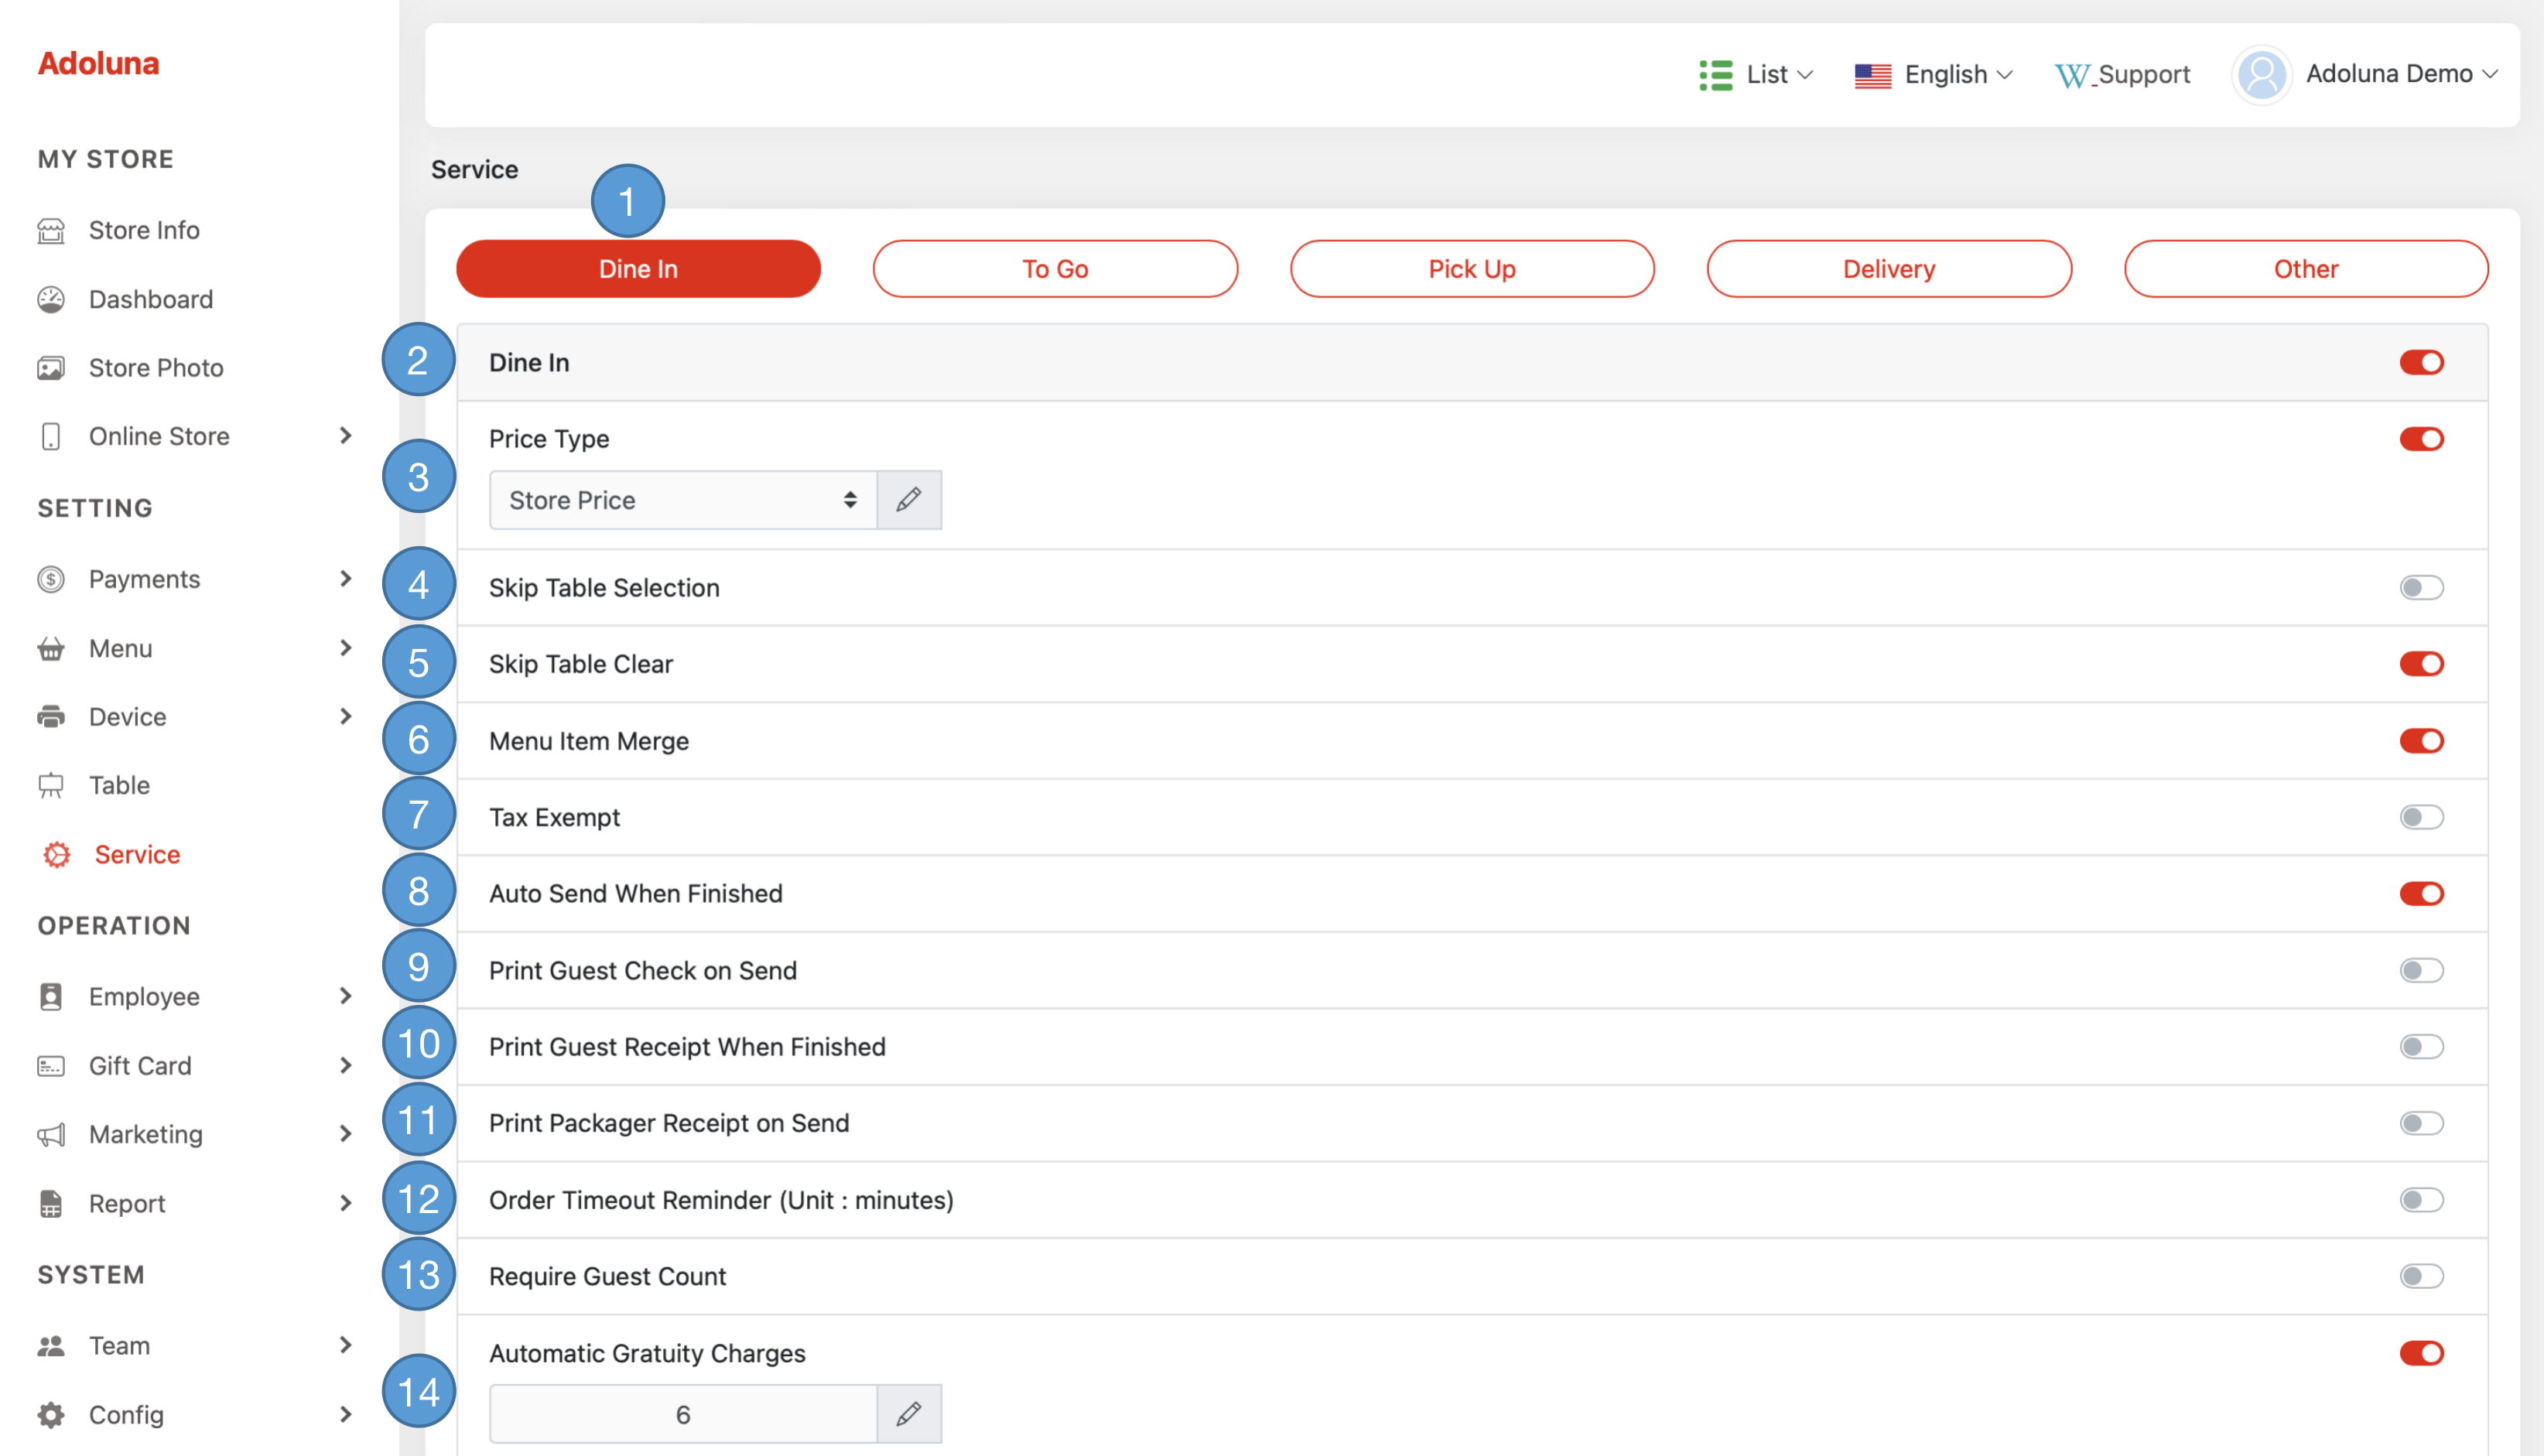

- Tap Dine In to access and display all dine-in service configurations.
- Enable or disable the Dine In service.
 indicate enable.
 indicate disable.
- Enable or disable Price Type. Click the
 icon to select a specific pricing option.
- If the price is disabled or no price type is selected, the menu item price will be set to $0.00.
- Enable or disable the Skip Table Selection feature.
- Enable or disable the Skip Table Clear feature. When enabled, the table will remain in a ‘clearing’ status, and employees will need to manually update the status once the table is cleaned.
- Enable or disable the Menu Item Merge feature. When enabled, identical menu items without modifiers will be combined.
- Enable or disable Tax Exempt.
- Enable or disable Automatically Send Order When Settled.
- Enable or disable Automatically Print Guest Check when an order sent to the kitchen.
- Enable or disable Automatically Print Customer Receipt when an order is settled.
- Enable or disable Automatically Print Packager Receipt when an order is sent to the kitchen.
- Enable or disable Order Timeout Reminder. Click the
 icon to set the order reminder in minutes.
 - Enable or disable the Required Guest Count feature. When enabled, the employees are required to enter guest count when initiating a dine-in order.
- Enable or disable the Automatic Gratuity Charges feature. Click the
 icon to set the minimum guest count that will trigger the charge.
 - Enable or disable the Automatic Gratuity Charges Amount. Click the
 icon to set the gratuity amount.
- The gratuity amount will not be applied if the automatic gratuity charges feature(#14) is disabled.
- Enable or disable the Print Modifier Item Price feature. When enabled, each modifier’s price will be printed separately; otherwise, the modifier’s price will be added to the item price.
- Enable or disable the Print Zero Price Menu Item feature. When enabled, menu items with zero price will be printed on the customer receipt.
- Enable or disable the Tip Pooling. Click the
 icon to set the tip pooling percentage.
 - Enable or disable the Keep Ordering Page on Save feature. When enabled, the POS system will stay on the ordering page after saving the order.
- Enable or disable the Keep Ordering Page on Send feature. When enabled, the POS system will stay on the ordering page after sending the order.
- Enable or disable the Open a New Order When Settled feature. When enabled, the POS system will automatically start a new dine-in order after the current dine-in order is settled from the ordering page
- Enable or disable the Print Other Department Menu Item feature. When enabled, all kitchen department printers will print menu items from other departments.
- Enable or disable the Keep Table Page When Settled feature. When enabled, the POS system will stay on the table selection page after an order is settled.
To Go #
The To Go section provides comprehensive configurations tailored for to-go ordering, allowing you to customize the settings according to your specific requirements and preferences.
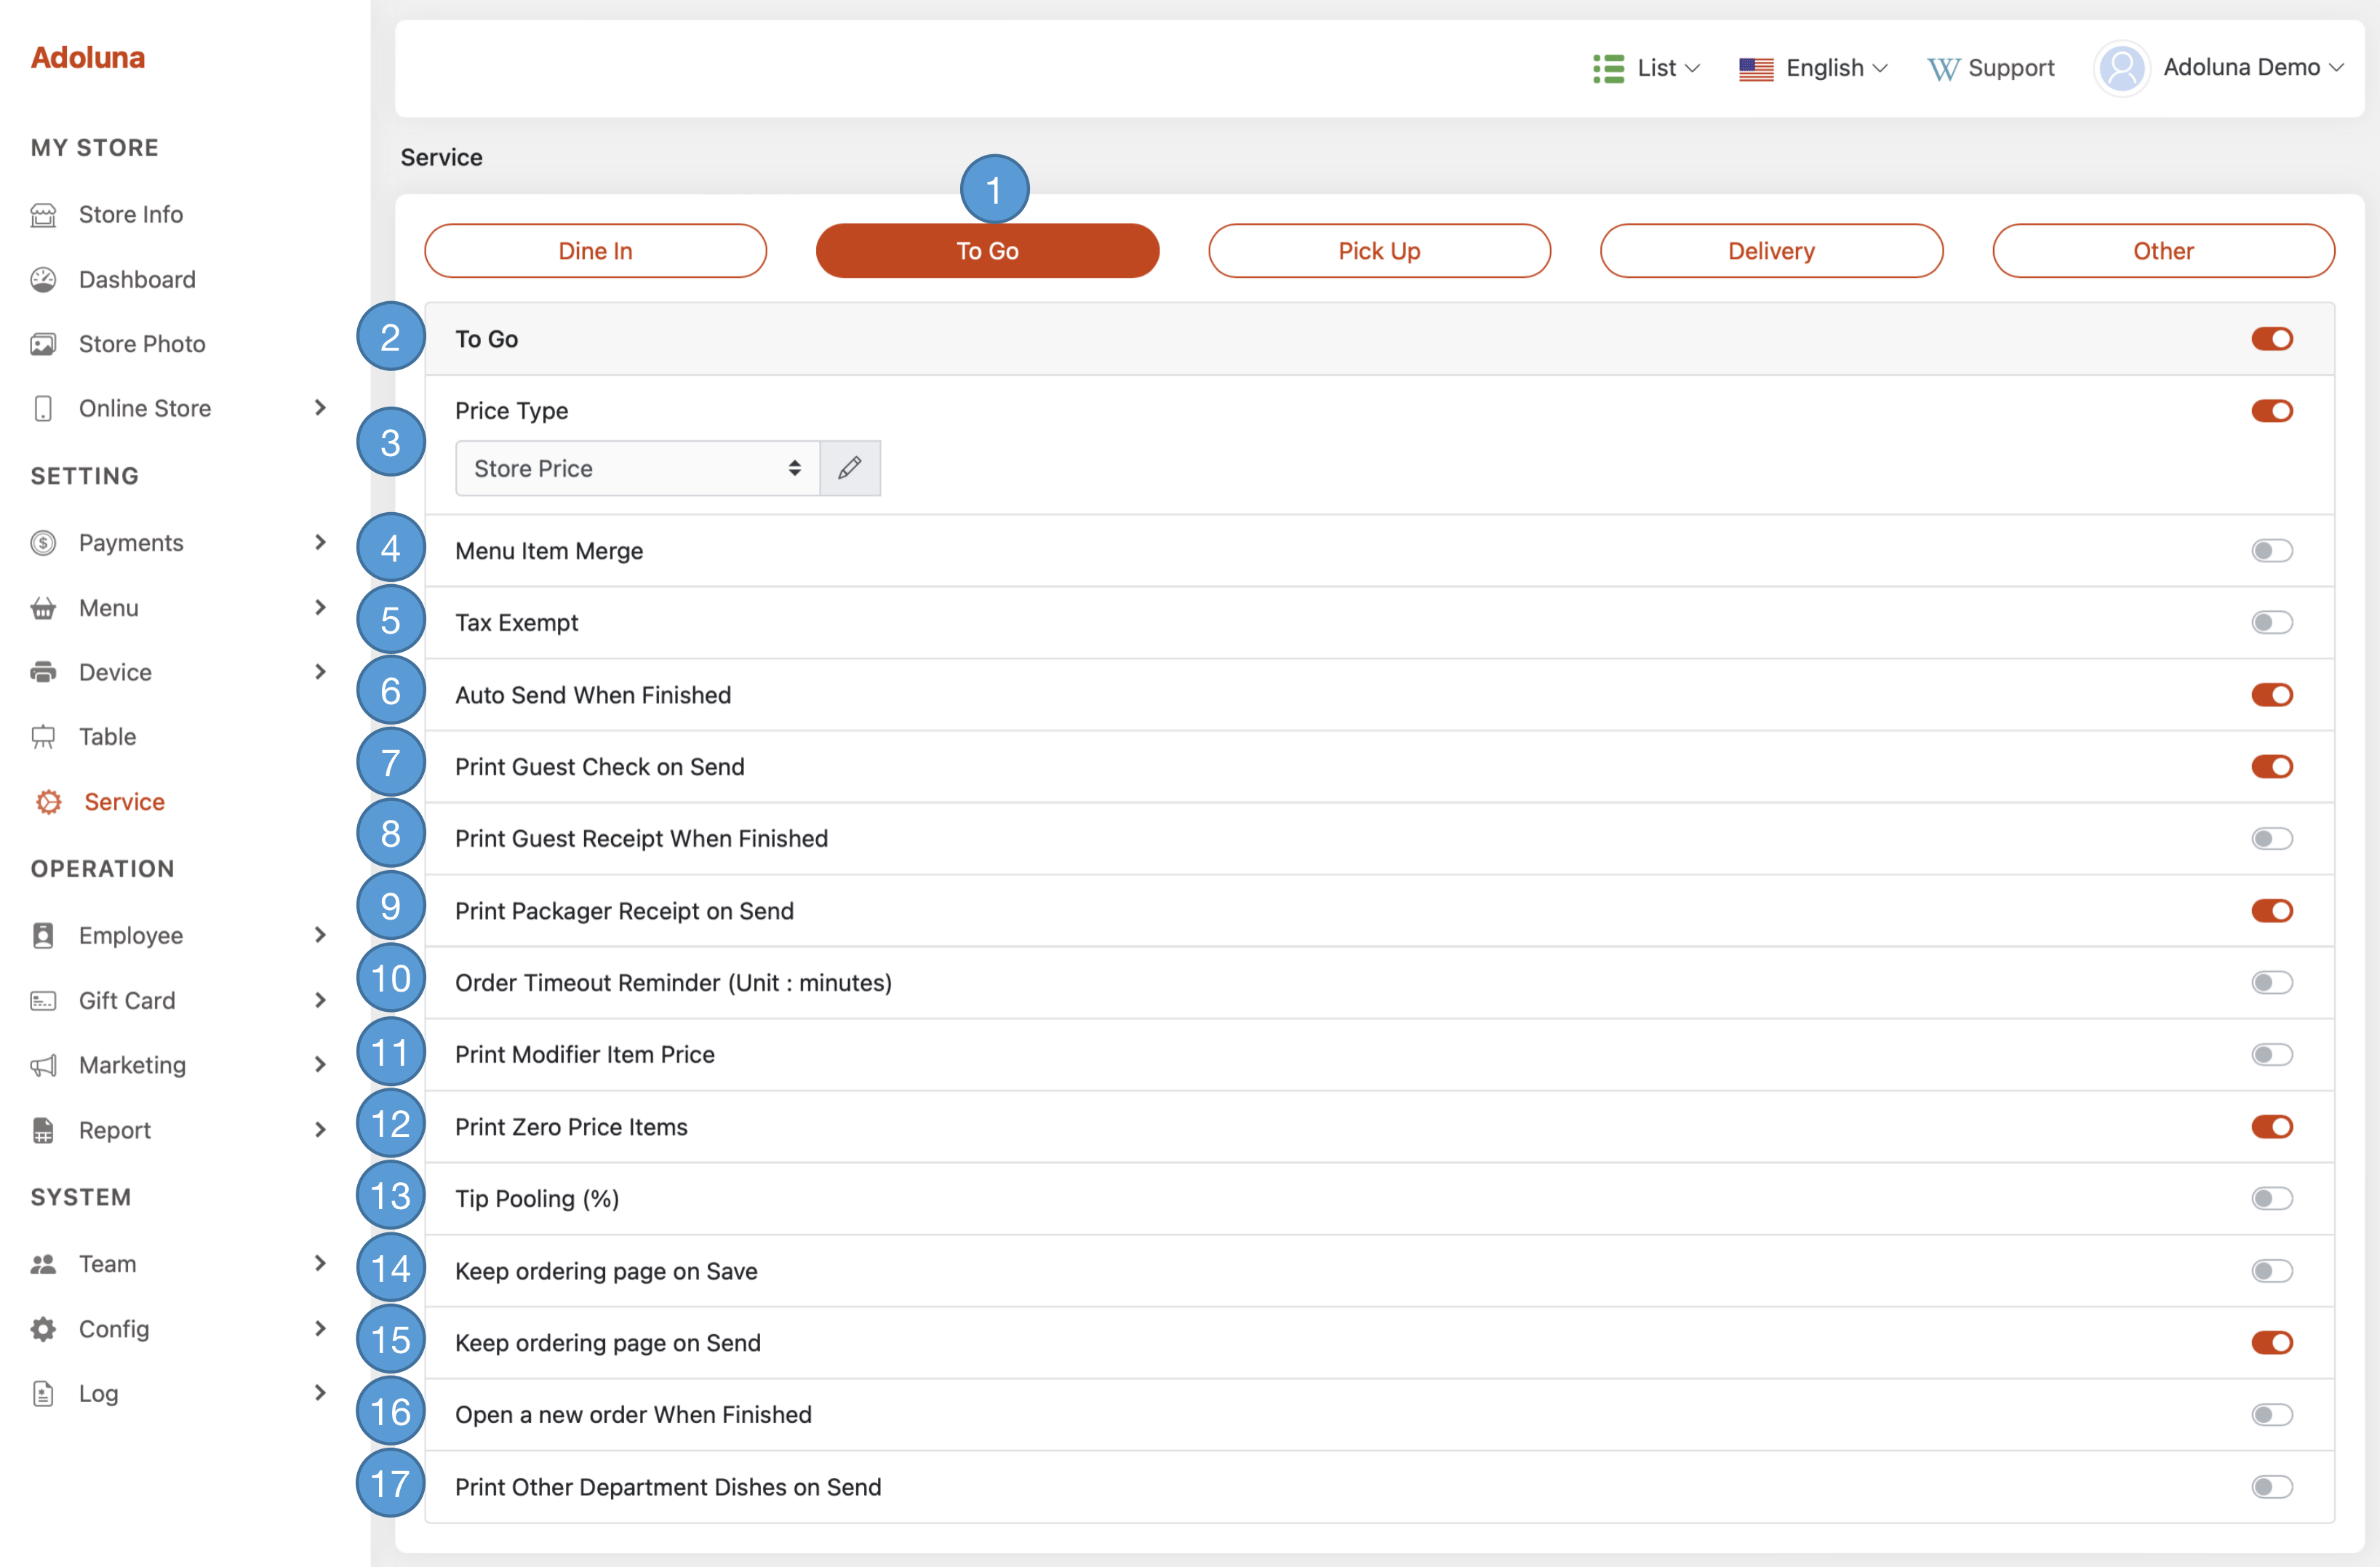
- Tap To Go to access and display all to-go service configurations.
- Enable or disable the To Go service.
 indicate enable.
 indicate disable.
- Enable or disable Price Type. Click the
 icon to select a specific pricing option.
- If the price is disabled or no price type is selected, the menu item price will be set to $0.00.
- Enable or disable the Menu Item Merge feature. When enabled, identical menu items without modifiers will be combined.
- Enable or disable Tax Exempt.
- Enable or disable Automatically Send Order When Settled.
- Enable or disable Automatically Print Guest Check when an order sent to the kitchen.
- Enable or disable Automatically Print Customer Receipt when an order is settled.
- Enable or disable Automatically Print Packager Receipt when an order is sent to the kitchen.
- Enable or disable Order Timeout Reminder. Click the
 icon to set the order reminder in minutes.
 - Enable or disable the Print Modifier Item Price feature. When enabled, each modifier’s price will be printed separately; otherwise, the modifier’s price will be added to the item price.
- Enable or disable the Print Zero Price Menu Item feature. When enabled, menu items with zero price will be printed on the customer receipt.
- Enable or disable the Tip Pooling. Click the
 icon to set the tip pooling percentage.
 - Enable or disable the Keep Ordering Page on Save feature. When enabled, the POS system will stay on the ordering page after saving the order.
- Enable or disable the Keep Ordering Page on Send feature. When enabled, the POS system will stay on the ordering page after sending the order.
- Enable or disable the Open a New Order When Settled feature. When enabled, the POS system will automatically start a new to-go order after the current to-go order is settled from the ordering page
- Enable or disable the Print Other Department Menu Item feature. When enabled, all kitchen department printers will print menu items from other departments.
Pick Up #
The Pick Up section provides comprehensive configurations tailored for pick-up ordering, allowing you to customize the settings according to your specific requirements and preferences.
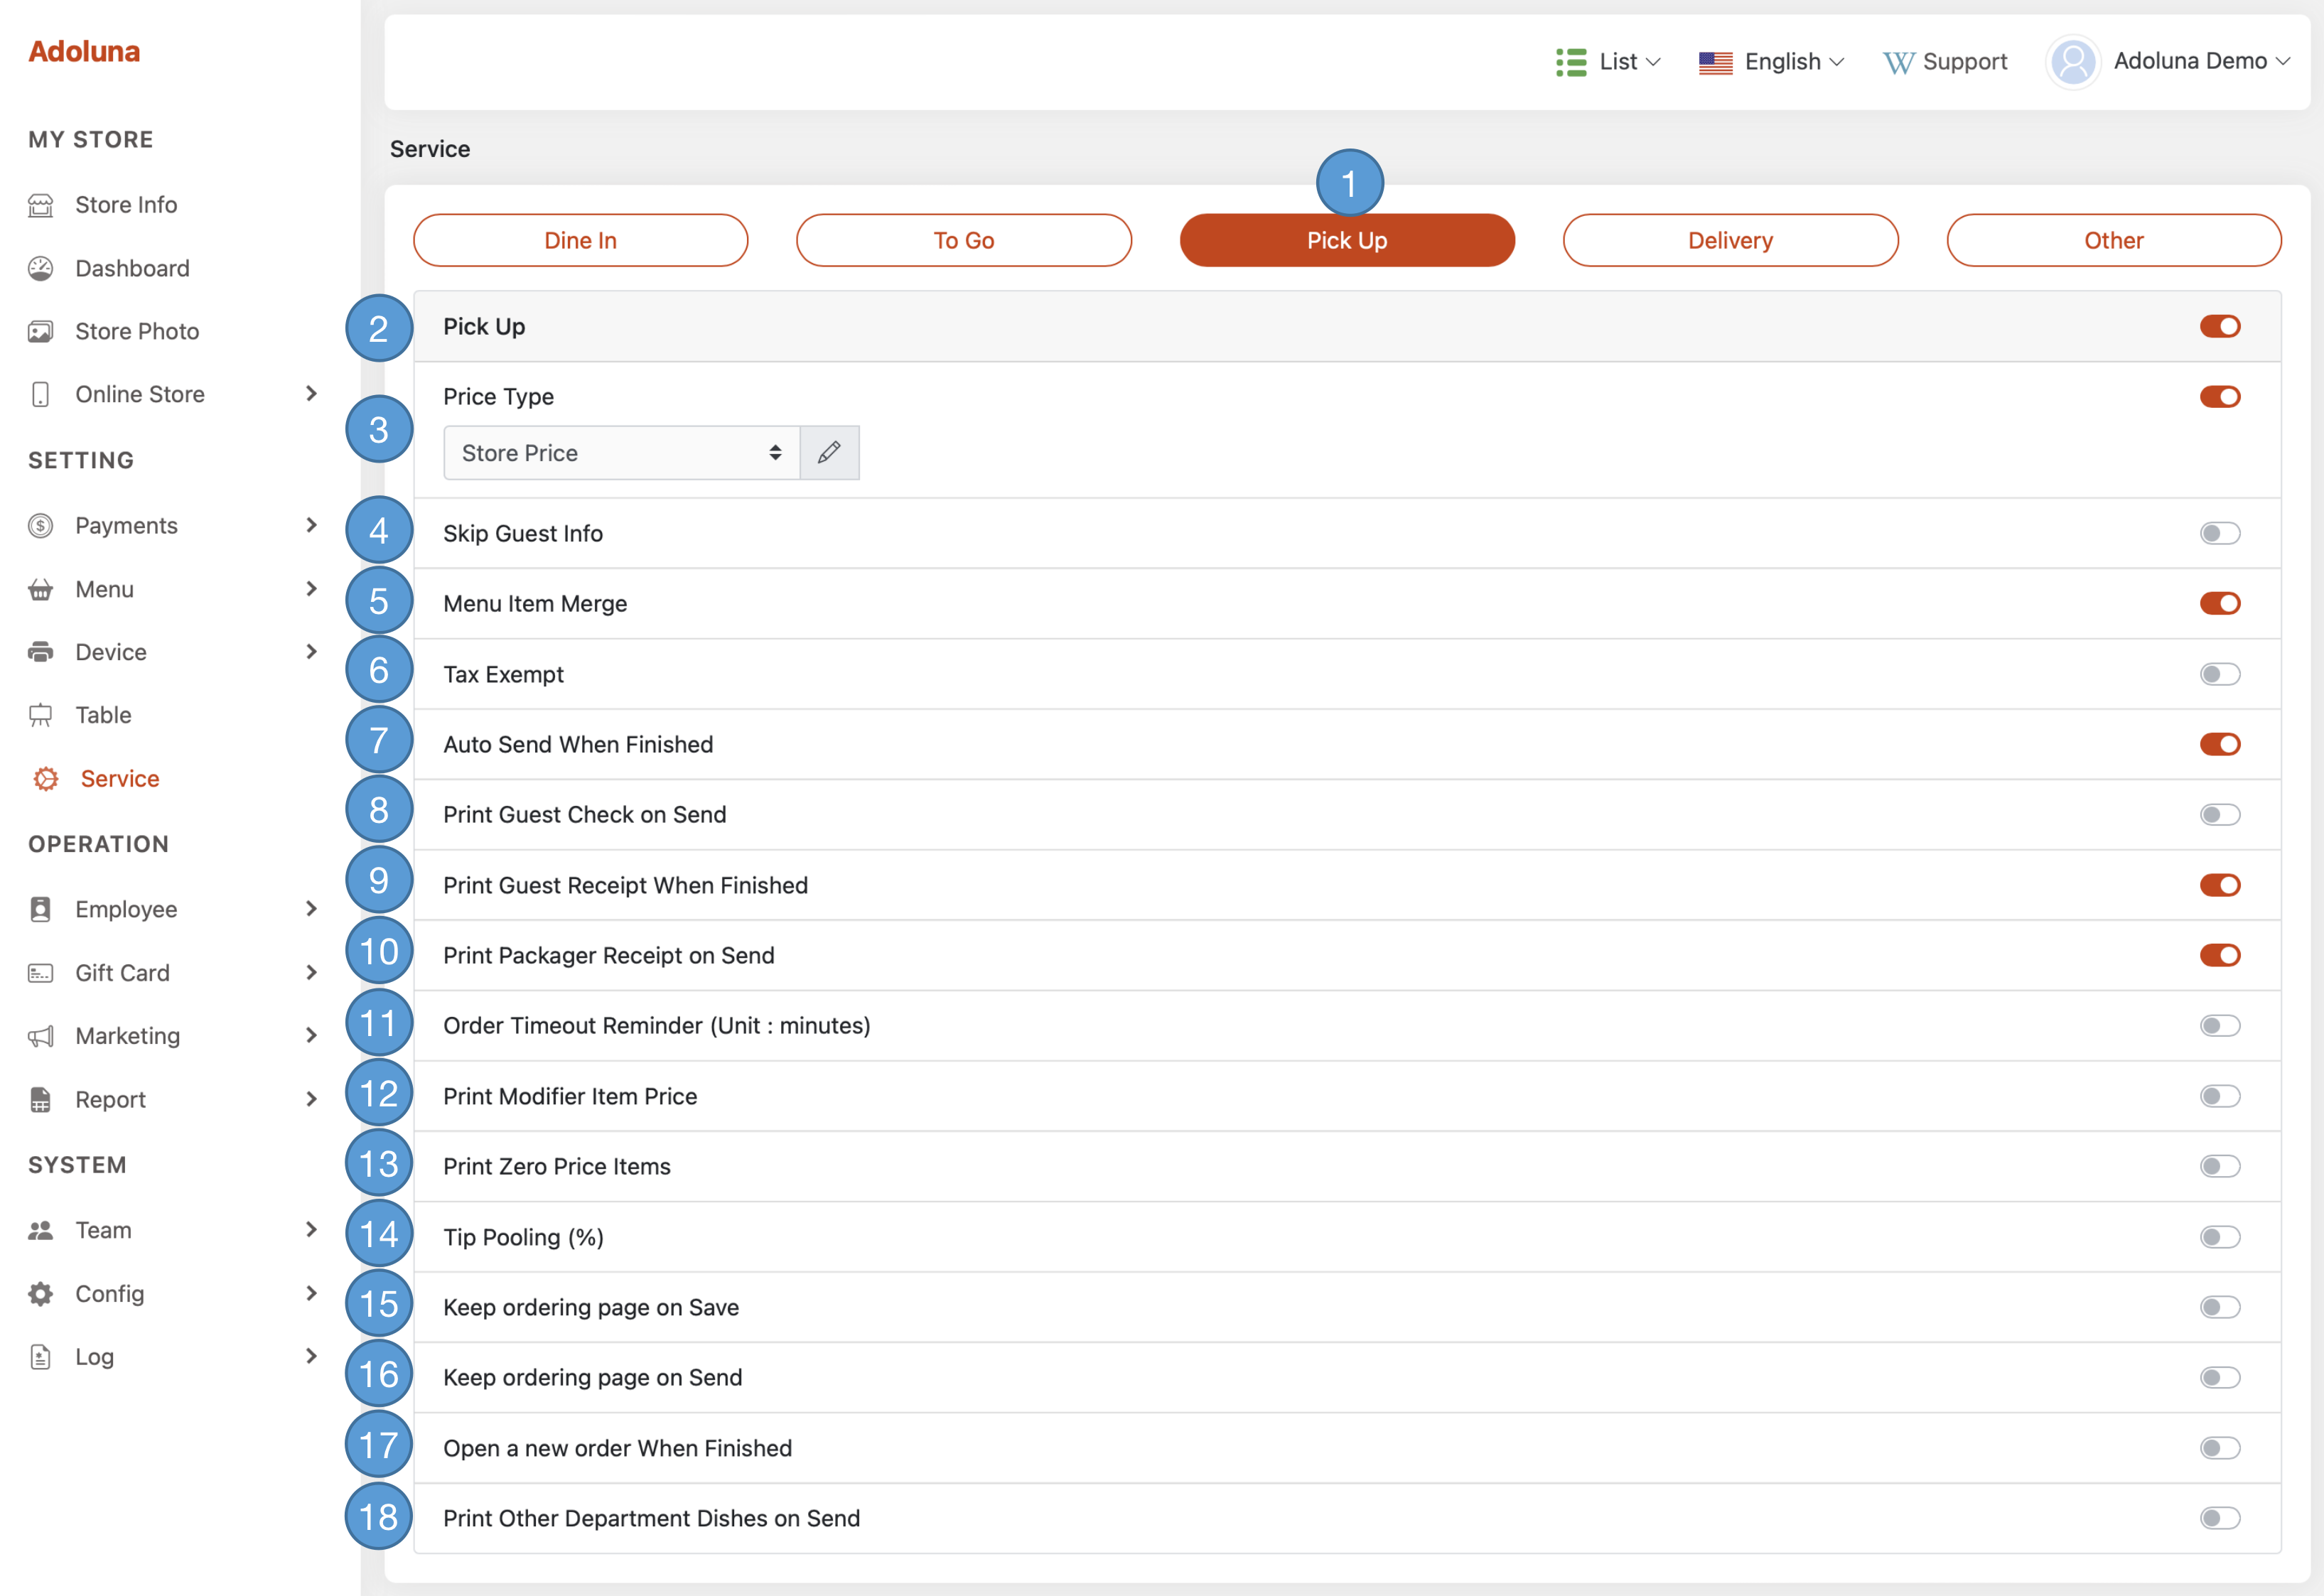
- Tap Pick Up to access and display all pick-up service configurations.
- Enable or disable the Pick Up service.
 indicate enable.
 indicate disable.
- Enable or disable Price Type. Click the
 icon to select a specific pricing option.
- If the price is disabled or no price type is selected, the menu item price will be set to $0.00.
- Enable or disable the Skip Guest Info feature. When enabled, the POS system will not prompt for customer information when initiating a pick-up order.
- Enable or disable the Menu Item Merge feature. When enabled, identical menu items without modifiers will be combined.
- Enable or disable Tax Exempt.
- Enable or disable Automatically Send Order When Settled.
- Enable or disable Automatically Print Guest Check when an order sent to the kitchen.
- Enable or disable Automatically Print Customer Receipt when an order is settled.
- Enable or disable Automatically Print Packager Receipt when an order is sent to the kitchen.
- Enable or disable Order Timeout Teminder. Click the
 icon to set the order reminder in minutes.
 - Enable or disable the Print Modifier Item Price feature. When enabled, each modifier’s price will be printed separately; otherwise, the modifier’s price will be added to the item price.
- Enable or disable the Print Zero Price Menu Item feature. When enabled, menu items with zero price will be printed on the customer receipt.
- Enable or disable the Tip Pooling. Click the
 icon to set the tip pooling percentage.
 - Enable or disable the Keep Ordering Page on Save feature. When enabled, the POS system will stay on the ordering page after saving the order.
- Enable or disable the Keep Ordering Page on Send feature. When enabled, the POS system will stay on the ordering page after sending the order.
- Enable or disable the Open a New Order When Settled feature. When enabled, the POS system will automatically start a new pick-up order after the current pick-up order is settled from the ordering page
- Enable or disable the Print Other Department Menu Item feature. When enabled, all kitchen department printers will print menu items from other departments.
Delivery #
The Delivery section provides comprehensive configurations tailored for delivery ordering, allowing you to customize the settings according to your specific requirements and preferences.

- Tap Delivery to access and display all delivery service configurations.
- Enable or disable the Delivery service.
 indicate enable.
 indicate disable.
- Enable or disable Price Type. Click the
 icon to select a specific pricing option.
- If the price is disabled or no price type is selected, the menu item price will be set to $0.00.
- Enable or disable the Menu Item Merge feature. When enabled, identical menu items without modifiers will be combined.
- Enable or disable Tax Exempt.
- Enable or disable Automatically Send Order When Settled.
- Enable or disable Automatically Print Guest Check when an order sent to the kitchen.
- Enable or disable Automatically Print Customer Receipt when an order is settled.
- Enable or disable Automatically Print Packager Receipt when an order is sent to the kitchen.
- Enable or disable Order Timeout Teminder. Click the
 icon to set the order reminder in minutes.
 - Enable or disable the Print Modifier Item Price feature. When enabled, each modifier’s price will be printed separately; otherwise, the modifier’s price will be added to the item price.
- Enable or disable the Print Zero Price Menu Item feature. When enabled, menu items with zero price will be printed on the customer receipt.
- Enable or disable the Free Delivery feature. Click the
 icon to set the minimum order amount to qualify for free delivery.
 - Enable or disable the Delivery Fee. Click the
 icon to set the delivery fee.
- If the free delivery feature is enabled and the customer’s order qualifies, the delivery fee will be waived.
- Enable or disable the Tip Pooling. Click the
 icon to set the tip pooling percentage.
 - Enable or disable the Keep Ordering Page on Save feature. When enabled, the POS system will stay on the ordering page after saving the order.
- Enable or disable the Keep Ordering Page on Send feature. When enabled, the POS system will stay on the ordering page after sending the order.
- Enable or disable the Open a New Order When Settled feature. When enabled, the POS system will automatically start a new delivery order after the current delivery order is settled from the ordering page
- Enable or disable the Print Other Department Menu Item feature. When enabled, all kitchen department printers will print menu items from other departments.
Other #
The Other section encompasses various additional settings that don’t fall into specific categories. Here, you can find and configure miscellaneous configurations to enhance the functionality of your POS system.
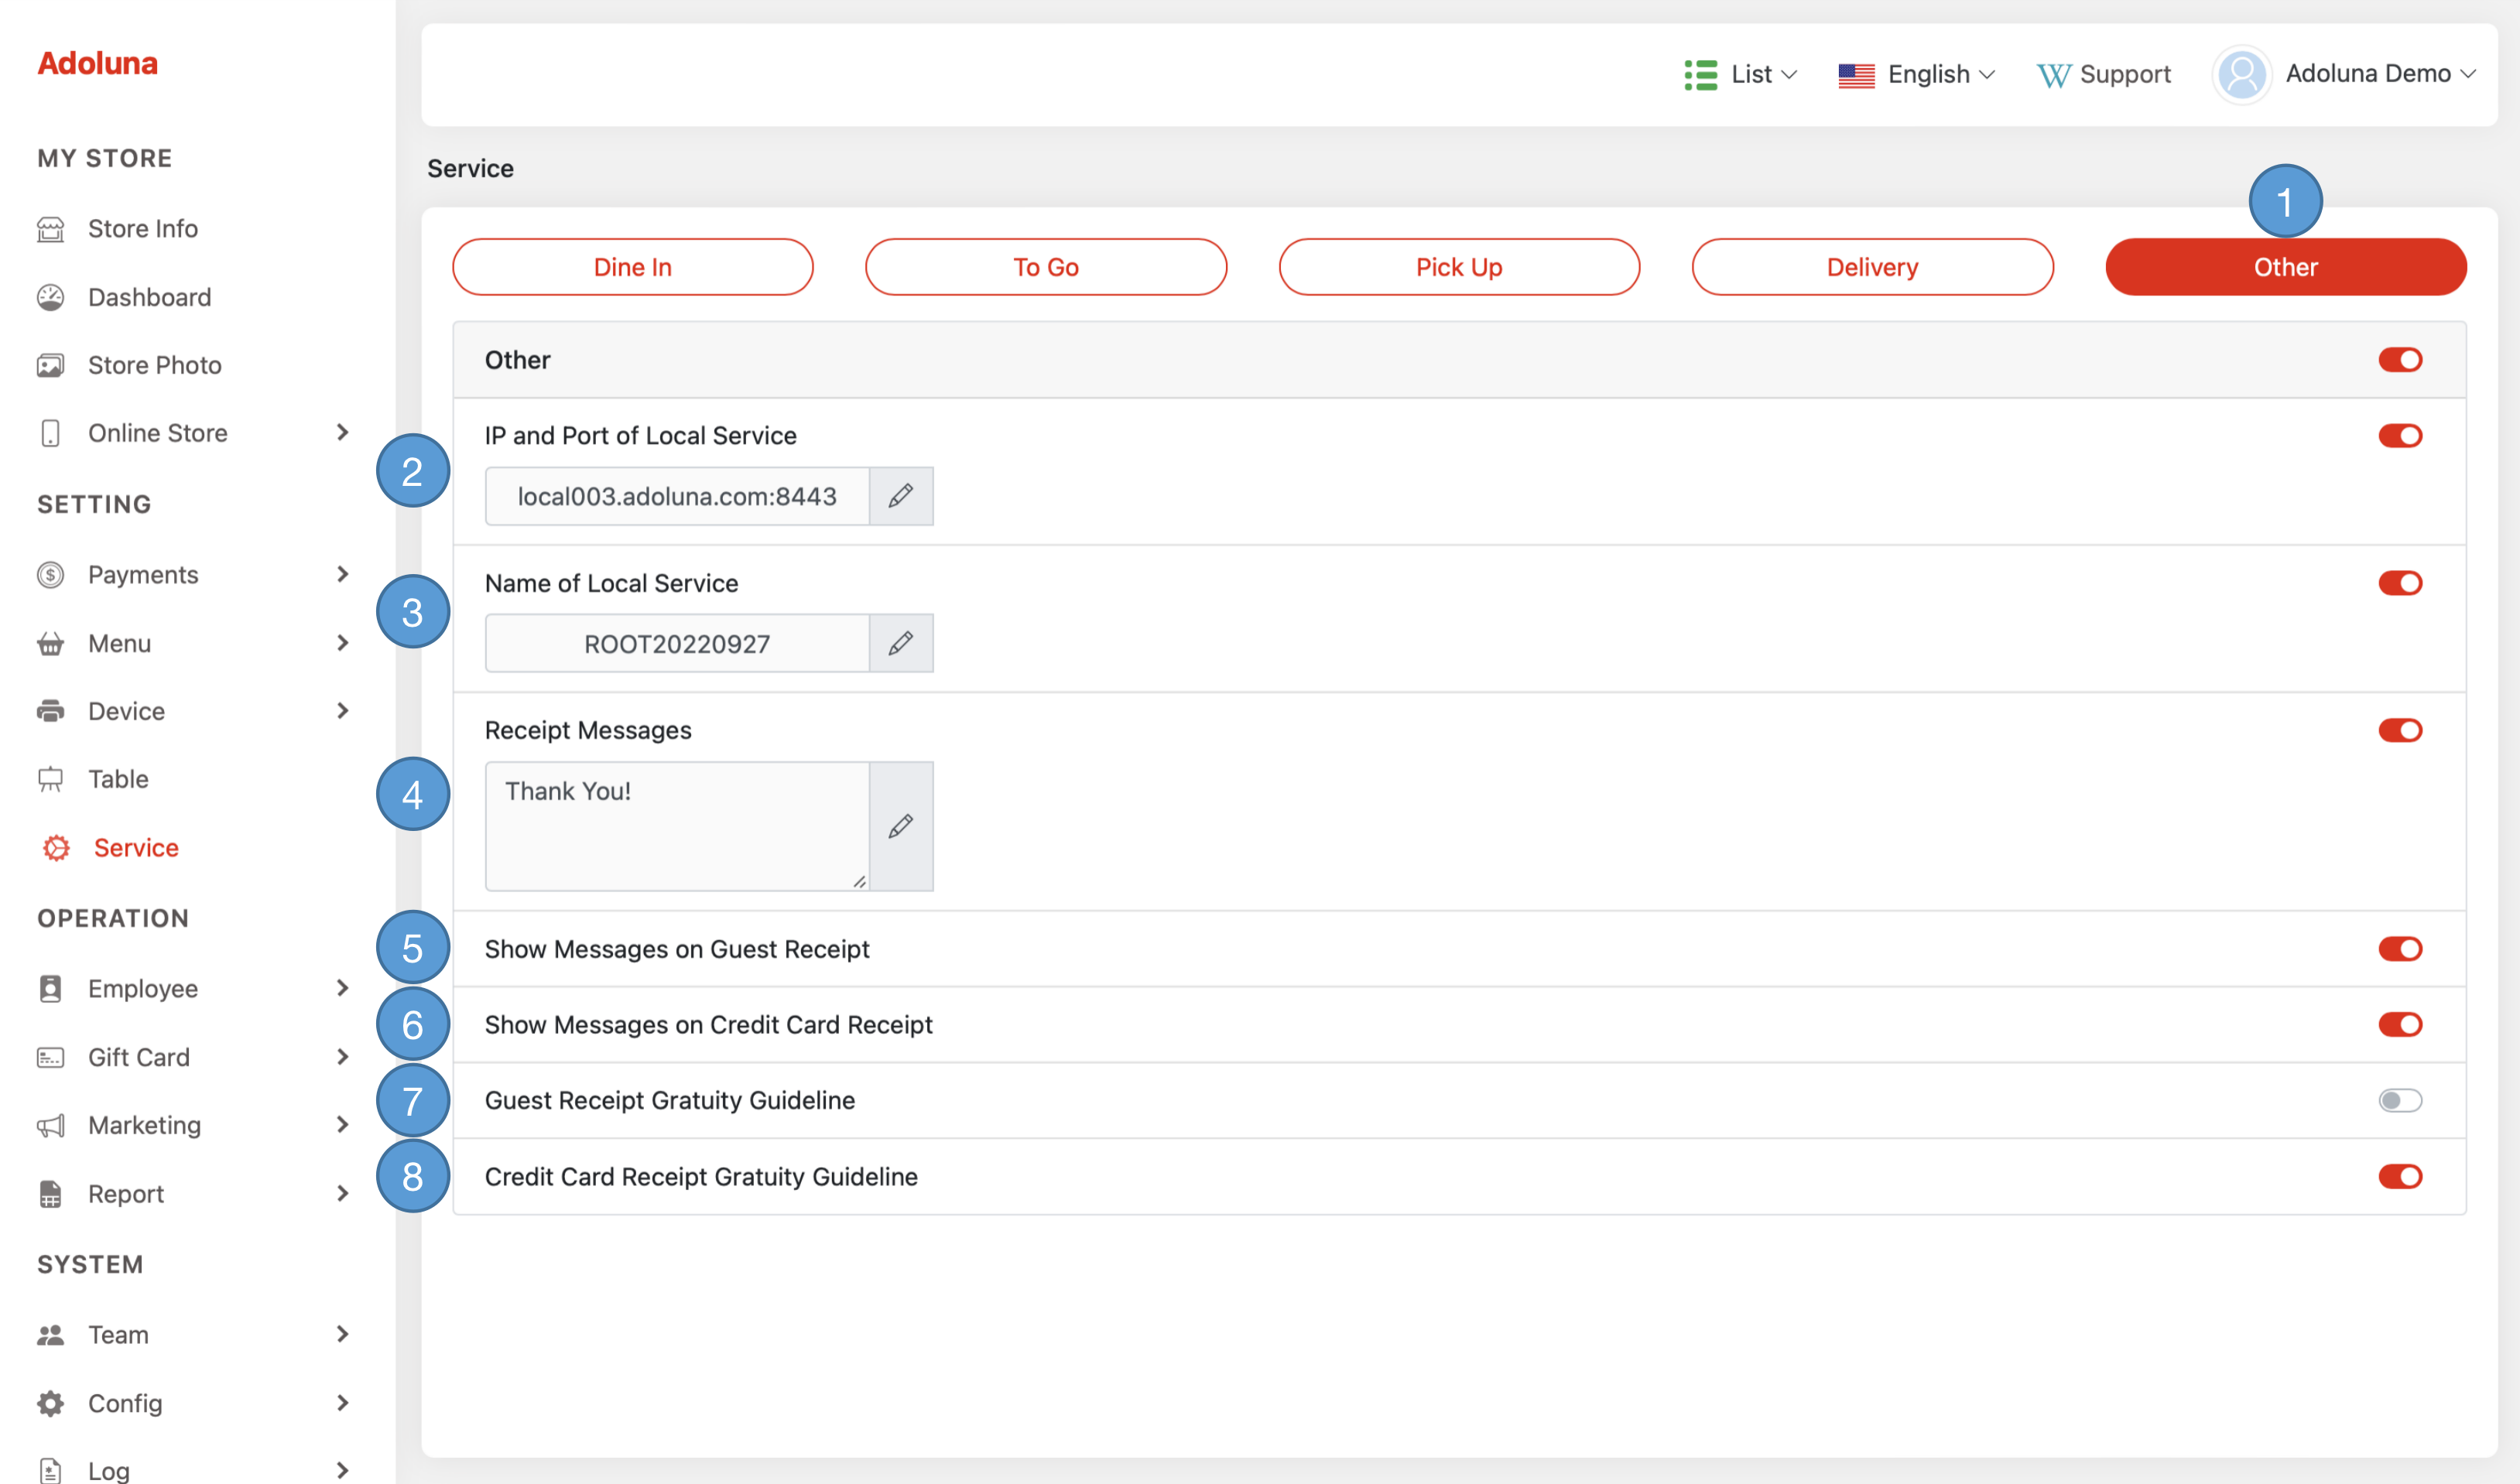
- Tap Other to access and display all other configurations.
- Click the
 icon to set IP Address and Port of Local Service, this parameter is required to enable the customer display feature.
- Please contact Adoluna Support Team for proper parameters.
- Click the
 icon to set Name of Local Service, this parameter is required to enable the customer display feature.
- Please contact Adoluna Support Team for proper parameters.
- Enable or disable the Receipt Message. Click the
 icon to edit the message.
 - Enable or disable the Show Messages on Customer Receipt. When enabled, the message will be printed at the bottom of the customer’s receipt.
- Enable or disable the Show Messages on Credit Card Receipt. When enabled, the message will be printed at the bottom of the credit card’s receipt.
- Enable or disable the Guest Receipt Tip Guideline. When enabled, tip guidelines based on the Tip Setting will be printed at the bottom of the guest’s receipt.
- Enable or disable the Credit Card Receipt Tip Guideline. When enabled, tip guidelines based on the Tip Setting will be printed at the bottom of the credit card’s receipt.
