
Purpose: Add custom payment types (e.g. DoorDash, Uber Eats) for cashiers to use when settling on the POS (see 1.3.4 How to settle with a custom payment type). For: owners, managers.
Before you start: this list shows only custom payment types; cash, credit card and gift card aren’t listed here (see 1.3.1 How to take a cash payment, 1.3.2 How to take a credit card payment, 1.3.3 How to pay with a gift card).
Steps #
1. In the Backoffice left menu, click Payments > ① Payment Type. The list’s columns are Name, Description, Open Draw, Status and Operate; the demo store has DoorDash and Uber Eats. A grey ③ Open Draw means it’s off; a green dot under ④ Status means the type is enabled. Click ② + Add New to add a payment type.

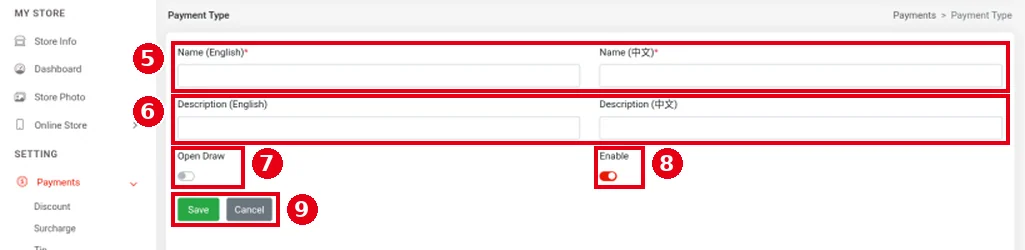
2. Fill in the form:
-
⑤ Name (English), Name (中文): the payment type name (required), shown when settling on the POS.
-
⑥ Description (English), Description (中文): optional descriptions.
-
⑦ Open Draw: according to the website docs, when on, settling with this type opens the cash drawer. Off by default.
-
⑧ Enable: turns the type on.
-
⑨ Click Save to save or Cancel to cancel.
Notes / FAQ #
-
Orders already paid through a third-party platform usually don’t need the cash drawer, so leave Open Draw off for those; turn it on for custom types where you take cash. For cash drawer setup, see 3.3.6 How to set up a cash drawer.
-
To stop using a type without deleting it, turn off Enable.


