
Purpose: Create positions (e.g. Server, Manager, Cashier) and tick which POS actions each one may use. Employees get their permissions from their position. For: owners, managers, Adoluna onboarding staff.
Steps #
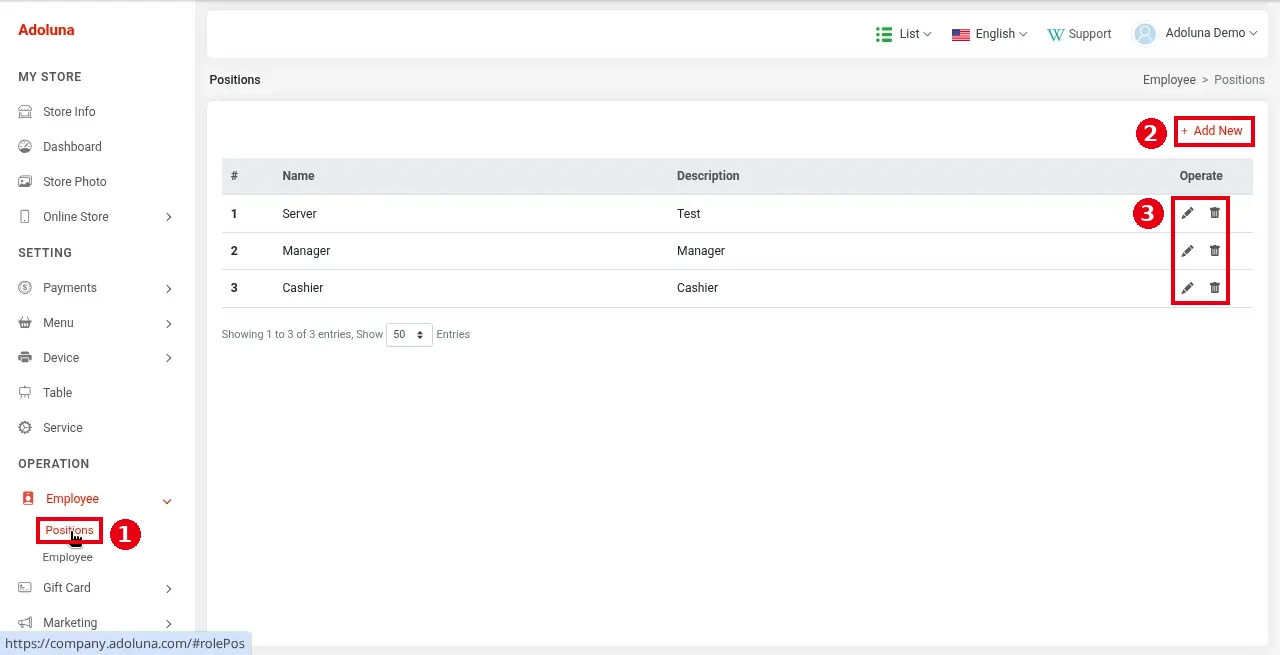
1. In the Backoffice left menu, click Employee > ① Positions. The list’s columns are Name, Description and Operate; the demo store has Server, Manager and Cashier. ③ Operate: the pencil edits, the bin deletes. Click ② + Add New to add a position.
2. Fill in the form:
-
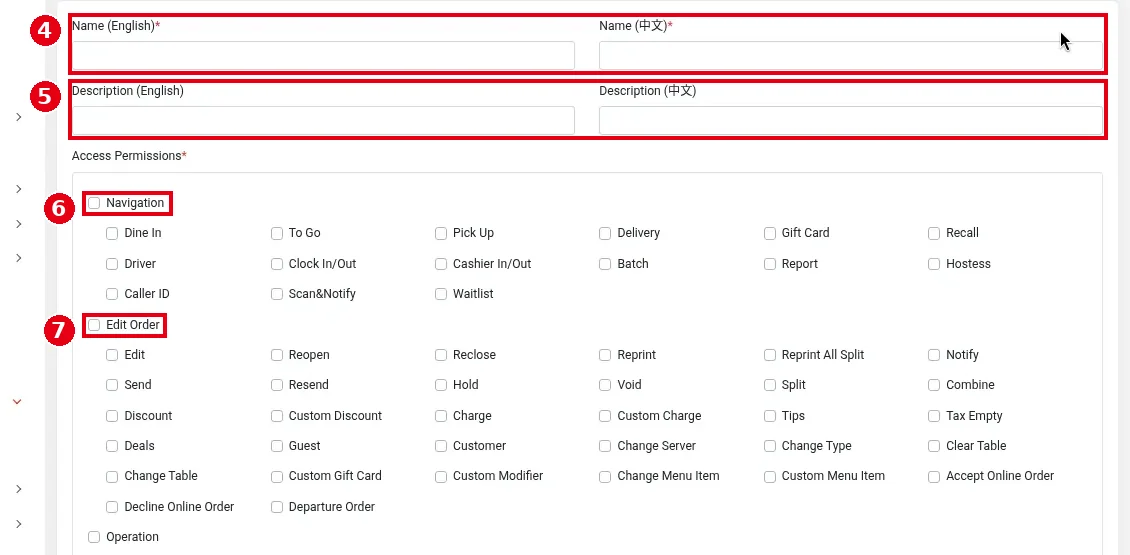
④ Name (English)*, Name (中文)*: the position name.
-
⑤ Description (English), Description (中文): optional.
-
Access Permissions*: tick the features this position may use (at least one). Permissions are in 6 groups, each with a group checkbox in front, e.g. ⑥ Navigation and ⑦ Edit Order.
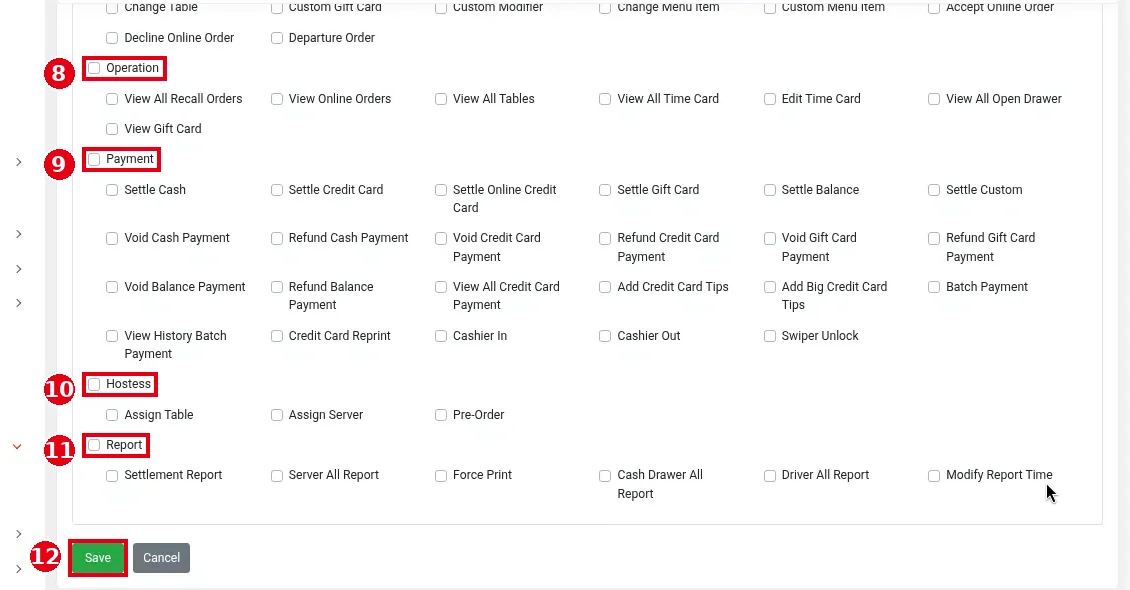
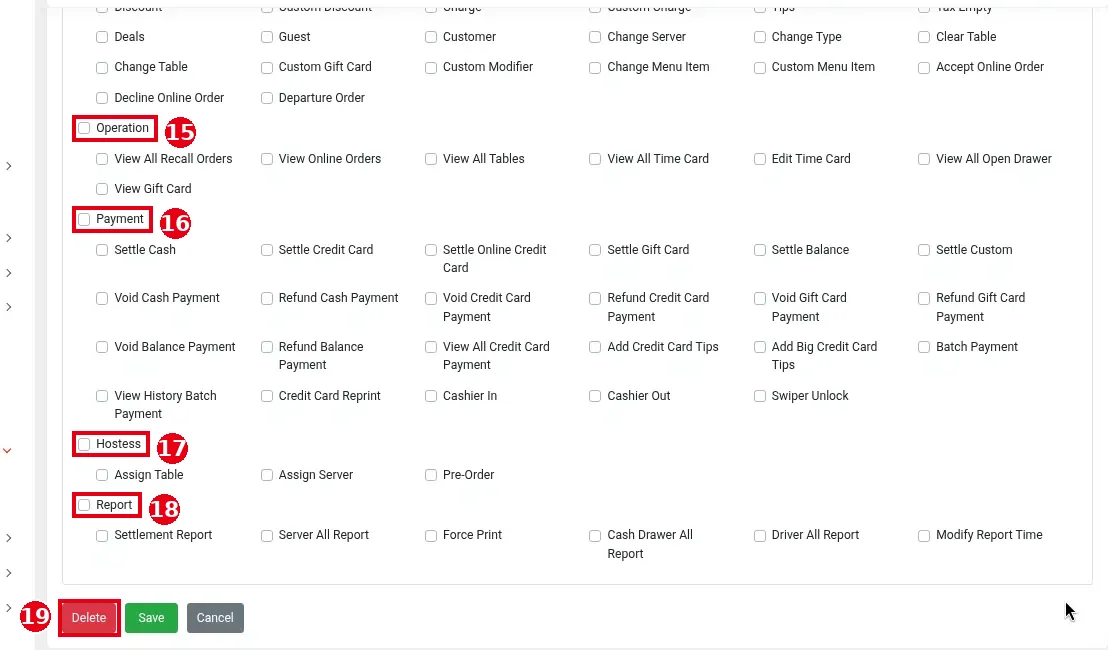
3. Scroll down for four more groups: ⑧ Operation, ⑨ Payment, ⑩ Hostess and ⑪ Report. When done, click ⑫ Save (or Cancel).
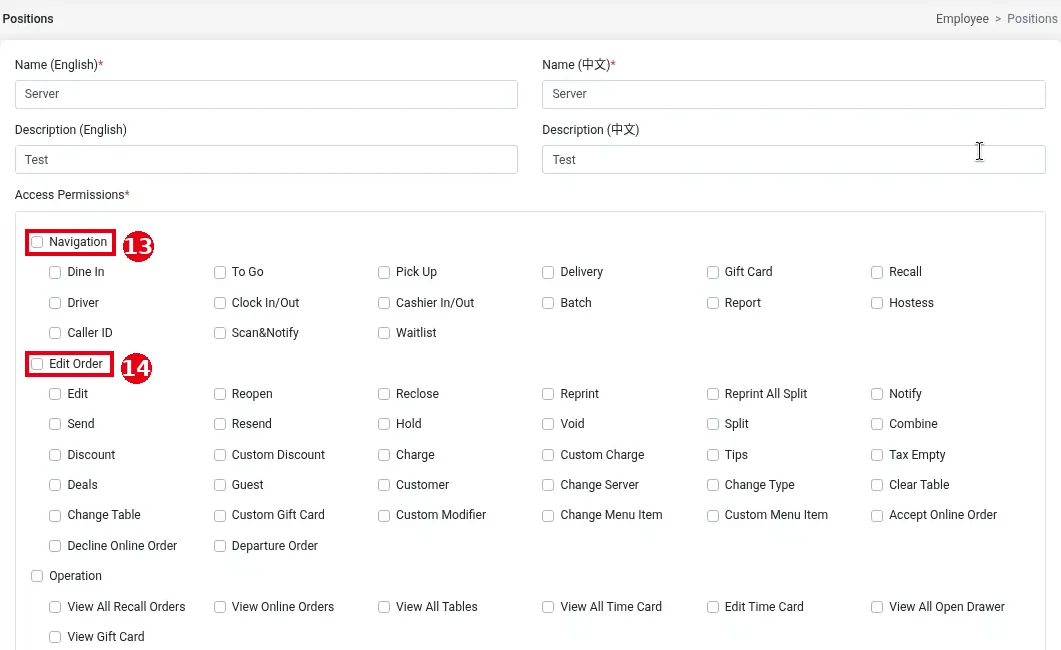
Permission list (notes in brackets). The two pictures below show the demo store’s Server position edit page; ⑬–⑱ are the six groups:
-
⑬ Navigation (the POS home screen buttons, see 1.1.2 How to find your way around the POS home screen): Dine In, To Go, Pick Up, Delivery, Gift Card, Recall, Driver, Clock In/Out, Cashier In/Out (cash drawer check-in and check-out), Batch, Report, Hostess (tables and host stand), Caller ID, Scan&Notify, Waitlist.
-
⑭ Edit Order: Edit, Reopen (reopen a settled order), Reclose, Reprint, Reprint All Split, Notify, Send, Resend, Hold, Void, Split, Combine, Discount, Custom Discount, Charge (surcharge), Custom Charge, Tips, Tax Empty (as spelled on the page; presumably tax exempt), Deals, Guest (guest count), Customer, Change Server, Change Type (order type), Clear Table, Change Table, Custom Gift Card, Custom Modifier, Change Menu Item, Custom Menu Item (open item), Accept Online Order, Decline Online Order, Departure Order.
-
⑮ Operation (what staff can see): View All Recall Orders (everyone’s orders), View Online Orders, View All Tables, View All Time Card (everyone’s time cards), Edit Time Card (see 2.8.5 How to edit or add time card records), View All Open Drawer, View Gift Card.
-
⑯ Payment (settle, void, refund, batch): Settle Cash, Settle Credit Card, Settle Online Credit Card, Settle Gift Card, Settle Balance, Settle Custom (custom payment types), Void Cash Payment, Refund Cash Payment, Void Credit Card Payment, Refund Credit Card Payment, Void Gift Card Payment, Refund Gift Card Payment, Void Balance Payment, Refund Balance Payment, View All Credit Card Payment, Add Credit Card Tips, Add Big Credit Card Tips, Batch Payment, View History Batch Payment, Credit Card Reprint, Cashier In, Cashier Out, Swiper Unlock.
-
⑰ Hostess: Assign Table, Assign Server, Pre-Order.
-
⑱ Report: Settlement Report, Server All Report (all servers’ reports), Force Print, Cash Drawer All Report, Driver All Report, Modify Report Time (change the report time range).
What some of the permissions mean:
-
Tax Empty: clear the tax on an order (tax exempt).
-
Deals: apply promotions or discounts to an order.
-
Notify: send the customer a pickup notice through Scan & Notify.
-
Reclose: reopen a closed (paid) order to view its details, then close it again.
-
Departure Order: assign a driver to a delivery order and mark it departed.
-
Settle Balance / Balance Payment: pay with the customer’s member account balance (in the member system customers can top up money; the payment type is called Balance).
-
Add Big Credit Card Tips: needed to add a credit card tip above a set percentage.
-
Swiper Unlock: unlock the card reader when it’s busy or stuck.
-
Pre-Order: lets the host place a first order (e.g. drinks) for the server when seating the customer.
-
Force Print: a server report can normally be printed only after all of that server’s orders are paid; Force Print bypasses this.
Notes / FAQ #
-
Keep void, refund, batch, time card editing and report time permissions for managers. When staff without a permission try the action, a manager enters their passcode to approve (see 1.2.7 How to change an item’s quantity, price, discount or charge, 1.2.10 How to add an order-level discount, charge or tip).
-
To edit an existing position, click its pencil in the list. The same form opens (see the two pictures in the permission list above); click Save when done. The edit form also has ⑲ Delete at the bottom to delete the position.
-
Changing a position’s permissions doesn’t change employees who already have that position: each employee keeps their own copy of the permissions, so the change only applies to employees added to the position later. To change an existing employee, edit that employee’s Access Permissions (see 2.8.2 How to add an employee and set their passcode).
-
If an employee can’t see a feature, see 4.5.2 Why can’t an employee see a feature or report?.


