
Purpose: Start a table for All You Can Eat (buffet) guests: the server opens a dine-in order on the POS, chooses the buffet menu and saves, and then the guests can keep ordering on the tableside Kiosk or by scanning with their own phones. For: servers, managers.
Before you start:
-
Set up a buffet menu in the Backoffice first (see 2.3.13 How to set up an All You Can Eat (buffet) menu). The buffet time limit and the interval between orders are set under Service > Dine In (see 2.6.3 How to set buffet time limits and ordering intervals).
-
A separate buffet menu isn’t required; the normal menu works too: each item can carry several prices, one set per service type (see 2.3.1 How to set up price tables, 2.3.5 How to add menu items). With the normal menu there are two ways to start the table: the server opens it (the steps below), or guests pay first and then scan the receipt QR code to open it (see 1.8.4 How to open a table on the Kiosk by scanning a receipt QR code). Either way, the order type is Dine In.
-
Guests can keep ordering in three ways: the tableside Kiosk (mode 2, Fixed Table, or mode 3, Server-Assigned Table; see 1.8.3 How to open a table on the Kiosk for guests (server mode)); Scan to Order’s Buffet Mode, where guests scan the table’s QR code with their own phone (see 2.6.2 How to set up Scan to Order); or scanning the receipt QR code at the store’s Kiosk (mode 4, which currently needs a barcode scanner and will later change to the device camera; see 1.8.4 How to open a table on the Kiosk by scanning a receipt QR code).
Steps #
1. On the home screen tap Dine In, choose the area and tap a free table to open the order screen (see steps 1–3 of 1.2.1 How to start a dine-in order). You can tap the guest count at the top (e.g. 0P) to enter the party size (see steps 4–6 of 1.2.1 How to start a dine-in order).
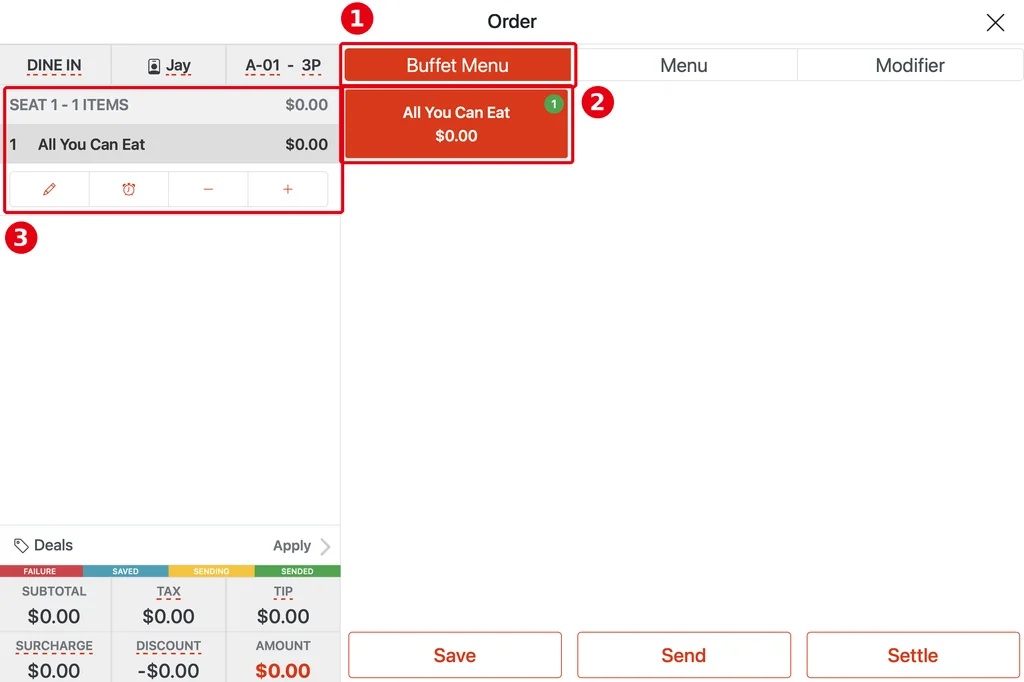
2. On the right of the order screen tap the ① Buffet Menu tab (the tabs on the right are Buffet Menu, Menu and Modifier; see 1.2.1 How to start a dine-in order). It lists the buffet menus that are enabled in the Backoffice and within their schedule right now. Each button uses the Display Color set in the Backoffice and shows the price (see 2.3.13 How to set up an All You Can Eat (buffet) menu).
3. Tap ② the buffet menu for this table (e.g. All You Can Eat) to add it to the order; ③ it shows as a line in the order on the left. The buffet price is per guest.
-
Once a buffet menu is chosen, the items included in that buffet are charged at the prices set in the buffet menu; items outside the buffet (e.g. drinks) are charged at the normal price for the order type.
-
An order can use only one buffet menu. Tapping a different buffet menu shows Different buffet menus are not allowed in the same order.
-
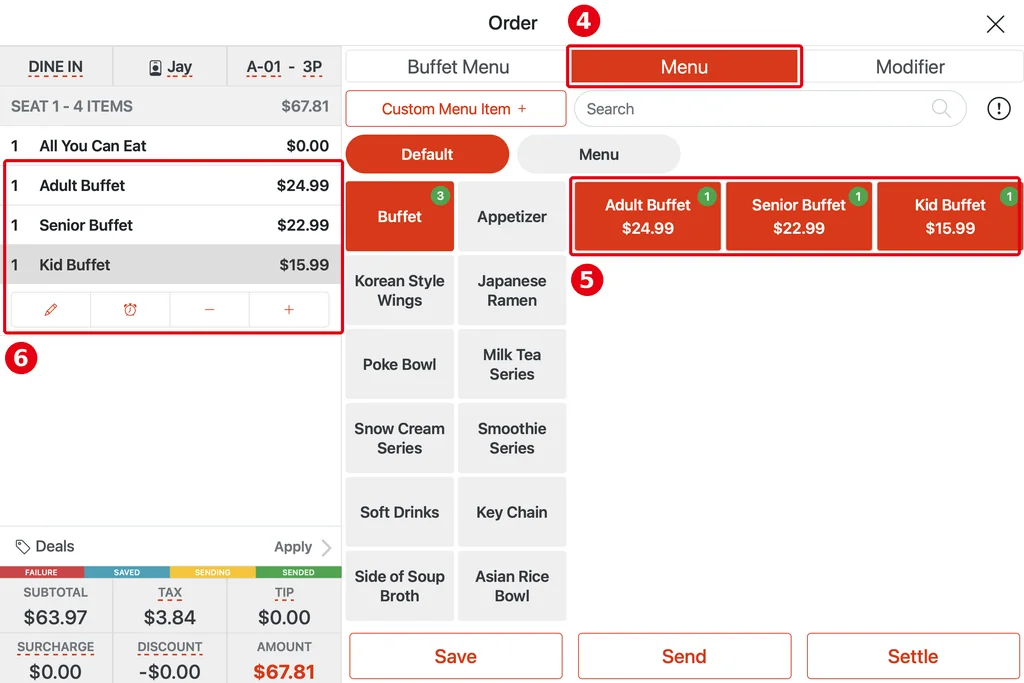
Charging per guest: you can tap the buffet menu once per guest (quantity = number of guests), but this isn’t recommended: an order can use only one buffet menu, so it can’t handle different prices for seniors or children. Instead, give the buffet menu no price and create a few normal items, e.g. “Adult”, “Senior” and “Child”, then add them per guest after opening the table (see 2.3.5 How to add menu items, 2.3.13 How to set up an All You Can Eat (buffet) menu).
In the example below, the buffet menu All You Can Eat is priced $0.00. Under the ④ Menu tab, in the Buffet category, ⑤ Adult Buffet ($24.99), Senior Buffet ($22.99) and Kid Buffet ($15.99) are added per guest, and ⑥ these items in the order carry the charge.
4. If needed, order the first round for the guests, then tap Save (tap Send to also send it to the kitchen; see 1.2.12 How to save, send and settle an order). Back on the Table page, the table turns green (see 1.7.1 How to check table status and mark tables clean).
5. After the order is saved, the guests can keep ordering themselves:
-
Tableside Kiosk, mode 2: after saving, the Kiosk assigned to this table activates and shows the menu (see 1.8.3 How to open a table on the Kiosk for guests (server mode)).
-
Tableside Kiosk, mode 3: the server enters their own employee passcode on the Kiosk and chooses this table (see 1.8.3 How to open a table on the Kiosk for guests (server mode)). The server can also choose the buffet menu for the guests on the Kiosk; after the first order is submitted, the Kiosk switches to that buffet’s menu, and from then on guests can only order the items included in it.
-
Scan to Order Buffet Mode: guests scan the table’s QR code with their own phone and go straight into buffet ordering (see 2.6.2 How to set up Scan to Order).
On the Kiosk and on guests’ phones, only the items included in the chosen buffet are shown.
Notes / FAQ #
-
Ordering interval: sends to the kitchen must be at least Buffet Ordering Interval (minutes) apart. During the interval guests can still add items, but the send button is grey with a countdown next to it. The interval doesn’t limit servers adding items on the POS (see 2.6.3 How to set buffet time limits and ordering intervals).
-
Time limit: timing starts when the table is opened. Once time is up, guests can still add items on the Kiosk but can’t send them to the kitchen; the server can add items on the POS if needed (see 2.6.3 How to set buffet time limits and ordering intervals).
-
Item limits: the buffet menu can set an order limit for each item (see step 3 of 2.3.13 How to set up an All You Can Eat (buffet) menu); going over it shows Exceeds order limit. The limit adds up per guest: e.g. a limit of 2 with 4 guests allows 8 in total.
-
Outside the buffet menu’s schedule the POS doesn’t show that buffet menu; a Kiosk table that’s already open and still within its time limit can keep ordering from it (see 2.3.13 How to set up an All You Can Eat (buffet) menu).
-
To settle, see 1.8.6 How to settle an All You Can Eat (buffet) table: the server settles on the POS, or guests pay on the tableside Kiosk.


