
Purpose: Create a spend-based discount (money off or a percentage off once the order reaches an amount), a menu item special price or a second-item discount, and check how it performs. For: owners, managers.
Before you start:
-
In the official docs, promotions are for the Kiosk and online ordering. In the current version Platform also has a POS option. With POS ticked and the promotion started, it applies automatically to qualifying POS orders; staff don’t need to choose it (see step 5).
-
Each order can use only one promotion or coupon (official release notes).
-
Discounts that staff apply by hand on the POS are a separate setting; see 2.4.1 How to set up discounts.
Steps #
1. In the Backoffice left menu click ① Marketing > Promotion. ② filters by platform (All Platforms), promotion type (All Promotions) and status (All Status). List ④ has the columns #, Platform, Event Name, Begin Time, End Time, Status (e.g. EXPIRED) and Operate. The ⑤ bin icon deletes a promotion.
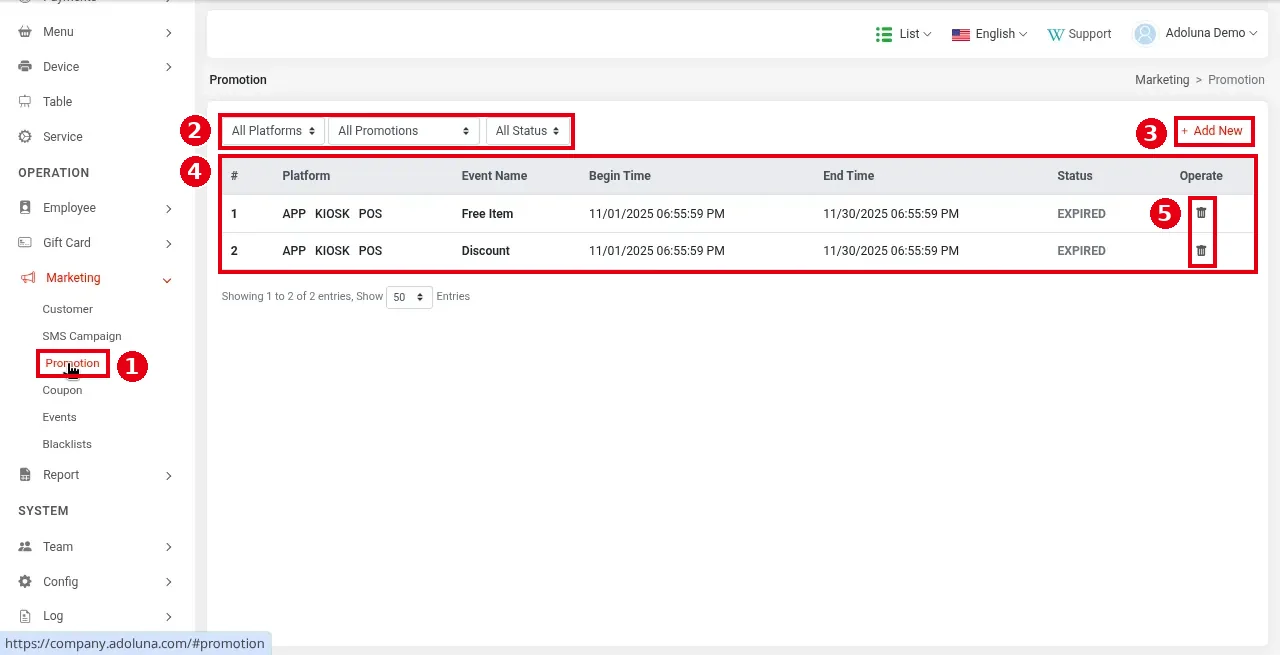
2. Click ③ + Add New and fill in:
-
⑥ Platform*: where the promotion applies; tick any of APP (online store), KIOSK and POS.
-
⑦ Event Name (English)* and Event Name (中文)*: the promotion name (both are required).
-
⑧ Description (English) and Description (中文).
-
⑨ Begin Time* and End Time*.
-
⑩ Promotion Scheme Type*: the promotion type. There are three: Discount Promotion (spend-based discount, the default), Menu Item Promotion (special price on an item) and Second Item Discount. One promotion can have several rules (two were added in testing, not saved).
-
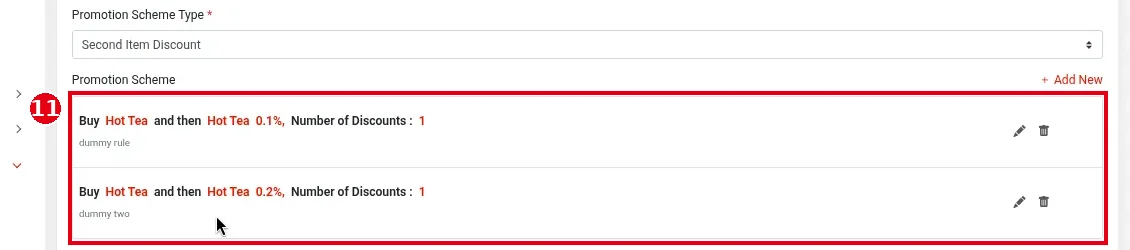
⑪ + Add New next to Promotion Scheme: add a rule (see step 3).
-
⑫ Schedule: which days and times the promotion shows.
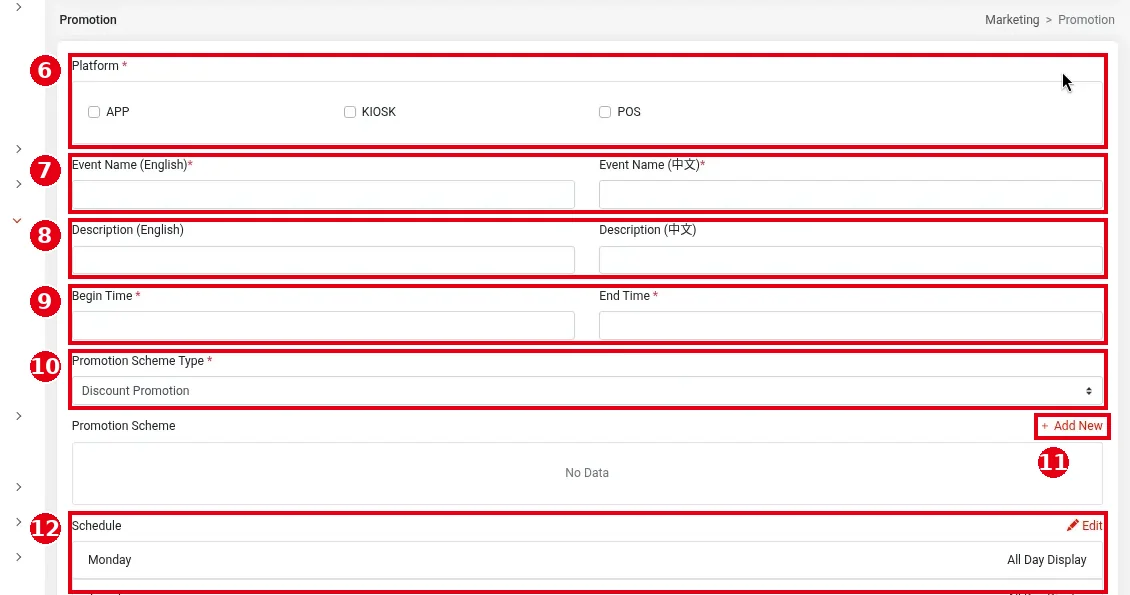
3. Click ⑪ + Add New to add a rule. The dialog depends on the ⑩ promotion type:

-
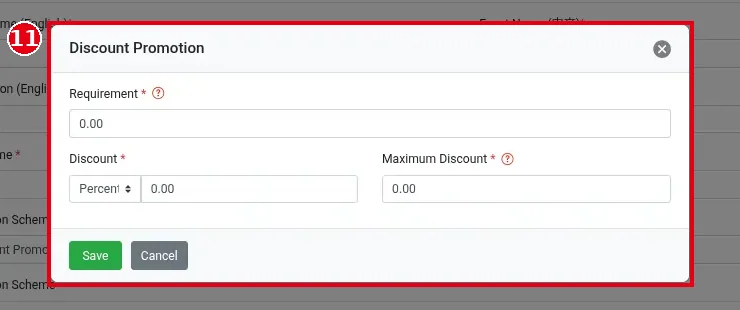
Discount Promotion: Requirement* is the order amount needed; under Discount* choose the type (Percent in the screenshot; the official docs also have Cash for money off) and enter the value; Maximum Discount* is the most it can take off; click Save.
-
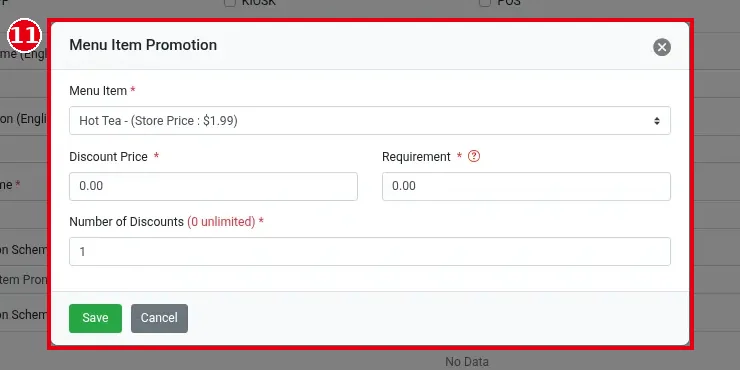
Menu Item Promotion: choose the item in Menu Item* (each item in the list shows its Store Price); Discount Price* is the special price; Requirement* is the order amount needed; Number of Discounts* is how many can be discounted (0 for no limit); click Save.
-
Second Item Discount: an added rule reads like Buy Hot Tea and then Hot Tea 0.1%, Number of Discounts : 1, with its description below. Each rule has a pencil (edit) and a bin (delete) icon on the right. The two rules in the picture below were added temporarily in testing and not saved.
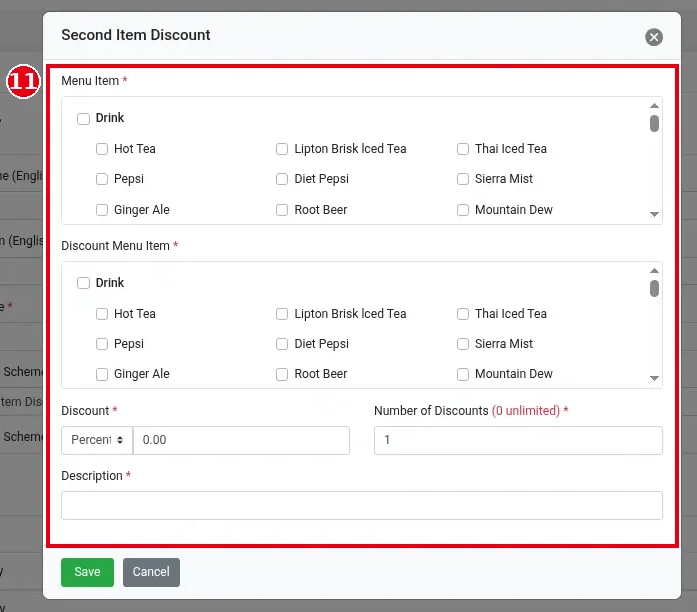
The + Add New dialog for Second Item Discount: under Menu Item* tick the item to buy first; under Discount Menu Item* tick the discounted second item; under Discount* choose the discount type (Percent in the screenshot) and enter the value; in Number of Discounts (0 unlimited)* enter how many can be discounted (0 means no limit); fill in Description*; then click Save.
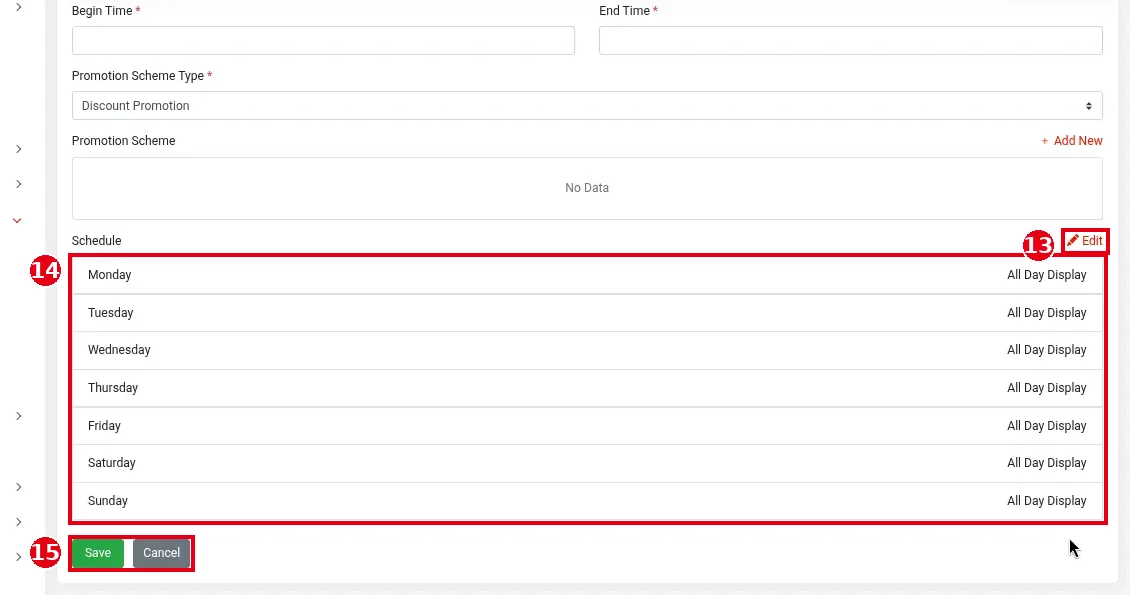
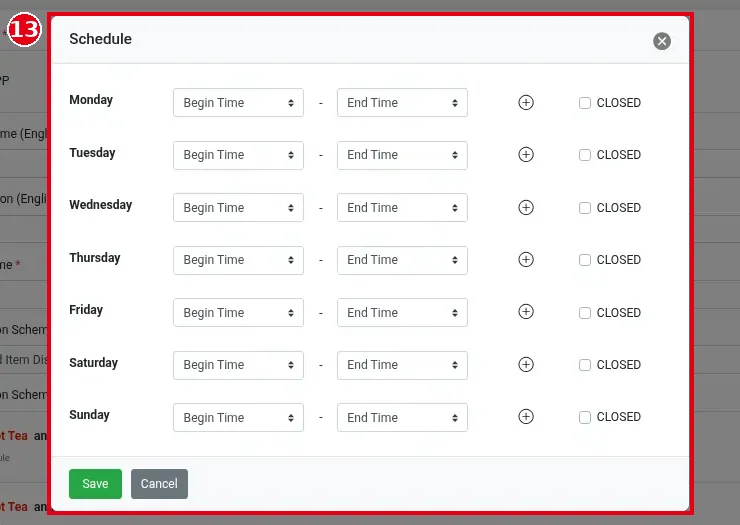
4. Set the display times: ⑭ every day from Monday to Sunday is All Day Display by default. To show it only at certain times, click ⑬ Edit: the dialog has a row for each day with Begin Time, End Time, a ⊕ icon and a CLOSED checkbox; click Save when done. Then click ⑮ Save to save the promotion (or Cancel).
5. Start the promotion: after you save a new promotion, it shows as ㉑ STOPPED in the list and doesn’t apply, even after its Begin Time. Click the ㉒ green icon (start) in the Operate column; it only applies once the status changes to LIVE. A running promotion can be stopped from the Operate column (a confirmation appears first); to remove one you no longer need, click the bin (also with a confirmation).

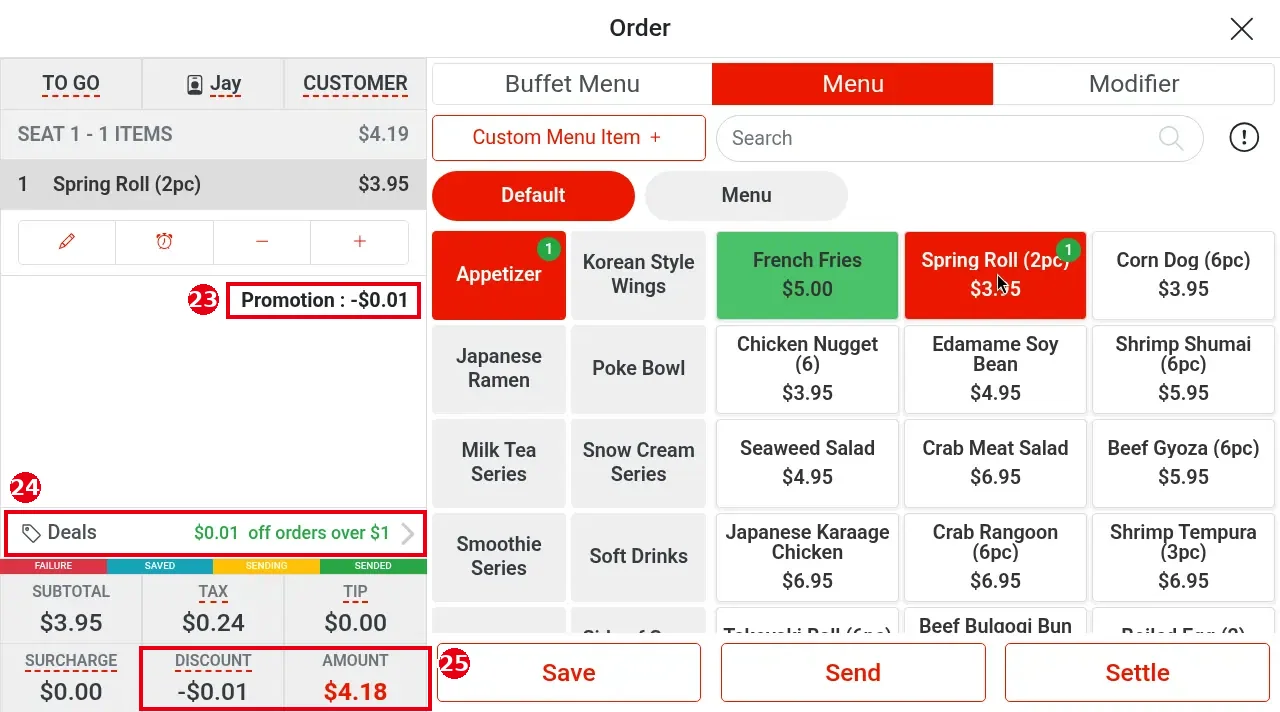
Once started, the promotion applies automatically to qualifying POS orders. The picture below shows a POS-only test promotion ($0.01 off orders over $1): ㉓ the order shows Promotion : -$0.01, ㉔ Deals shows the rule, and ㉕ DISCOUNT and AMOUNT update to match. On the demo, both test orders P0003 and P0004 got the $0.01 off automatically and came to $4.18. The test promotion was then stopped and deleted.
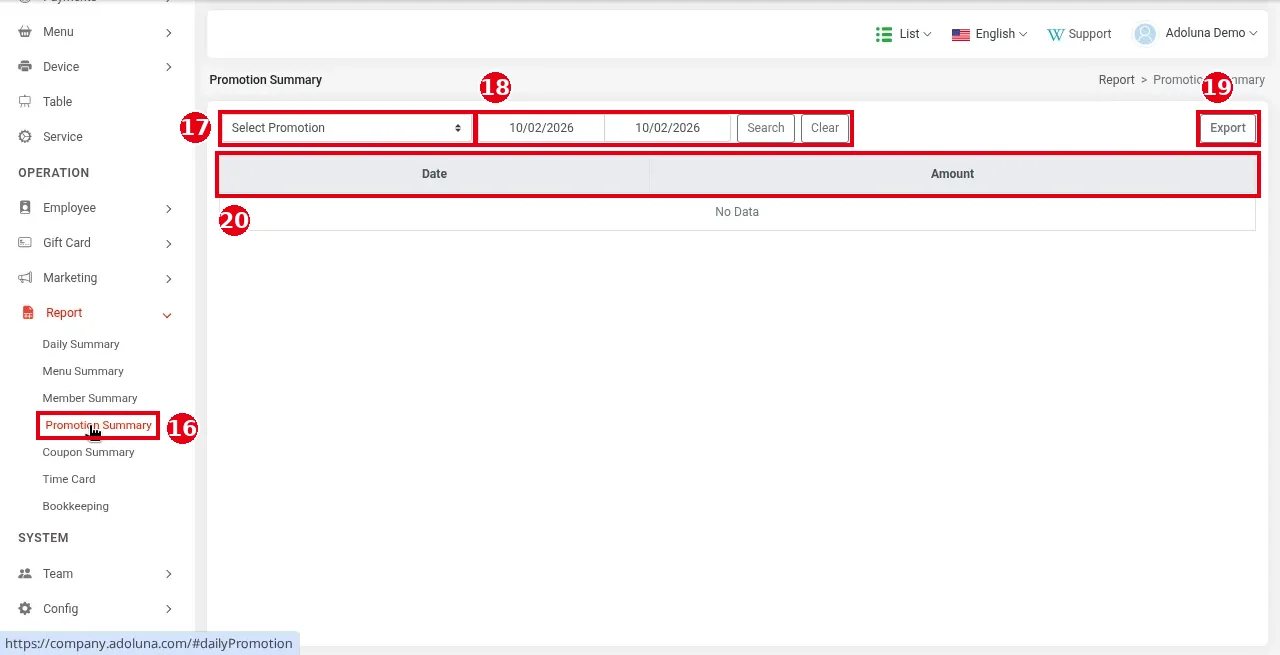
6. Check the results: in the left menu click ⑯ Report > Promotion Summary, choose the promotion in ⑰ (Select Promotion), choose the date range in ⑱ and click Search (Clear resets), and ⑲ Export to export. The columns ⑳ are Date and Amount. Amount is the dollar amount discounted by the promotion.
Notes / FAQ #
-
On the demo Backoffice, expired (EXPIRED) promotions only have a delete icon. To run one again, create a new promotion.
-
Guests see the promotion name and description, so write both the English and Chinese clearly.
-
For coupons, see 2.12.3 How to create a coupon.


