
Purpose: Set up a Clover Go 3 (Bluetooth) or VP3350 (USB) card reader. Guests swipe, insert or tap on the reader and choose tip and sign on the customer display or the POS. For: Adoluna onboarding staff. Hardware: a Clover Go 3 or VP3350 reader; a customer display is optional (see Before you start).
Before you start: the system supports two card readers. Both are set up as the BOLT type in the Backoffice. They have no screen of their own. Where tip and signature show depends on whether this POS is bound to a customer display: if it is, they show on the customer display, so set up the customer display first (see 3.5.1 How to set up the customer display); if no customer display is bound, they show directly on the POS screen (see 1.3.2 How to take a credit card payment). They keep working when the Local Server is offline.
– Clover Go 3: connects by Bluetooth. Works on Android and on iOS (iPhone / iPad).
– VP3350 (supported since 2026-06-28): plugs into the POS device by USB cable only, so it works only on Android devices with a USB port, not on iPhone / iPad.
– The older VP3300 is still available for purchase, but not recommended (legacy). Some Mastercard / Discover failures on it can’t be fixed; for new installs use a Clover Go 3 or VP3350 (see 4.1.2 What to do when the card terminal doesn’t respond).
Latest Adoluna App needed: the Clover Go 3 works on Android and iOS (iPhone / iPad); the VP3350 works on Android only. To take payments with either reader you need the latest Adoluna App from the app store. The new version is waiting for app store approval and is coming soon; we’ll let you know when it’s available (2026-10-05).
Steps #
1. Connect the reader: plug the VP3350 into the POS device with the USB cable. The Clover Go 3 connects by Bluetooth and is paired inside Adoluna POS (see steps 4 and 5), not in the system Bluetooth settings.
2. In the Backoffice, go to Device > Terminal, click + Add New (see step 1 of 3.4.1 How to add a PAX terminal) and fill in:
-
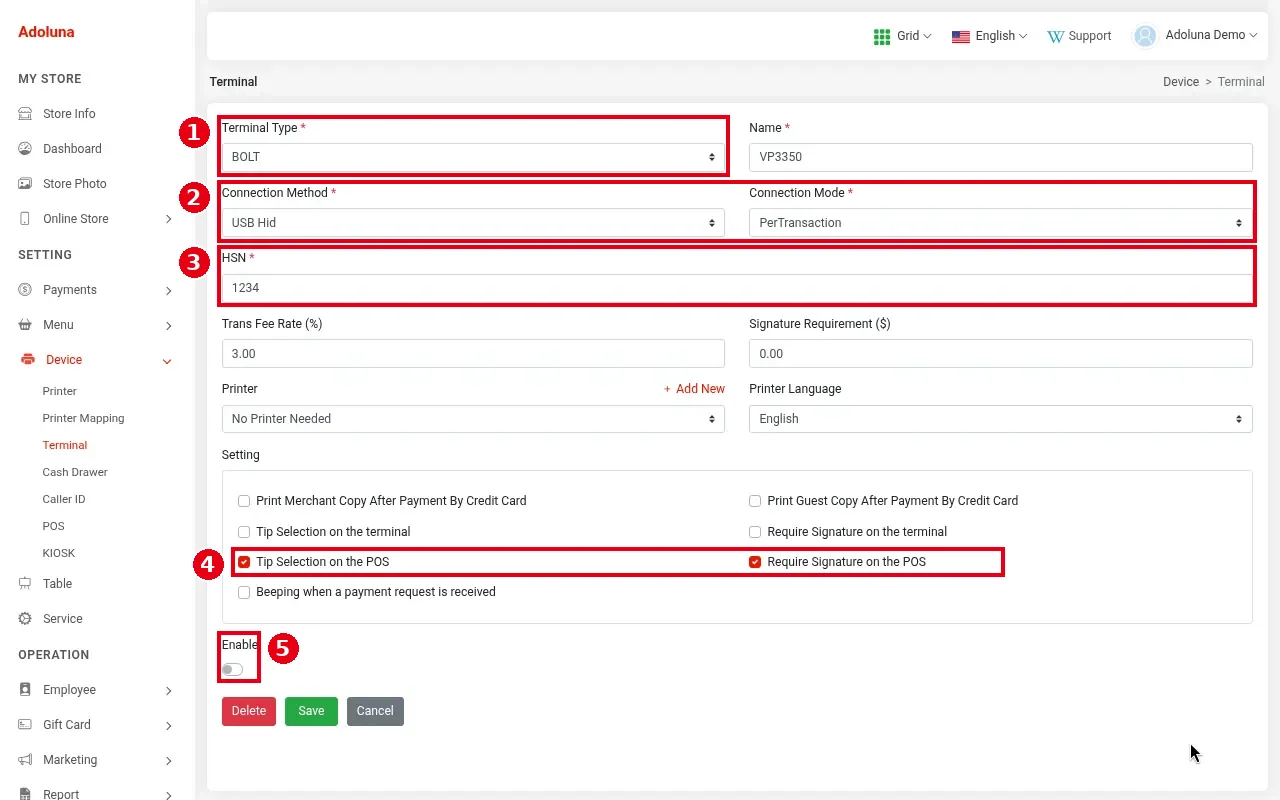
① Terminal Type: BOLT; Name: e.g. “Clover Go 3” or “VP3350”.
-
② Connection Method: USB Hid for the VP3350, Bluetooth for the Clover Go 3. Connection Mode only matters for Bluetooth readers: Persistent keeps the Bluetooth connection after a successful payment; PerTransaction disconnects after each payment to save power. PerTransaction in the screenshot.
-
③ HSN (required): a note / label only, to help tell readers apart in the list (it shows in the terminal list on the POS edit page, see step 3). It doesn’t affect connecting or pairing. You can enter the reader’s serial number for reference; a wrong value doesn’t stop the reader from working. Note: HSN is only a note for card readers like the Clover Go 3 / VP3350; for networked Bolt terminals such as the Clover Flex, HSN must be the correct device serial number (see 3.4.2 How to set up a Bolt terminal).
-
Printer: No Printer Needed in the screenshot. If no printer is linked to the reader, the POS opens a Print window after a successful payment so you can choose a printer (see 1.3.2 How to take a credit card payment).
-
④ Setting: tick Tip Selection on the POS and Require Signature on the POS so the POS handles tip and signature: they show on the customer display if one is bound to this POS, otherwise directly on the POS screen (see 1.3.2 How to take a credit card payment).
-
⑤ Enable: the on/off switch. It’s off for the VP3350 in the screenshot and the reader still works: the switch currently has no effect (see 3.4.2 How to set up a Bolt terminal).
Click Save.
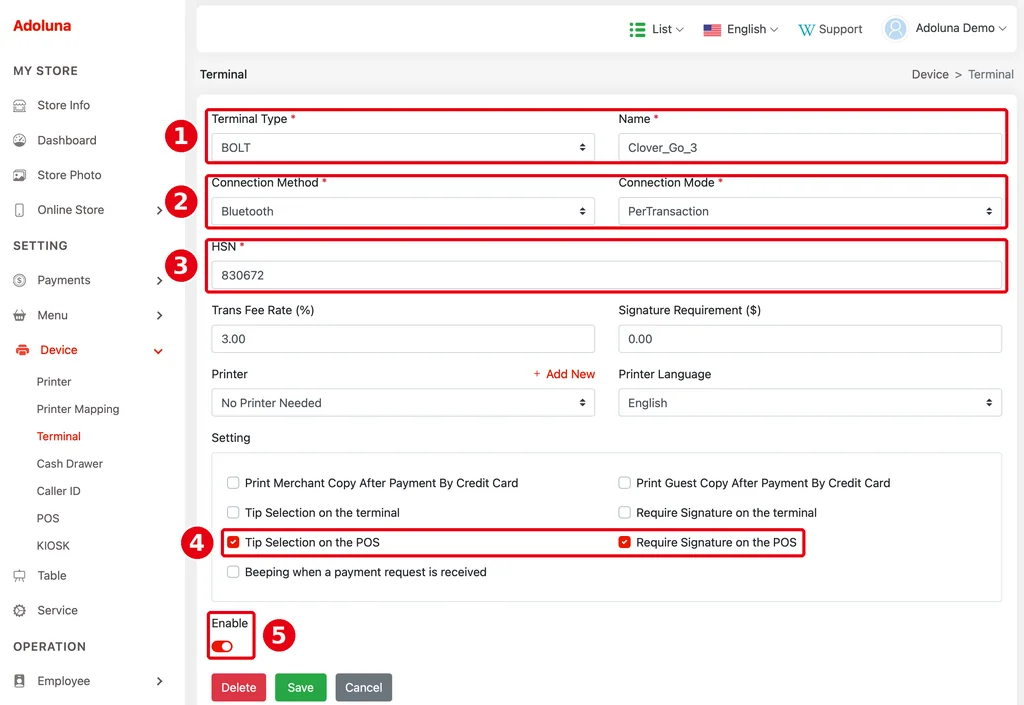
The Clover Go 3 setup is shown below (same numbers as above): ① Terminal Type BOLT, Name Clover_Go_3 (this name shows on the button in the POS payment window, see 1.3.2 How to take a credit card payment); ② Connection Method Bluetooth, Connection Mode PerTransaction; ③ HSN: a note (830672 in the screenshot); ④ Tip Selection on the POS and Require Signature on the POS ticked; ⑤ Enable on. Click Save.
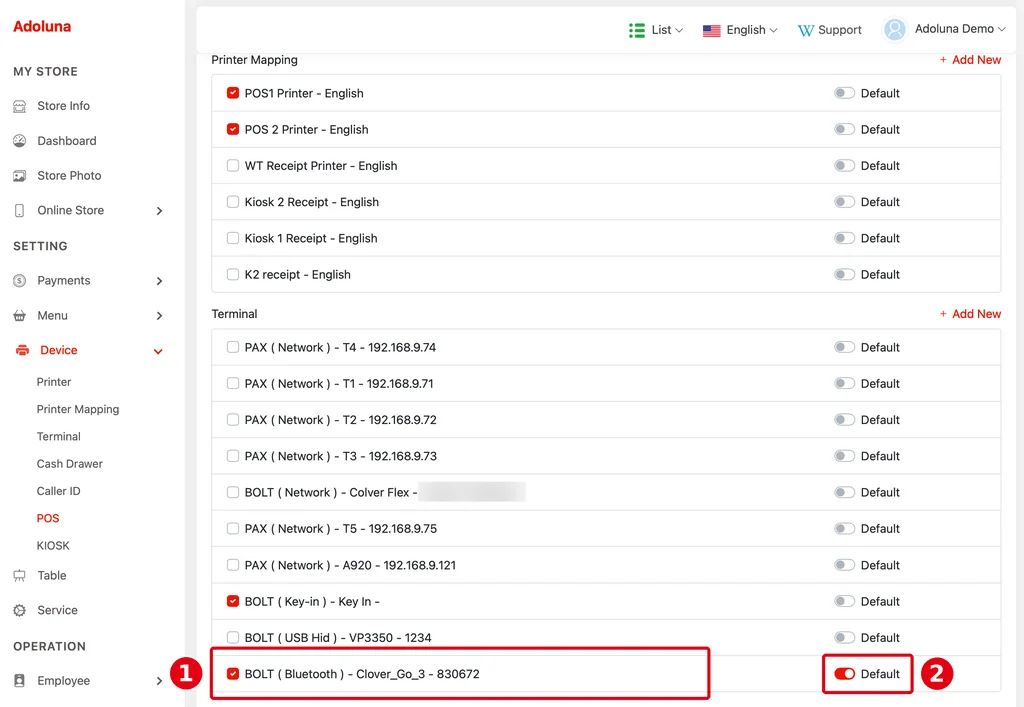
3. On this POS’s edit page (Backoffice Device > POS), scroll to Terminal: ① tick the reader, ② turn on Default, then save (see 3.2.2 How to create POS and Kiosk devices in the Backoffice). In the list a Clover Go 3 shows as BOLT ( Bluetooth ) – name – HSN (e.g. BOLT ( Bluetooth ) – Clover_Go_3 – 830672; the last part is the HSN entered in the Backoffice, only for telling readers apart); a VP3350 shows as BOLT ( USB Hid ).
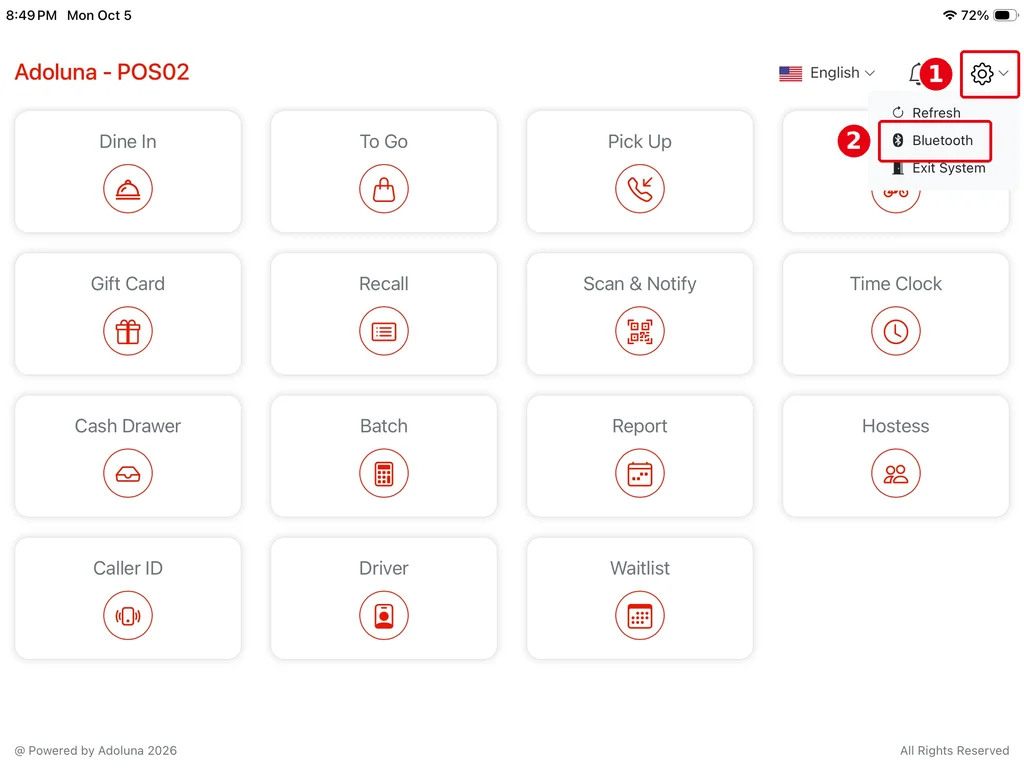
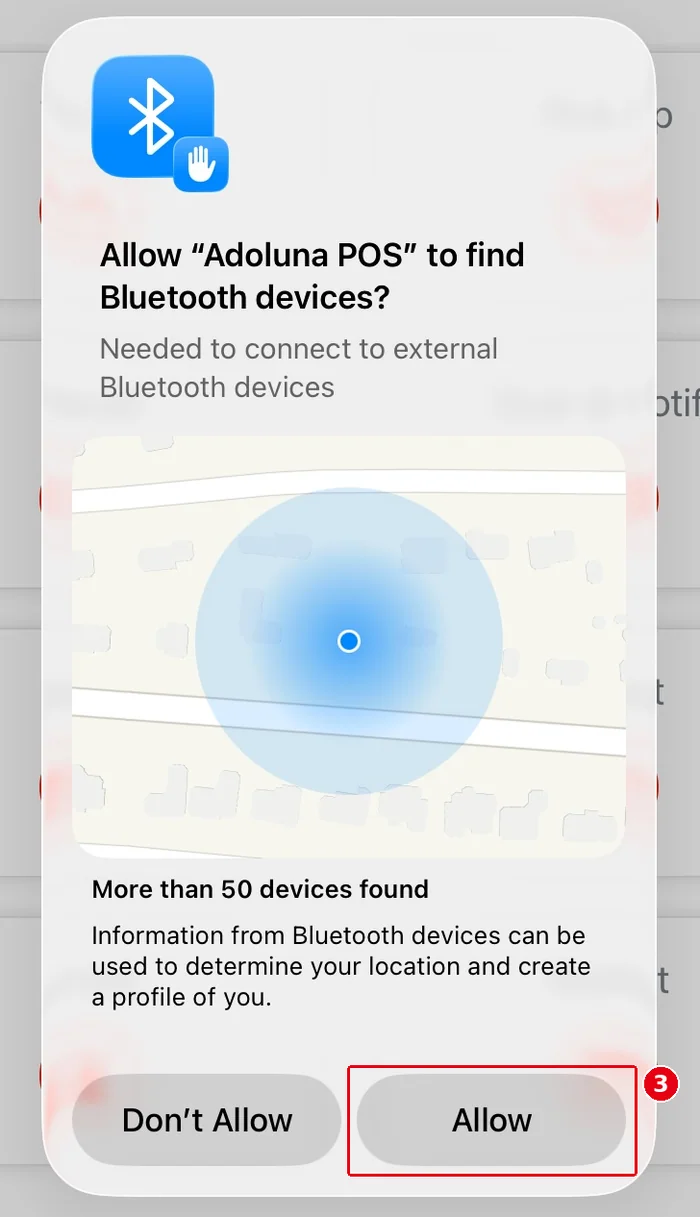
4. Clover Go 3: open the Bluetooth window on the POS (the VP3350 connects by USB cable, so skip steps 4 and 5). Once the Backoffice assigns the Bluetooth reader to this POS, tap ① the settings icon at the top right of the POS home screen and choose ② Bluetooth. The first time on an iPad, the system asks whether to allow “Adoluna POS” to find Bluetooth devices; tap ③ Allow.
5. Scan for the reader and bind it:
-
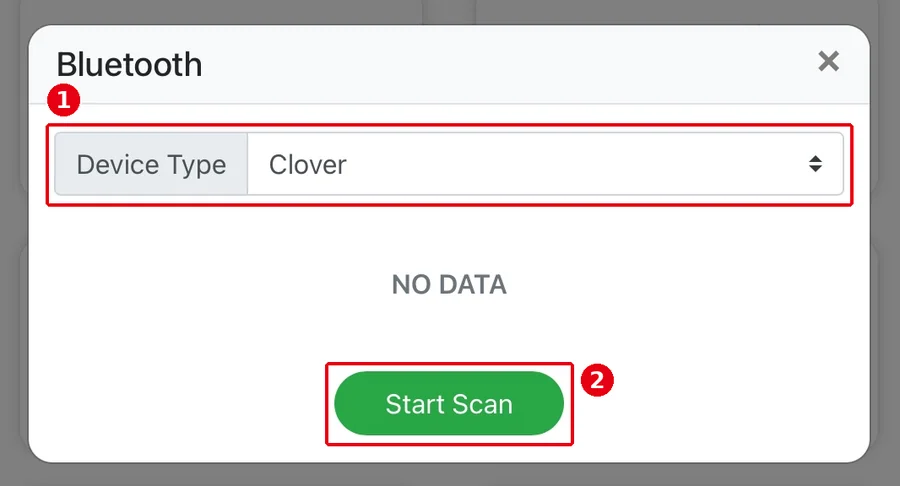
In the Bluetooth window, set ① Device Type to Clover and tap ② Start Scan (it shows NO DATA until a reader is found).
-
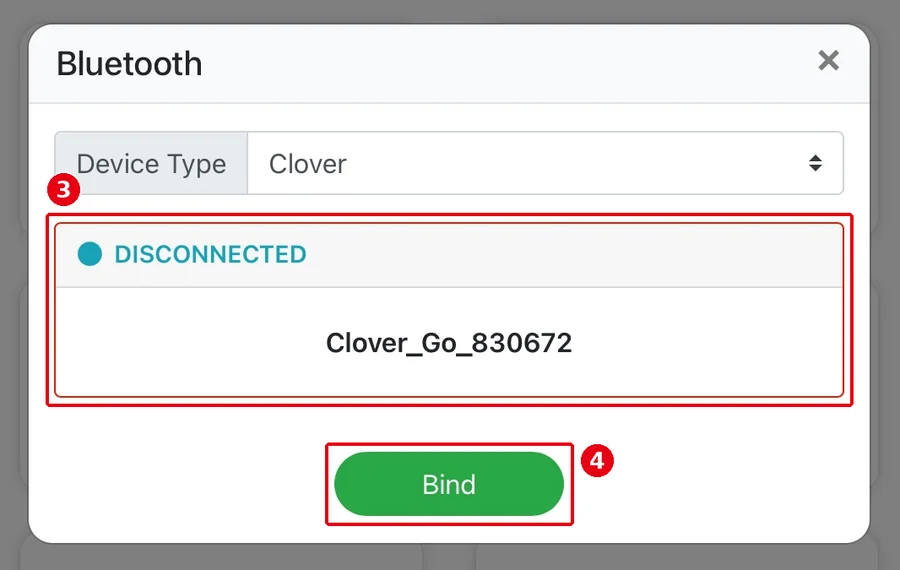
When the reader is found, ③ its device name shows with the status DISCONNECTED. The name looks like Clover_Go_830672 and helps you tell readers apart (the number isn’t necessarily the pairing code; see the next step). Tap ④ Bind.
-
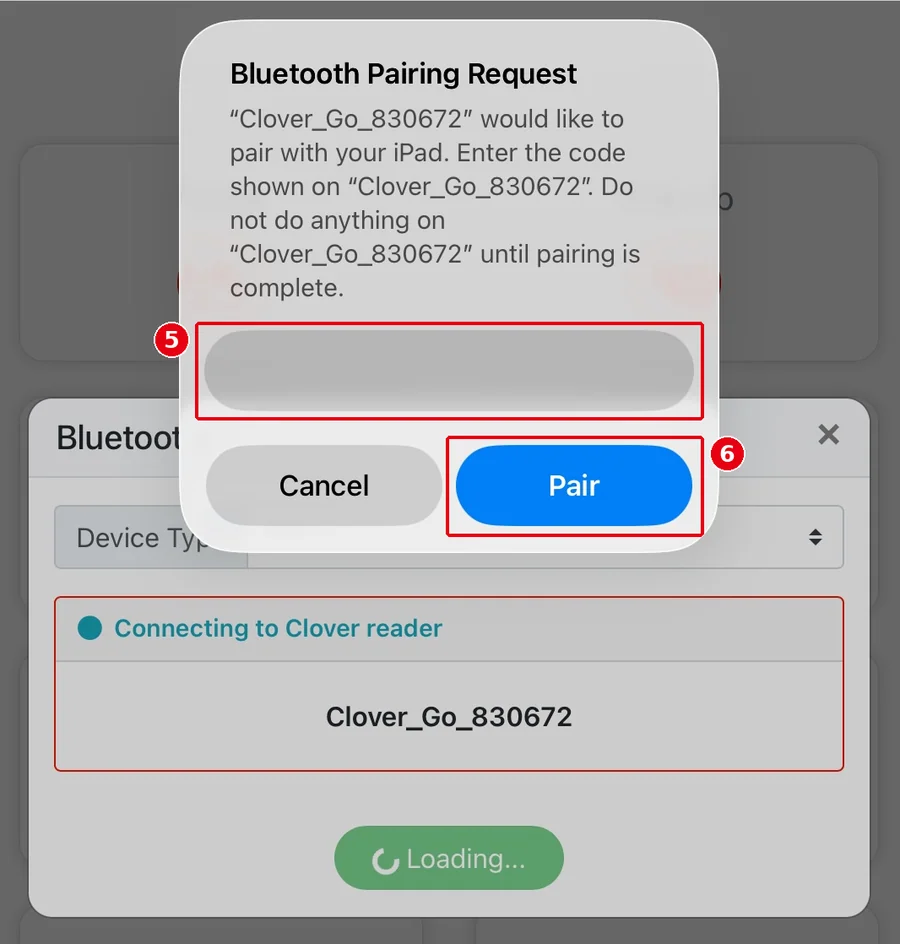
The window shows Connecting to Clover reader and the iPad shows a Bluetooth Pairing Request: enter the pairing code in ⑤ the box and tap ⑥ Pair. The pairing code is the last 6 digits of the serial number printed on the reader. It may differ from the number in the device name (e.g. Clover_Go_830672) and from the HSN entered in the Backoffice, so go by the serial number printed on the reader.
-
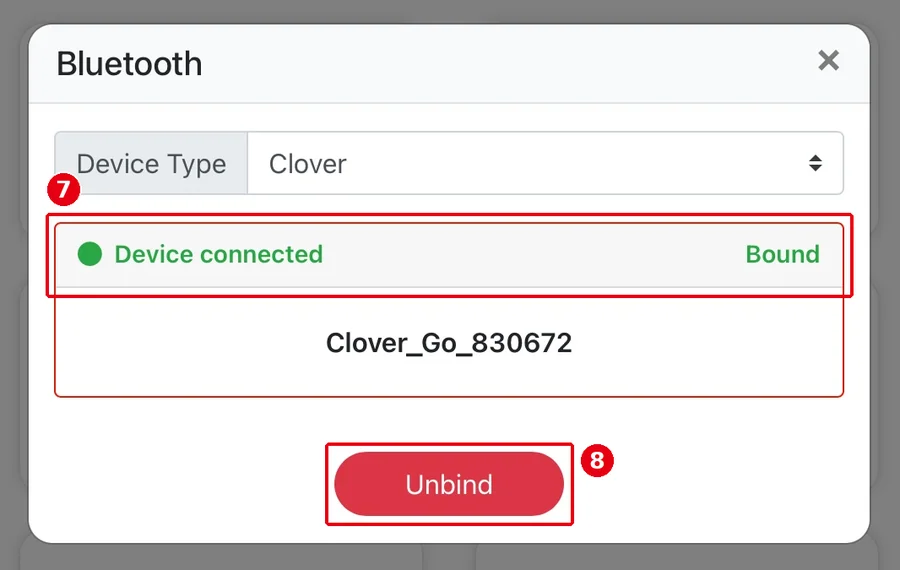
Once connected, it shows ⑦ Device connected and Bound. To unbind, tap ⑧ Unbind.
6. Test: settle a small test order, check that the tip and signature screens appear (on the customer display if one is bound to this POS, otherwise on the POS), that the reader reads the card, and that you hear the success tone and the “Please Remove Your Card!” prompt (when the POS is muted there is no sound, but the on-screen Remove Card prompt still appears). The reader’s own beeps are normal and can’t be turned off. Then void or refund the order (see 3.6.2 How to run a go-live test (test orders, printing, cards, Batch), 1.3.10 How guests add a tip and sign on the customer display, 1.3.2 How to take a credit card payment).
Notes / FAQ #
-
If this POS is bound to a customer display but it can’t connect, guests can’t choose a tip or sign; see 4.4.2 What to do when the customer display won’t connect.
-
One reader connects to only one POS at a time. To use it on another POS, disconnect it from the first POS (tap Unbind in the Bluetooth window), then connect it to the new one.
-
For the payment flow and error messages, see 1.3.2 How to take a credit card payment.


