
Purpose: Turn on Scan to Order, set the ordering and settling methods, then download a QR code for each table. Guests scan the code on their table to order on their phone. For: owners, managers, Adoluna onboarding staff.
Before you start: QR codes are downloaded per table, so set up dining areas and tables under Table in the Backoffice first (see 2.7.1 How to set up dining areas and table layout). Buffet Mode doesn’t need a separate buffet menu (see 2.3.13 How to set up an All You Can Eat (buffet) menu); you can use the normal menu, since each item can carry several prices, one set per service type (see 2.3.1 How to set up price tables and 2.3.5 How to add menu items). For how staff handle scan-to-order orders on the POS, see 1.9.2 How to handle Scan to Order orders.
Steps #
1. In the Backoffice left menu, click Service, choose the ① Scan to Order tab at the top and turn on the Scan to Order master switch at the top right. Then set:
-
② Guest Count: on/off switch. When on, guests must enter the number of guests when they scan.
-
③ Order Security Code: on/off switch. When on, guests must enter a security code to order. The restaurant gives the code to its guests, so people who aren’t in the restaurant can’t order by scan.
-
④ Ordering Method: how guests order; see step 2.
-
⑤ Settling Method: how orders are paid; see step 3.

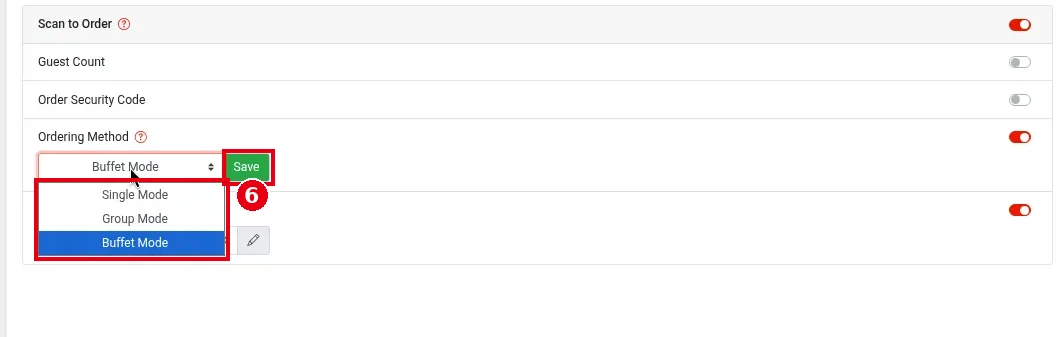
2. Click the pencil icon to the right of ④ Ordering Method. The dropdown becomes selectable and a green Save button appears next to it. The ⑥ dropdown has three options:
-
Single Mode: several people at the table each scan and order separately.
-
Group Mode: everyone at the table shares one order, synced in real time.
-
Buffet Mode: buffet mode. The server first opens the buffet table on the POS, then guests scan the table’s QR code with their own phone to order, and the server settles at the end, so it only works with Pay with Server (see step 3).
Click Save after choosing.
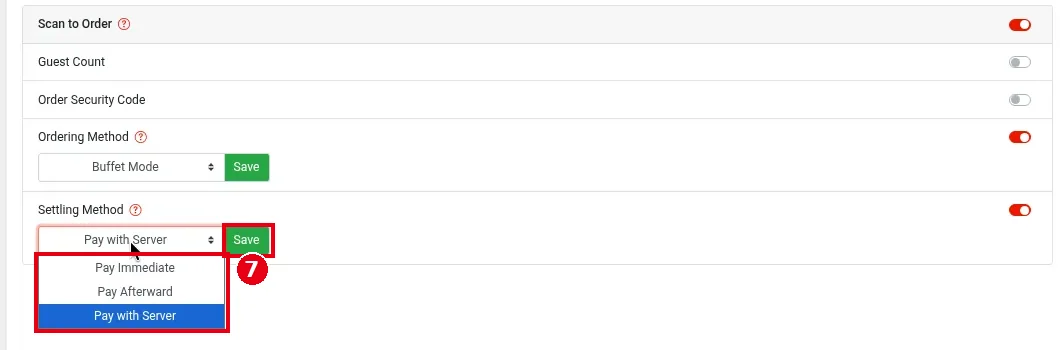
3. Change ⑤ Settling Method the same way. The ⑦ dropdown has three options:
-
Pay Immediate: guests pay on their own phone when they order.
-
Pay Afterward: guests pay on their own phone at the end of the meal.
-
Pay with Server: the server settles the order.
Buffet Mode only works with Pay with Server. Click Save after choosing.
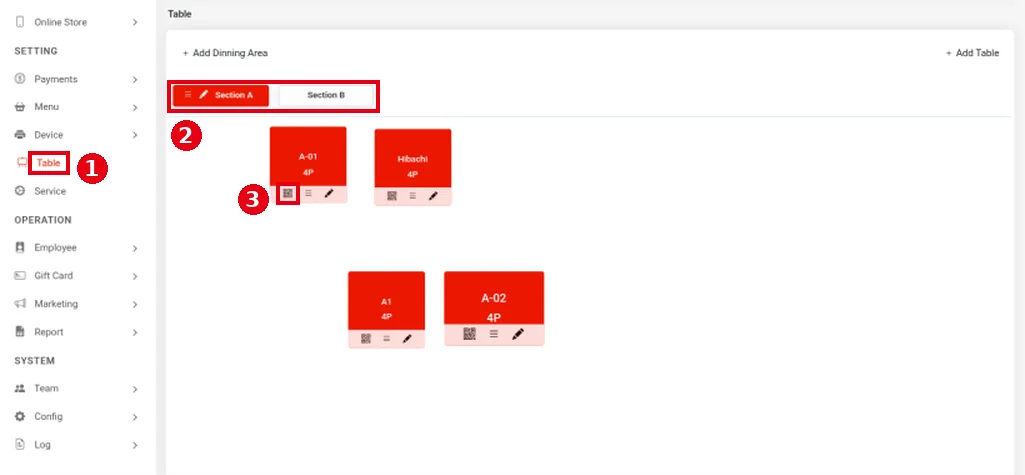
4. Download table QR codes: in the left menu click ① Table and choose a dining area at the top ② (e.g. Section A, Section B). The first icon ③ under each table is the QR code.
5. Click the QR code icon. Download Qrcode? appears; click ④ Confirm to download that table’s QR code (Cancel to stop). Download each table’s code separately, print it and put it on the matching table. The download is a 600×600-pixel PNG. Old QR codes keep working after a table is renamed, or deleted and re-created.

Notes / FAQ #
-
QR codes are downloaded per table, so label each printout with its table number and don’t mix them up.
-
On the Table page, Add Dinning Area, Add Table and the pencil icon on each table create and edit dining areas and tables; see 2.7.1 How to set up dining areas and table layout.
-
Buffet guests can keep ordering in two ways: with Scan to Order’s Buffet Mode (see step 2), or by scanning the QR code on their receipt at the store’s Kiosk (see 2.6.3 How to set buffet time limits and ordering intervals; scanning the receipt QR code currently needs a barcode scanner connected and will later change to the device camera, see 1.8.4 How to open a table on the Kiosk by scanning a receipt QR code), which is a Kiosk feature, separate from Scan to Order. For the buffet time limit and ordering interval, see 2.6.3 How to set buffet time limits and ordering intervals.


