
Purpose: Turn on the waitlist and set the party groups, the maximum number of waiting guests, the default wait time and the notification templates. For: owners, managers.
Before you start: for how staff use the waitlist on the POS, see 1.7.2 How to add a party to the waitlist (adding a party), 1.7.3 How to notify a waiting party that their table is ready (notifying a party) and 1.7.4 How to cancel a waitlist entry (cancelling). For the self check-in device at the door, see 3.5.3 How to set up a Waitlist self check-in kiosk.
Steps #
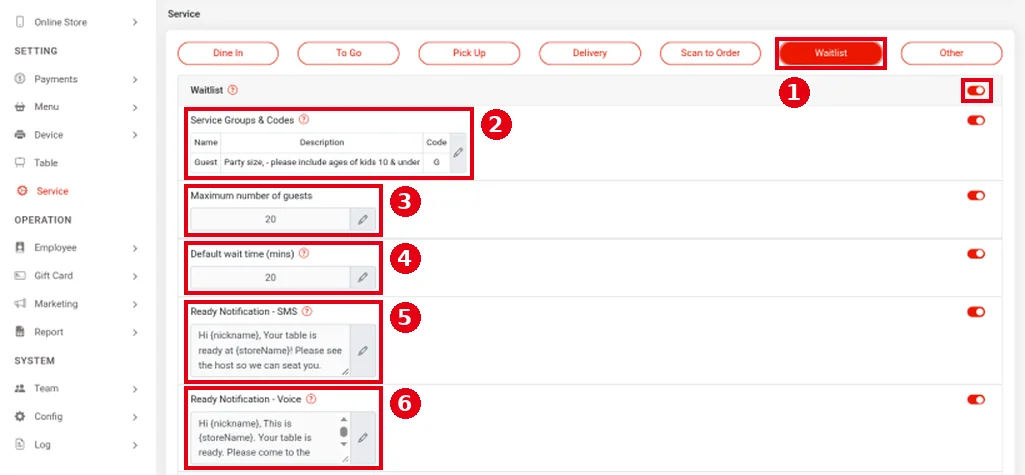
1. In the Backoffice left menu, click Service, choose the ① Waitlist tab at the top and turn on the Waitlist master switch at the top right.
2. Set each item. Each one has its own switch on the right; click the pencil icon to edit it, and you must save (Save) afterwards or the change won’t take effect.
-
② Service Groups & Codes: the party group table. Each group has a Name, a Description and a Code. The waitlist shows party sizes by code, e.g. “G-2”. You can split into several groups such as adults and kids; the list then shows “A-2 K-2”. The demo store has one group, Guest.
-
③ Maximum number of guests: the most guests allowed on the waitlist (the total across all parties). The cap only applies to guest self check-in; staff adding parties on the POS aren’t limited (see 1.7.2 How to add a party to the waitlist).
-
④ Default wait time (mins): the default estimated wait in minutes. It doesn’t change automatically with the queue, but staff can edit it.
-
⑤ Ready Notification – SMS: the text sent when the table is ready. {nickname} is replaced with the guest’s name and {storeName} with the store name.
-
⑥ Ready Notification – Voice: the voice call message for when the table is ready; it can use the same two variables.
3. Further down the page are Waitlist Confirmation SMS (sent automatically after a party is added; it includes links to cancel and to check their place in line) and Waitlist Cancellation SMS (sent when an entry is cancelled). See 3.5.3 How to set up a Waitlist self check-in kiosk for a screenshot.
Notes / FAQ #
-
When editing a template, keep {nickname} and {storeName} exactly as they are (including the braces), or they won’t be replaced.
-
Every text uses SMS credit; the remaining credit shows at the top left of the POS waitlist screen (see 1.7.2 How to add a party to the waitlist). Voice notifications also use SMS credit. Use your own phone number when testing.
-
For guests to add themselves at the door, you need a self check-in device; see 3.5.3 How to set up a Waitlist self check-in kiosk.


