
Purpose: Add a PAX card terminal (e.g. A35, A920) in the Backoffice so the POS sends the amount straight to the terminal at checkout. For: Adoluna onboarding staff. Hardware: a PAX terminal on the store network (see 3.1.2 How to set up the network and wire a POS station).
Before you start: PAX terminals are integrated through CardConnect and connect to the POS over the network. Each needs a fixed, unique IP address (set a fixed IP on the terminal and reserve it in the router; see 3.1.2 How to set up the network and wire a POS station). Stores use the PAX S300 and the A series (Android, e.g. A35, A80, A920). Adoluna technicians do the terminal’s acquiring (merchant processing) setup.
Viewing and setting the IP on the terminal (menu paths from the public sources below; they may differ slightly by firmware; Adoluna technicians hold the terminal settings password):
-
S300: press F and 1 together to open the main menu, enter the password → Communication (enter the password again) → LAN Parameters. Choose IP Address to see the current IP; to set a fixed IP, choose Static under LAN Type and enter the IP address, subnet mask and gateway when prompted. Sources: Versitech: Pax Set Static IPs, Merchant Industry: Finding the S300 IP Address.
-
A series (A35, A80 and other Android terminals): on the home screen tap Settings, enter the password → Network & internet → turn on Ethernet and tap it to see the current IP; tap Ethernet Configuration → Static and enter the IP address, netmask, gateway and DNS. The A920 needs its L920 base for a network cable; set it under Settings > Ethernet > Ethernet Configuration. Sources: Cybersource: PAX A35 Ethernet static IP, Heartland: PAX A920 Setup Guide.
-
Terminals can also be configured through the PAX cloud platform, PAXSTORE. For the S80 / S300 / SP30 the IP is set in the PAXSTORE parameter file; for the A80 / A35 and other Android terminals it is set in the terminal’s settings.
Steps #
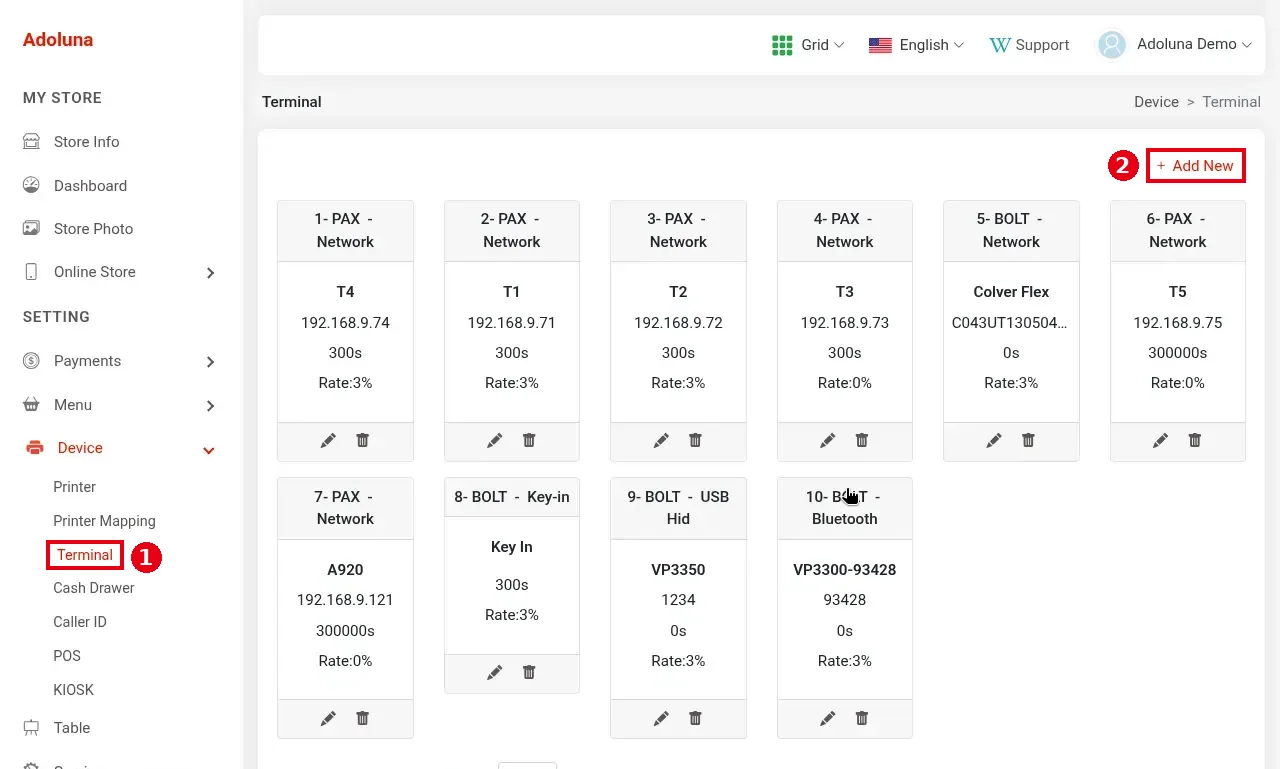
1. In the Backoffice left menu, click Device > ① Terminal to open the terminal list. Each card shows the terminal’s name, type and connection (e.g. “PAX ( Network ) – T4”). Click ② + Add New.
2. Fill in the terminal details:
-
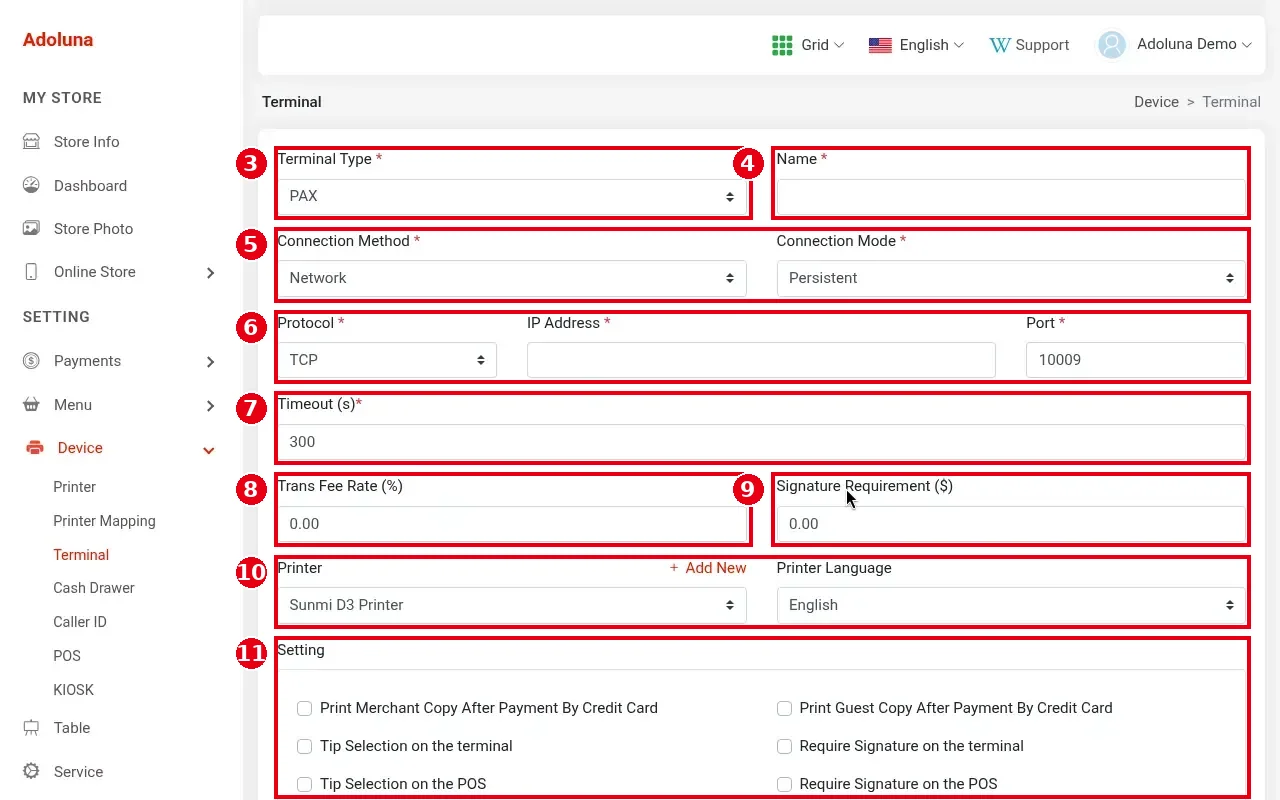
③ Terminal Type (required): choose PAX.
-
④ Name (required): e.g. “T1” or “Bar Terminal”. Staff pick the terminal by this name at checkout.
-
⑤ Connection Method (required): Network; Connection Mode (required): Persistent in the screenshot. Connection Mode only matters for the VP3300 Bluetooth reader (see 3.4.3 How to connect a Clover Go 3 / VP3350 card reader); leave the default for PAX.
-
⑥ Protocol (required): TCP by default; IP Address (required): the terminal’s IP; Port (required): 10009 by default for PAX.
-
⑦ Timeout (s) (required): card request timeout in seconds, default 300. Each terminal has its own.
-
⑧ Trans Fee Rate (%): the card processing fee rate. The server report uses it to work out the fee deducted from credit card tips.
-
⑨ Signature Requirement ($): card payments at or above this amount need a signature.
-
⑩ Printer, Printer Language: the printer and language for this terminal’s card slips (merchant / guest copy).
-
⑪ Setting:
-
Print Merchant Copy After Payment By Credit Card, Print Guest Copy After Payment By Credit Card: print the merchant / guest copy after a card payment.
-
Tip Selection on the terminal, Require Signature on the terminal: tip and signature on the terminal.
-
Tip Selection on the POS, Require Signature on the POS: tip and signature on the POS customer display (see 1.3.10 How guests add a tip and sign on the customer display). The terminal and POS options can both be ticked, but see the caution below.
-
Click Save.
3. In the Backoffice, open each POS under Device > POS, tick this terminal under Terminal, and turn on Default if needed (see 3.2.2 How to create POS and Kiosk devices in the Backoffice). With a default terminal, card payments pick it automatically; without one, staff choose a terminal each time.
4. Run a small test payment, then void or refund it (see 3.6.2 How to run a go-live test (test orders, printing, cards, Batch)).
Notes / FAQ #
-
If the terminal doesn’t respond or won’t connect, see 4.1.2 What to do when the card terminal doesn’t respond.
-
The terminal’s IP must not clash with printers or other devices, and shouldn’t be an address the router assigns automatically.
-
Caution: the terminal and POS tip / signature options can both be ticked, but turning them all on needs careful configuration. Before go-live, check with a test order what the guest actually sees for tip and signature.
-
PAX card payments are batched under the PAX device in Batch (see 1.6.3 How to close a credit card batch).


