
Purpose: Understand the full guest flow on the Kiosk (self-order kiosk), from starting an order to choosing items and paying, so staff can guide guests and handle problems. For: front counter, servers, managers.
Steps (guest) #
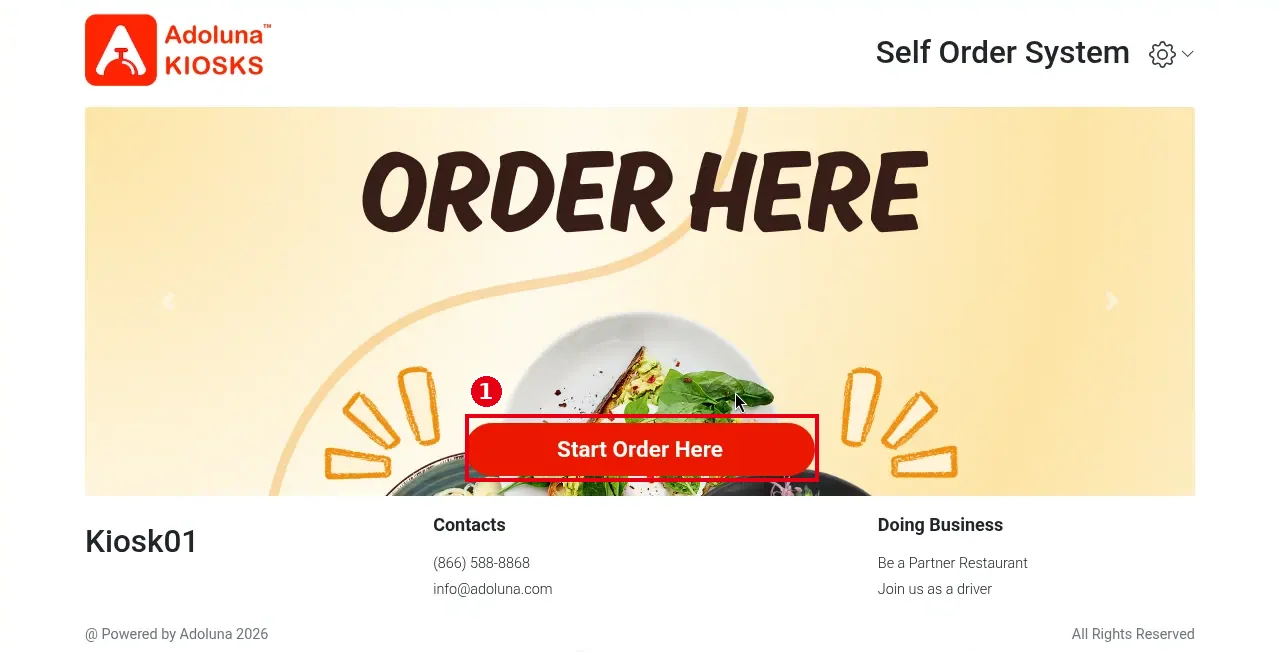
1. On the welcome page, tap ① Start Order Here. The top of the page shows the ORDER HERE banner; the bottom shows the Kiosk name (e.g. Kiosk01) and the store’s contact details.
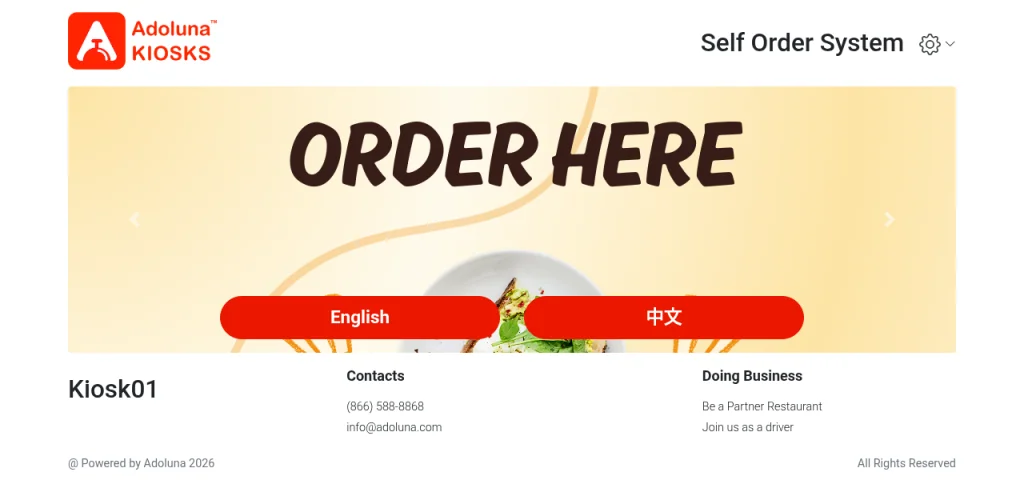
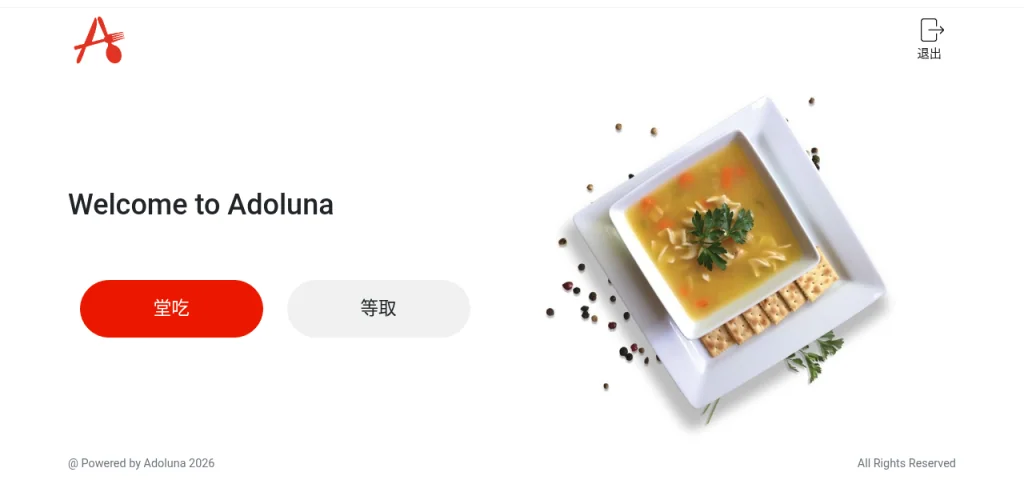
Choosing a language: if both English and 中文 are ticked for this Kiosk in the Backoffice (see 3.5.2 How to configure a Kiosk), the welcome page shows two buttons, English and 中文, at the bottom of the banner, and the guest taps one to start ordering. The following screens use the chosen language. For example, after tapping 中文 the order type buttons read 堂吃 and 等取, and the top right of the ordering screen reads 购物车, 帮助 and 退出.
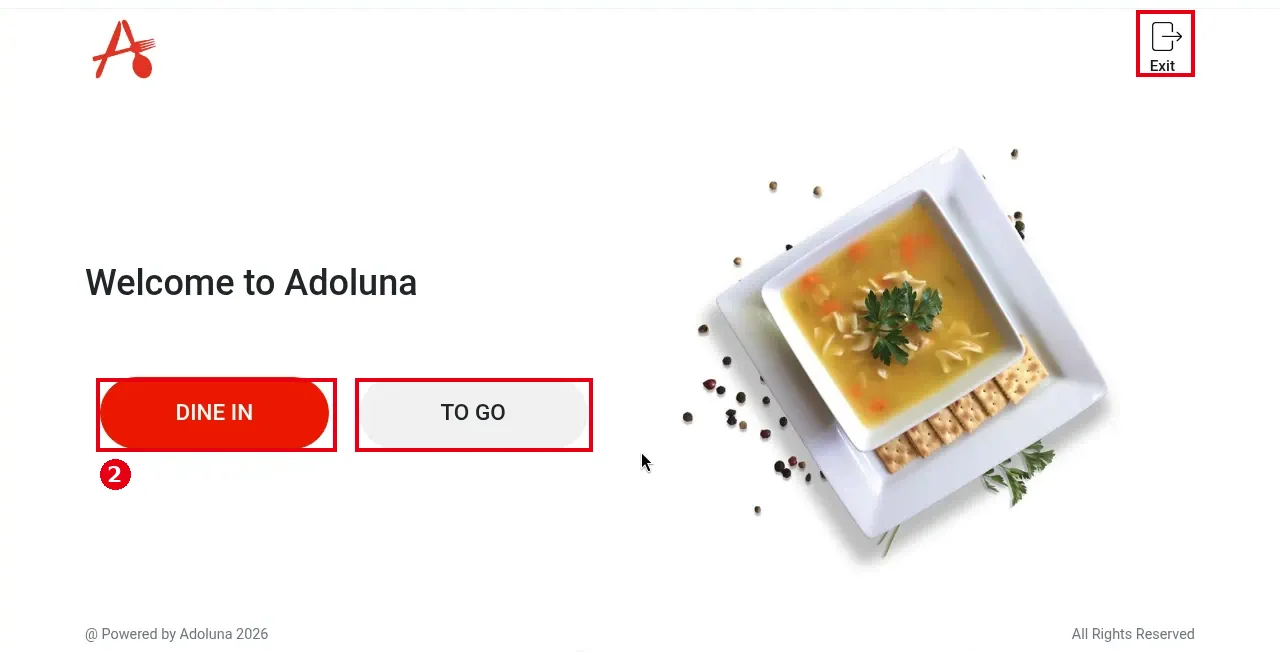
2. On the “Welcome to Adoluna” screen, choose ② DINE IN or TO GO. Exit at the top right leaves.
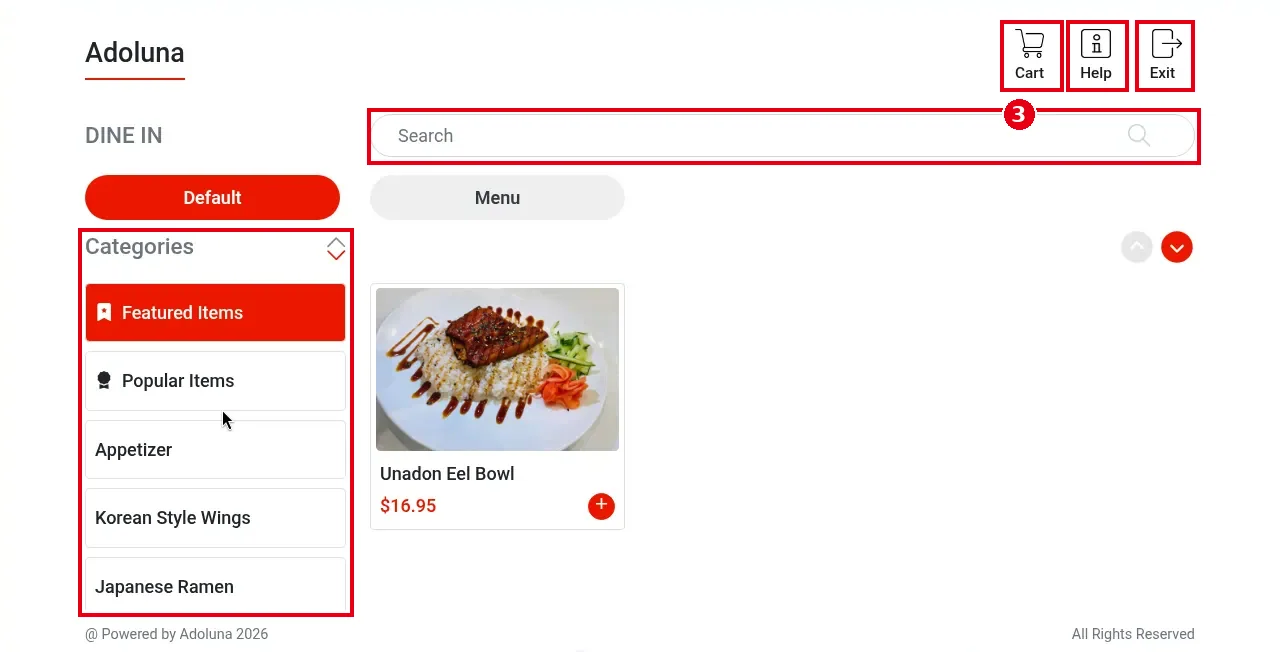
3. The ordering screen: Search at the top finds items, Categories on the left picks a category (e.g. Featured Items, Popular Items), and the + at the bottom right of an item adds it. The top right has ③ Cart, Help (call staff, see 1.8.2 How to respond to a Kiosk Need Help request) and Exit.
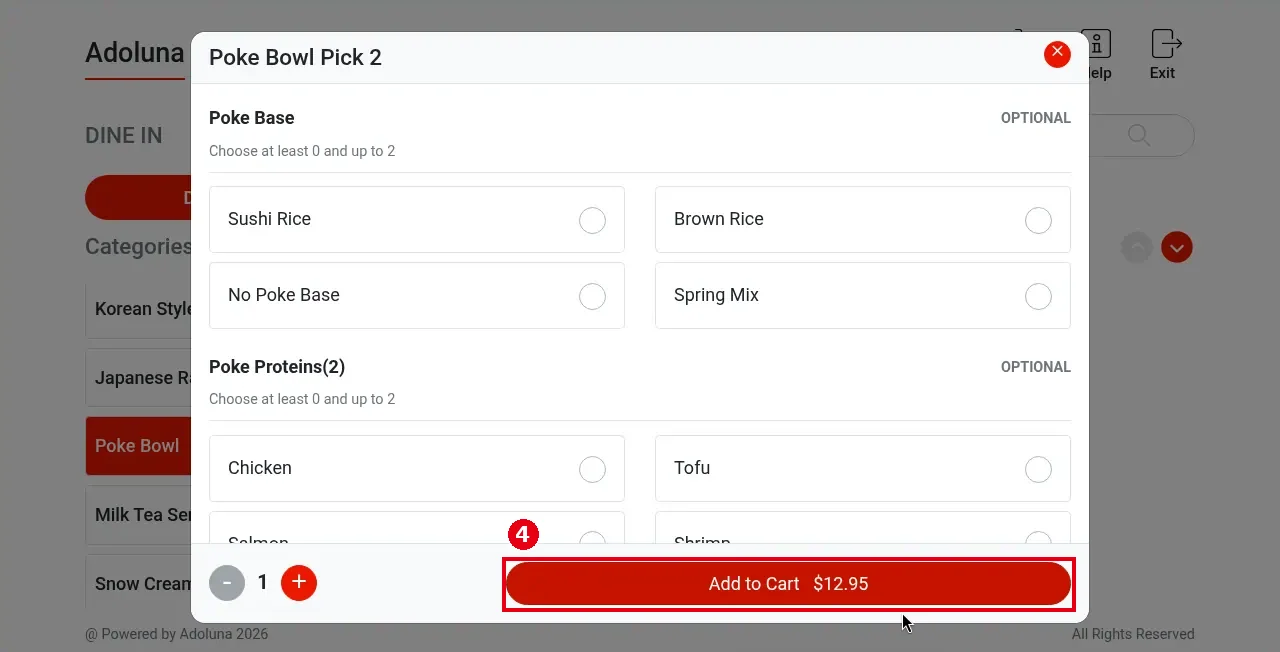
4. Items with modifiers open a selection screen (e.g. Poke Base and Poke Proteins(2) for “Poke Bowl Pick 2”). Choose the modifiers and quantity, then tap ④ Add to Cart $12.95. The cart count and amount at the top right update.
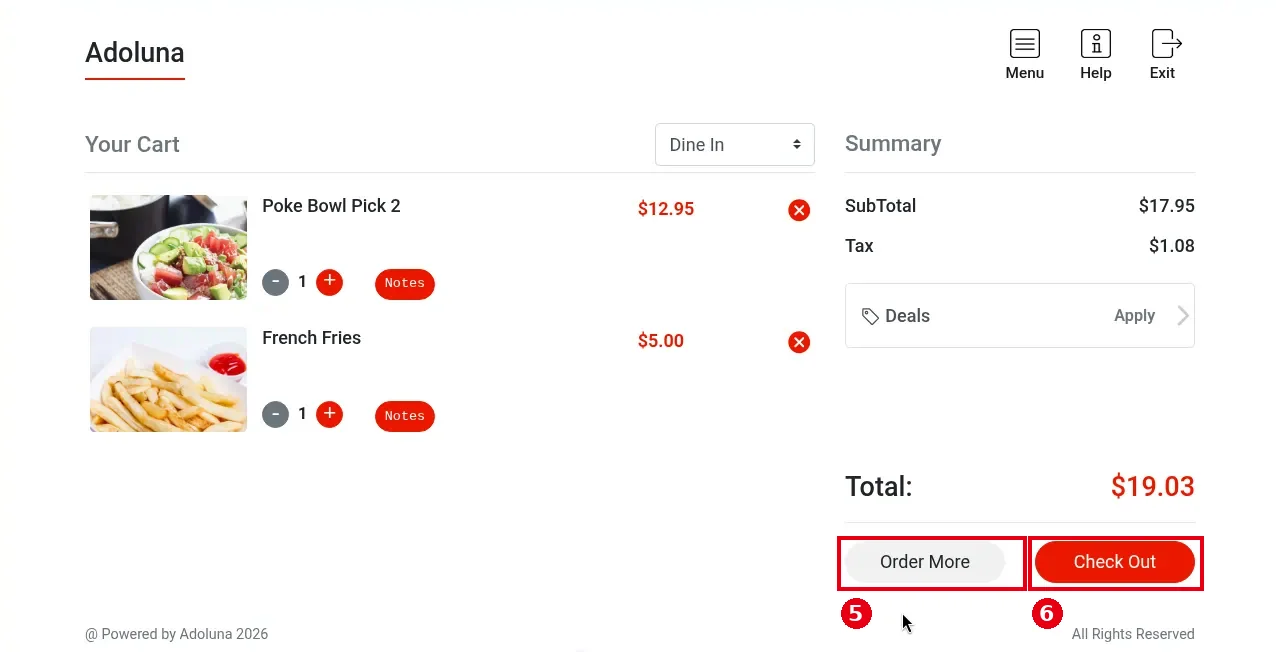
5. Tap Cart to open Your Cart: change quantities, add Notes or remove items; the right side shows the subtotal, tax and Total. Tap ⑤ Order More to keep ordering or ⑥ Check Out to pay.
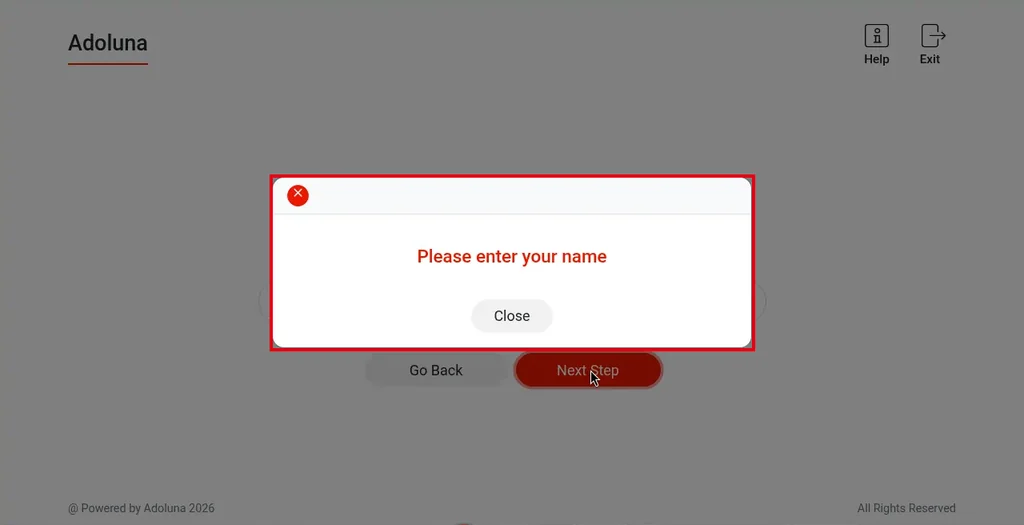
6. After Check Out, on “Enter your name”, the guest types a name (used to call out the order) and taps Next Step (Go Back returns to the previous step). The name is required: tapping Next Step without one shows “Please enter your name”. If Need Table Tent is turned on in the Backoffice, the guest also enters a table tent number (see 3.5.2 How to configure a Kiosk).
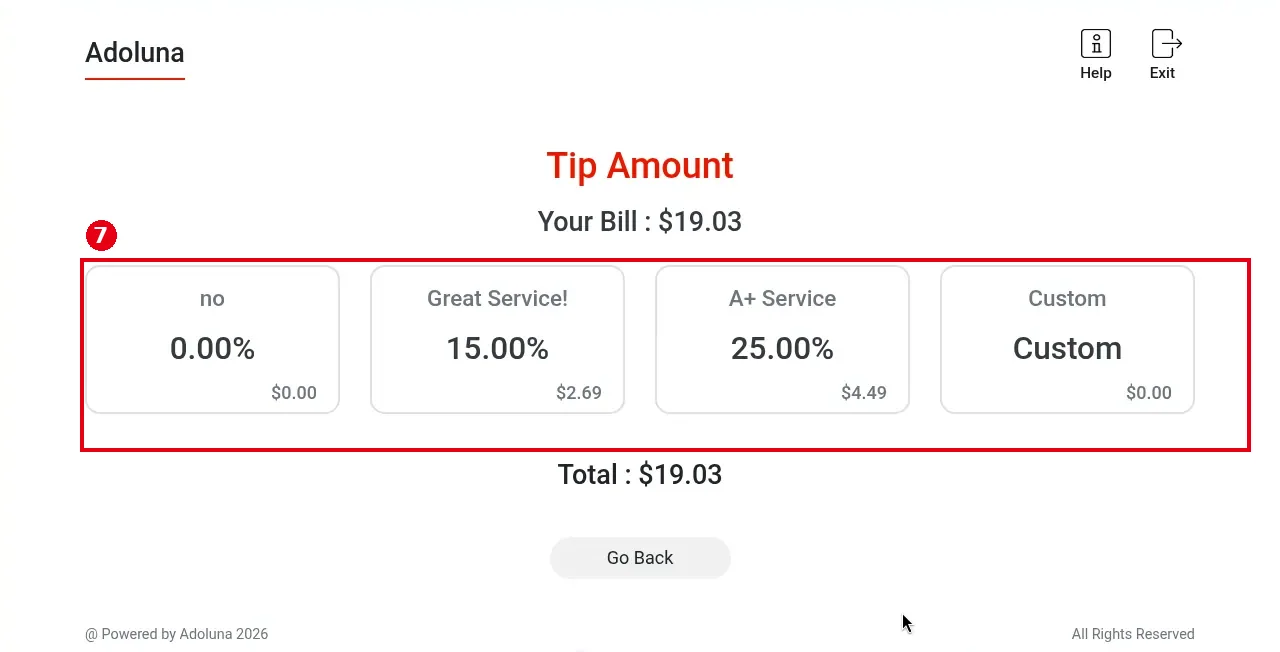
7. Choose a tip on ⑦ Tip Amount: no (0%), Great Service! (15%), A+ Service (25%) or Custom (enter an amount). The bill (Your Bill) shows at the top, each option shows its tip amount, Total below includes the tip, and Go Back is at the bottom.
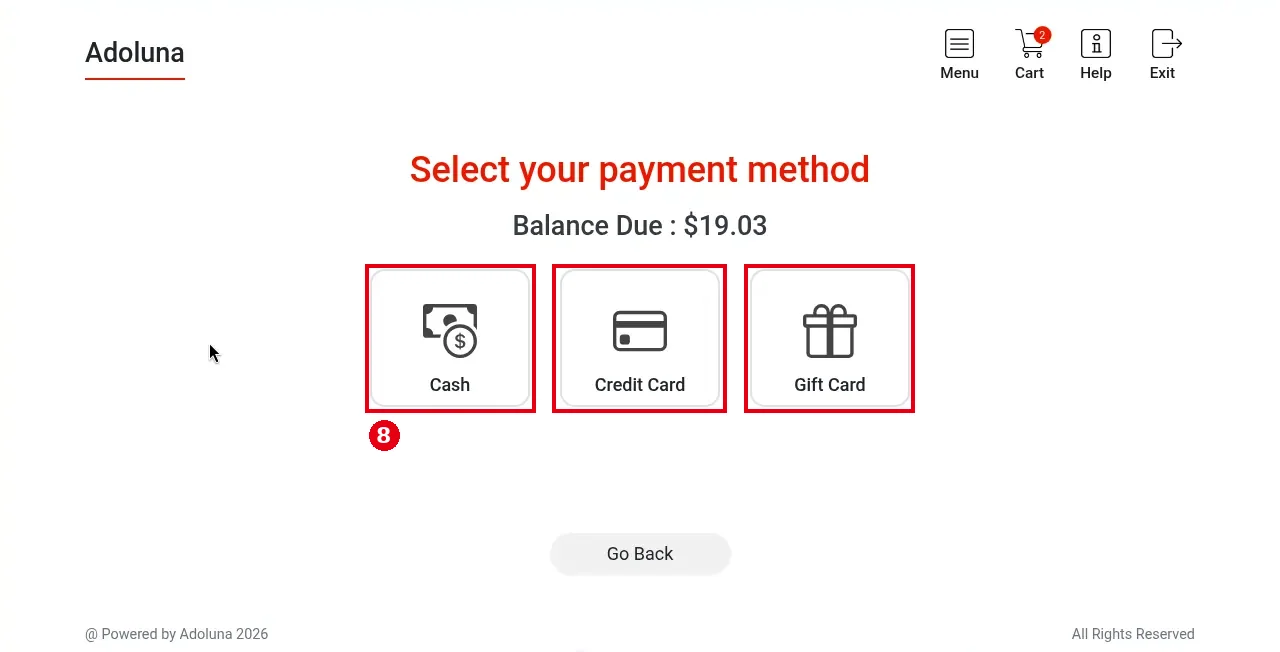
8. On “Select your payment method”, the guest chooses ⑧ a payment method: Cash, Credit Card or Gift Card. The amount due shows on the screen (e.g. Balance Due : $4.19). The payment types offered are set under Payment Type in the Backoffice (see 3.5.2 How to configure a Kiosk).
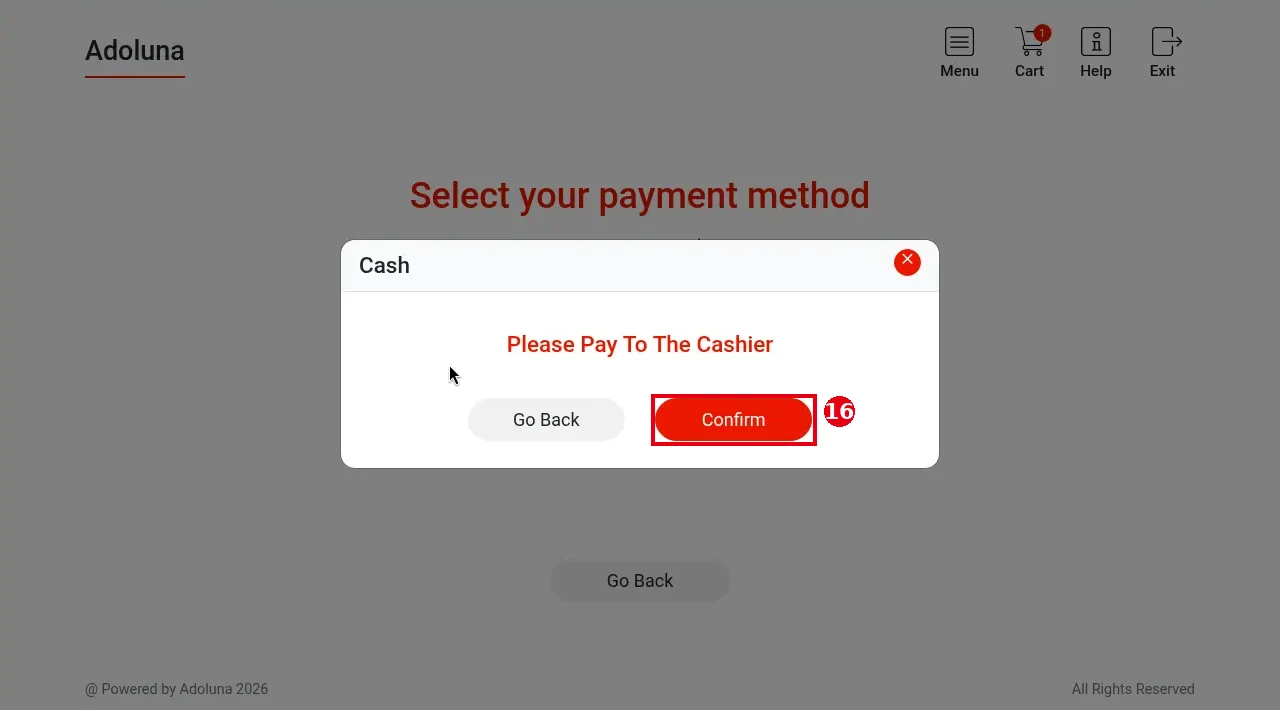
9. With Cash, “Please Pay To The Cashier” appears; tap ⑯ Confirm (Go Back returns).
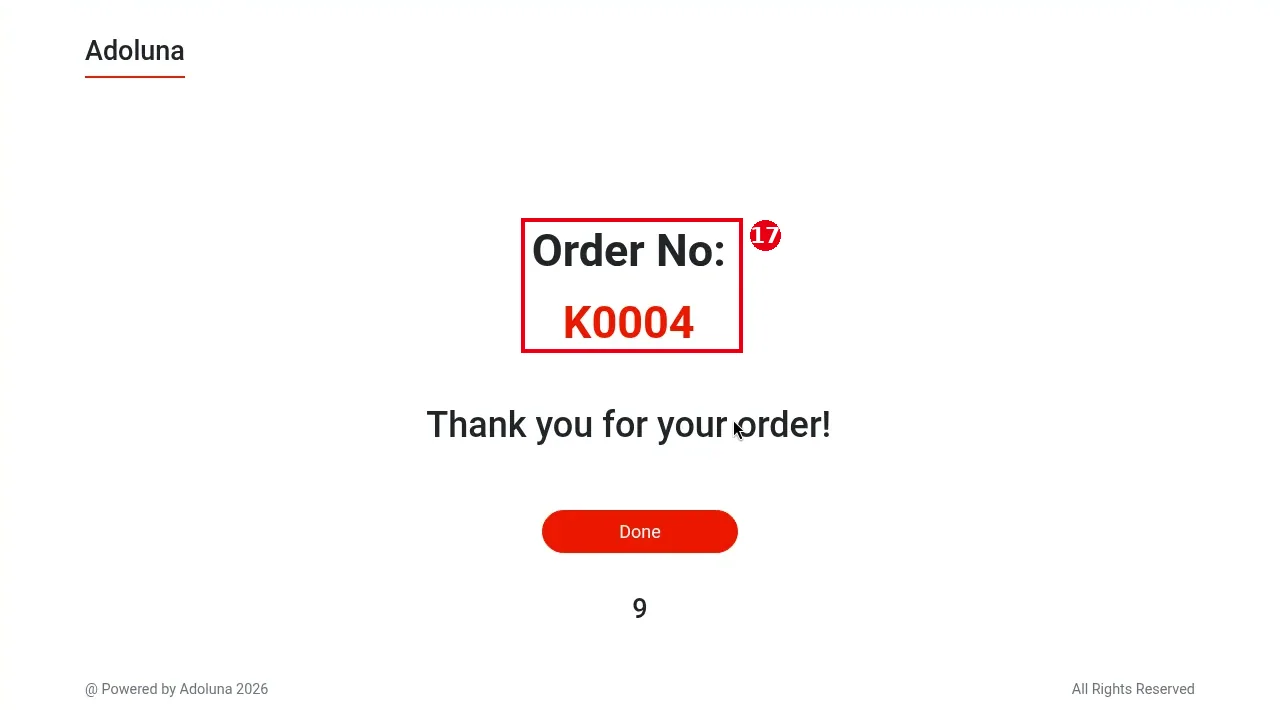
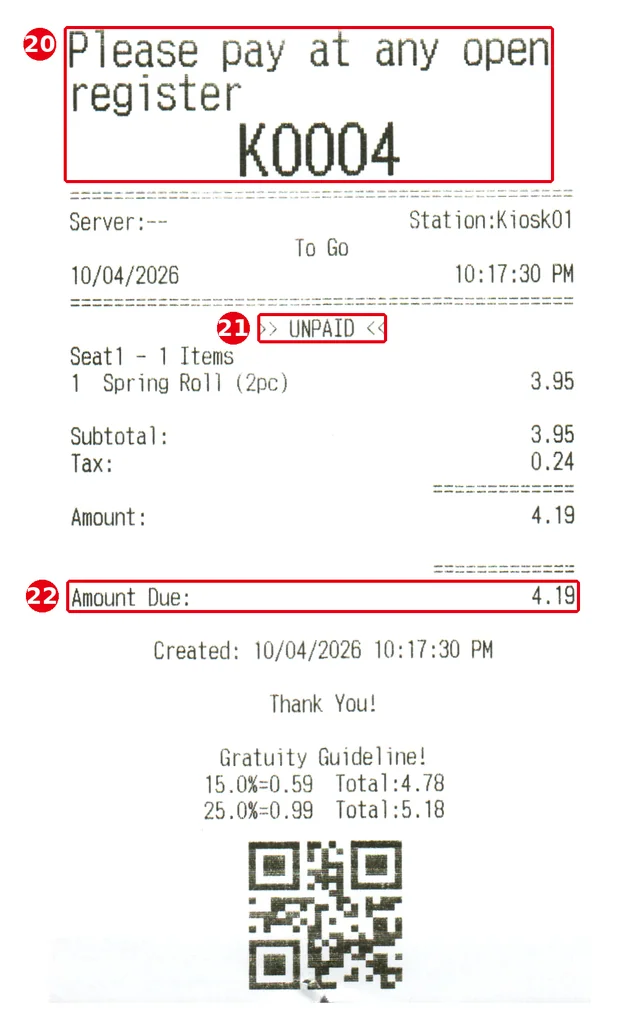
10. The Kiosk shows ⑰ the order number (e.g. K0004) and “Thank you for your order!”; tap Done to finish (the number below the button counts down). The Kiosk prints a payment slip, and the guest takes it to the counter to pay (see below).
The payment slip printed by the Kiosk: ⑳ “Please pay at any open register” and the order number (e.g. K0004) at the top; ㉑ >> UNPAID <<; ㉒ Amount Due, the amount to pay (e.g. 4.19). Station shows the Kiosk name (e.g. Kiosk01). The receipt message, tip guideline and QR code print at the bottom (see 2.5.5 How to set receipt messages and tip guidelines).
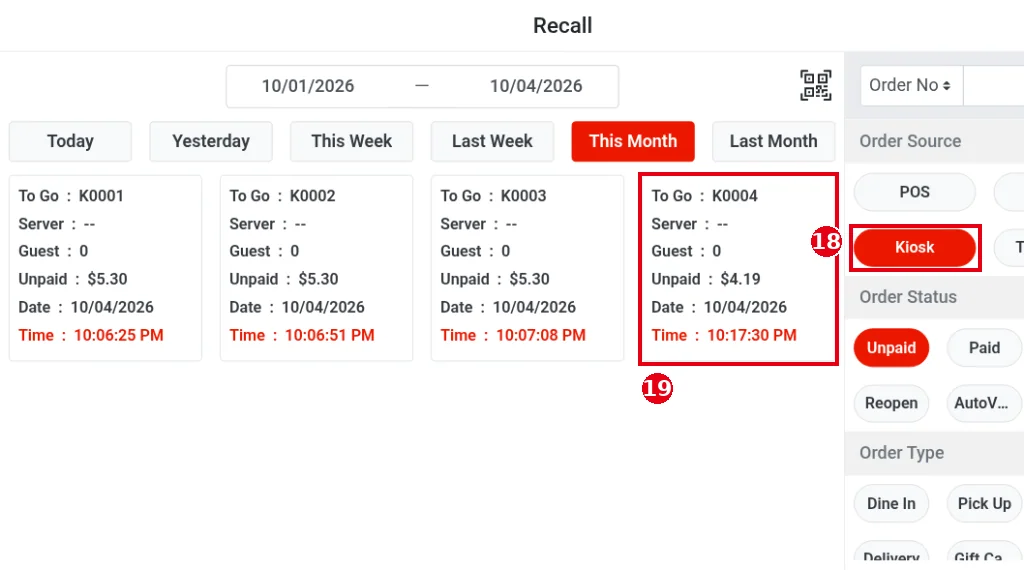
11. The cashier finds the order in Recall on the POS: set ⑱ Order Source to Kiosk; ⑲ the order card shows the order type and the unpaid amount (e.g. To Go : K0004, Unpaid : $4.19). Open the order and take payment on the POS (see 1.4.1 How to find an order in Recall). In our test, the items went to the kitchen as soon as Confirm was tapped on the Kiosk, without waiting for payment; whether they go right away is set by Auto Send When Payment By Cash in the Backoffice (see 3.5.2 How to configure a Kiosk).
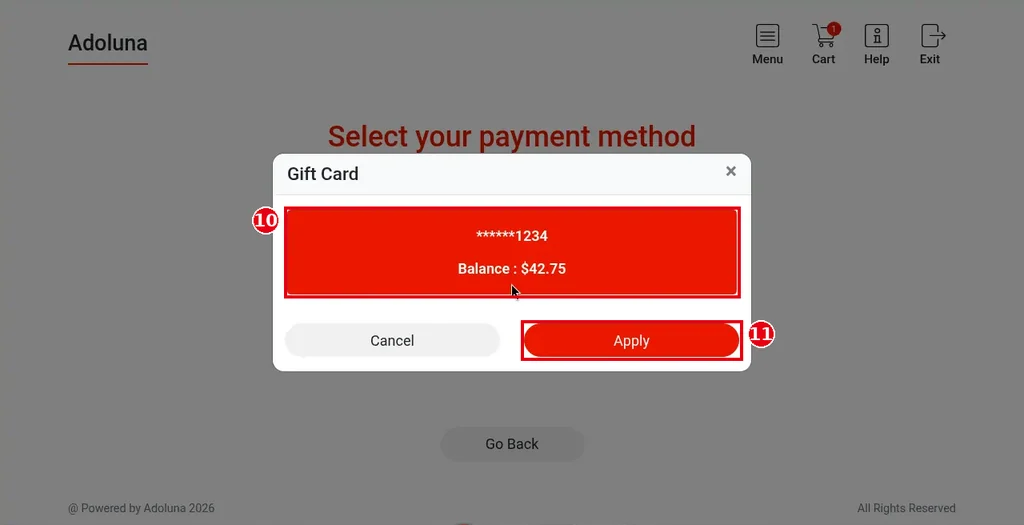
12. Gift Card: the Gift Card window opens with ⑨ “Please swipe your gift card”. The guest swipes the card on the magnetic stripe reader, and the number fills in automatically (shown as dots).

13. Once the card is read, ⑩ the card number (last four digits only, e.g. ******1234) and the balance (e.g. Balance : $42.75) appear. Tap ⑪ Apply to pay with the card (Cancel to go back).
14. Credit Card: the payment request goes straight to this Kiosk’s card terminal. A window opens on the Kiosk with ⑫ the terminal name as its title (e.g. T2), “Insert/Tap/Swipe” and the amount due (Balance Due : $4.19); the number in the circle counts down. The guest inserts, taps or swipes the card on the terminal. The order is saved as soon as the credit card payment screen opens; after that the guest can’t go back to the menu to change the order, only back to the payment method screen (updated 2026-10-05).

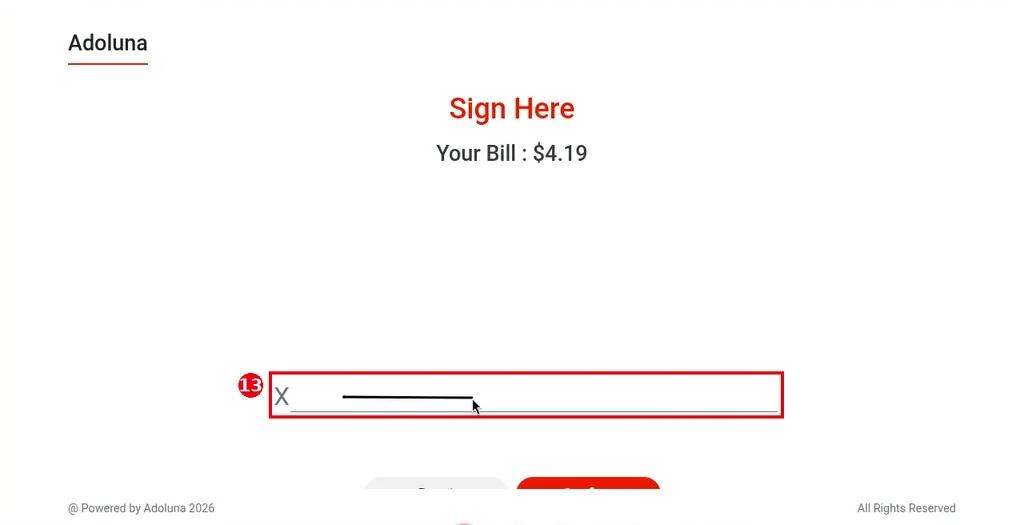
15. After the card is read, the Kiosk shows the “Sign Here” screen (with Your Bill : $4.19 at the top): ⑬ the guest signs on the X line with a finger, then taps Confirm. (The signature screen appeared in our test.)
16. After a card or gift card payment, ⑭ the order number (e.g. K0002) and “Thank you for your order!” appear, and the order goes to the kitchen. ⑮ The guest can tap Email Receipt, SMS Receipt or Print Receipt for a receipt, or Done to finish; the number below the buttons counts down.

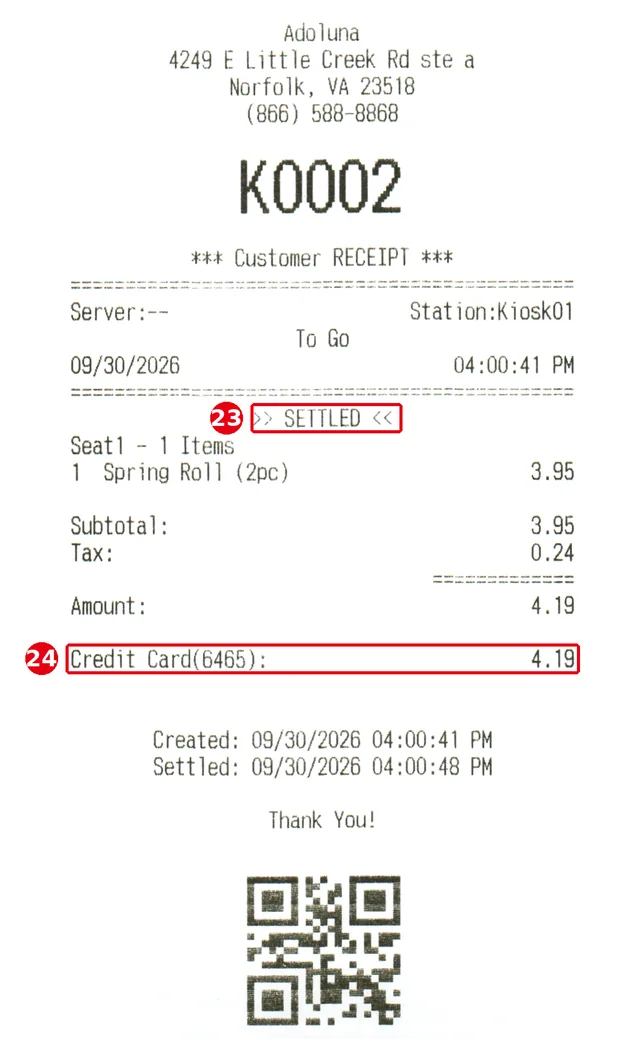
Whether the Kiosk prints the customer receipt (Customer RECEIPT) automatically after a card payment is set by Print Guest Receipt After Payment By Credit Card for this Kiosk in the Backoffice (see 3.5.2 How to configure a Kiosk). On the receipt: ㉓ >> SETTLED <<; ㉔ the payment method and amount, with only the last four digits of the card (e.g. Credit Card(6465), 4.19).
Tapping Exit at the top right at any point shows “Exit?”; Yes returns to the welcome page, No keeps ordering.
What staff should know #
-
If nobody uses the Kiosk for a while, it returns to the start page (the time is set in Auto Exit After Timeout in the Backoffice, see 3.5.2 How to configure a Kiosk).
-
Kiosk orders whose payment failed: if staff don’t open the order within 30 minutes, the system voids it automatically (Kiosk AutoVoid).
-
When an employee takes payment on the POS for a Kiosk order, the payment is credited to that employee.
-
In POS Recall, the Order Source filter (POS / APP / Kiosk) shows Kiosk orders (see 1.4.1 How to find an order in Recall).
-
Kiosk order numbers start with K (e.g. K0001, K0002).
-
When a guest taps Help, follow 1.8.2 How to respond to a Kiosk Need Help request.
-
To bind a Kiosk device, see 3.5.2 How to configure a Kiosk.
-
The English / 中文 buttons on the welcome page only appear if both English and 中文 are ticked under Language in this Kiosk’s device settings in the Backoffice (see 3.5.2 How to configure a Kiosk).
-
In Chinese mode, menu, category and item names show in Chinese only if Chinese names have been entered for the menu; otherwise the English names show (e.g. Appetizer, Korean Style Wings, Unadon Eel Bowl). The system categories 推荐菜品 and 畅销产品 show in Chinese; some screen text, such as Search and Categories, is still in English for now. Chinese names are entered in the Name (中文)* field of each Backoffice form: for items on the item edit page (see 2.3.5 How to add menu items), and for menus and categories in the menu and category forms (see 2.3.4 How to create and sort menu categories). The modifier and forced modifier forms also have Name (中文)* (see 2.3.6 How to set up modifiers, 2.3.7 How to set up forced modifiers and default choices).
-
This article covers Kiosk mode 1, Self-Order (orders go to the kitchen after payment). For server-opened tables, see 1.8.3 How to open a table on the Kiosk for guests (server mode); for opening a table by scanning a receipt QR code, see 1.8.4 How to open a table on the Kiosk by scanning a receipt QR code; for all modes, see 3.5.2 How to configure a Kiosk.


