
Purpose: Create price tables (e.g. store prices and online prices) so the same item can have a different price in each channel. For: owners, managers, Adoluna onboarding staff.
Before you start: a price table is just a named set of prices; each item’s actual price is entered per price table on the item’s edit page (see 2.3.5 How to add menu items). Which channel uses which price table isn’t chosen here: for order types on the POS, choose Price Type under Service in the Backoffice; for the online store, choose Price Type under Online Store > Store Setting (see 2.9.2 How to set online pick-up and delivery rules). For the overall menu setup order, see 3.6.1 How to build a new menu from scratch (setup order).
Steps #
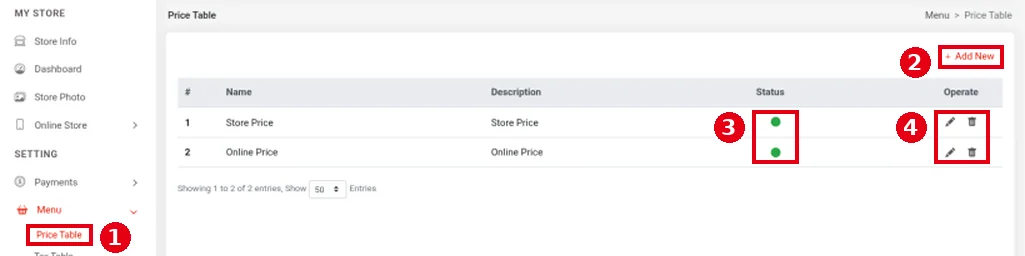
1. In the Backoffice left menu, click Menu > ① Price Table to open the price table list. Its columns are #, Name, Description, Status and Operate; the demo store has two price tables, Store Price and Online Price. A green dot under ③ Status means the table is enabled; under ④ Operate, the pencil icon edits and the bin icon deletes. Click ② + Add New at the top right to add a price table.
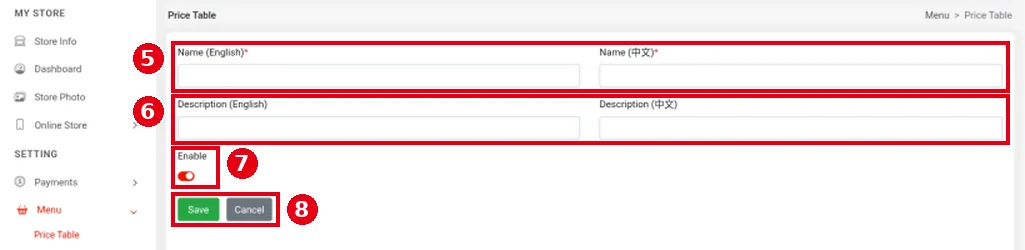
2. Fill in the form:
-
⑤ Name (English), Name (中文): the price table’s English and Chinese names. Fields marked * are required.
-
⑥ Description (English), Description (中文): optional descriptions.
-
⑦ Enable: turns the table on; on by default for a new table.
-
⑧ Click Save to save or Cancel to cancel.
3. Enter prices on items: open an item’s edit page. Under ⑨ Price, each price table has its own row (e.g. Store Price, Online Price). Enter the item’s price for that table in the amount box, then save the item. Discount Price on the right is the discount price; see 2.3.10 How to set a discount price on an item.

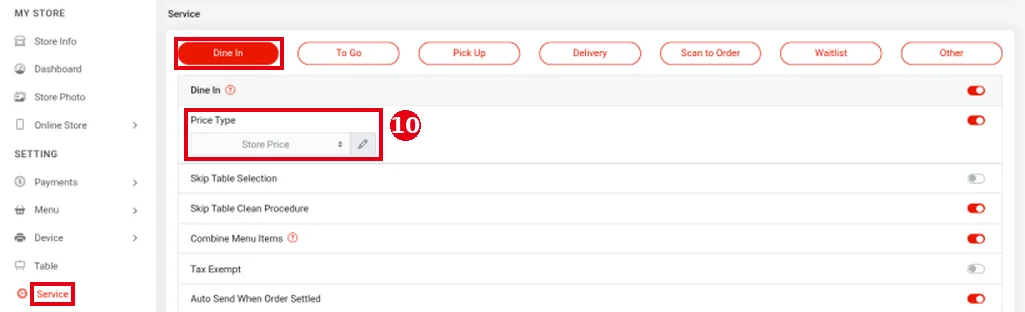
4. Choose the price table for order types on the POS: in the Backoffice left menu, click Service, pick an order type tab (e.g. Dine In), turn on the switch to the right of ⑩ Price Type, and click the pencil icon to choose a price table (Dine In uses Store Price in the screenshot). Set To Go, Pick Up, Delivery and the other tabs separately. The online store’s price table is chosen under Online Store > Store Setting > Price Type (see 2.9.2 How to set online pick-up and delivery rules). The Kiosk and Scan to Order use the price table chosen for the matching order type (its tab under Service), so they’re set here too.
Notes / FAQ #
-
After adding a price table, enter each item’s price for it on the item’s edit page. Don’t use Excel import to fill in prices (it only adds new items and isn’t recommended for merchants for now; see 2.3.12 How to import and export the menu with Excel).
-
If a price table isn’t enabled, or a channel’s Price Type is off or has no price table selected, item prices show as $0.00. For troubleshooting, see 4.3.1 Why do item prices show $0.00?.
-
Before disabling or deleting a price table, make sure no Service tab or the online store still uses it.


