
Purpose: Add receipt / kitchen network printers (or the POS device’s built-in printer) in the Backoffice. You need them before you can set up printer mapping. For: Adoluna onboarding staff, store managers. Hardware: a network thermal printer connected to the switch (see 3.1.2 How to set up the network and wire a POS station), or a POS device with a built-in printer (such as a Sunmi D3).
Before you start: the printer needs a fixed, unique IP address. If you don’t know it or need to change it, print a config page and change the IP first (3.3.2 How to print a config page and change a printer’s IP). The printer must be on the same network as the POS and the Local Server (see 3.2.5 How to set up the Adoluna Local Server).
Steps #
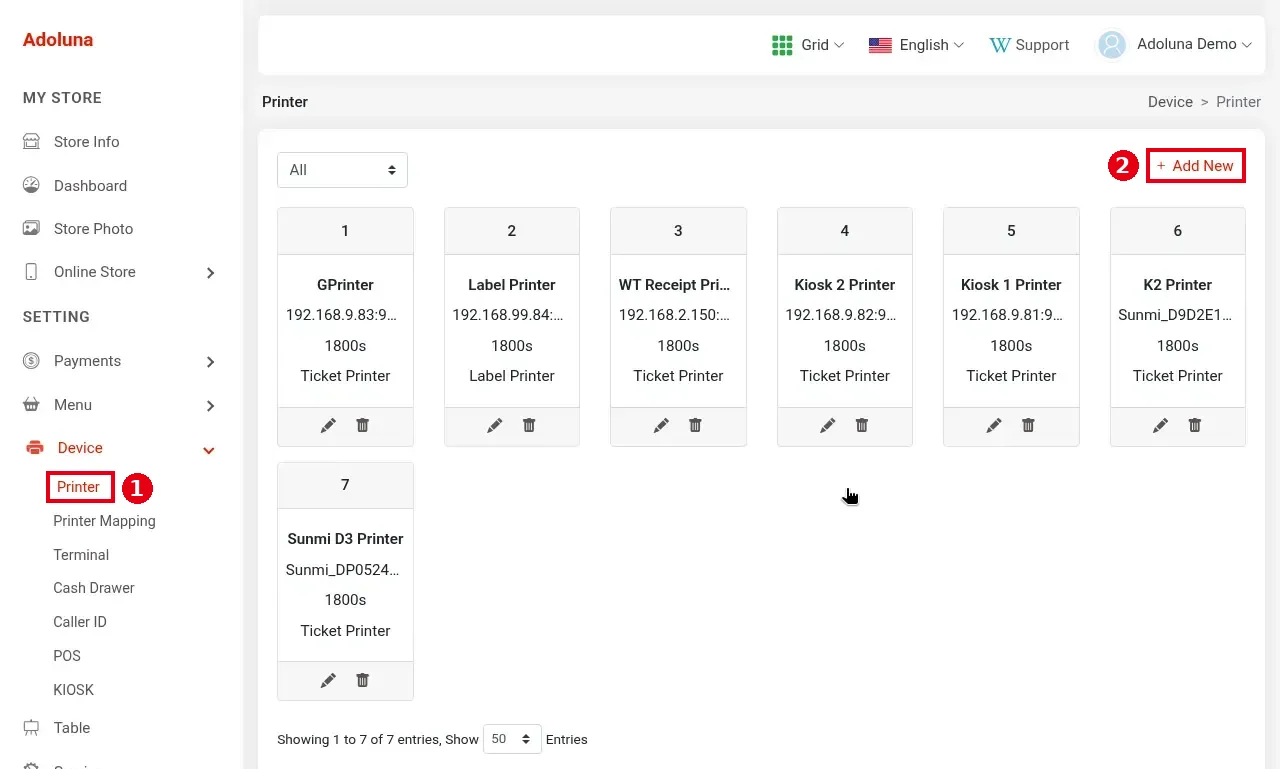
1. In the Backoffice left menu, click Device > ① Printer to open the printer list. Each printer shows as a card with its name, IP:port (e.g. 192.168.9.83:9100), timeout and type (Ticket Printer / Label Printer). The filter at the top shows only Ticket Printer or Label Printer. Click ② + Add New at the top right.
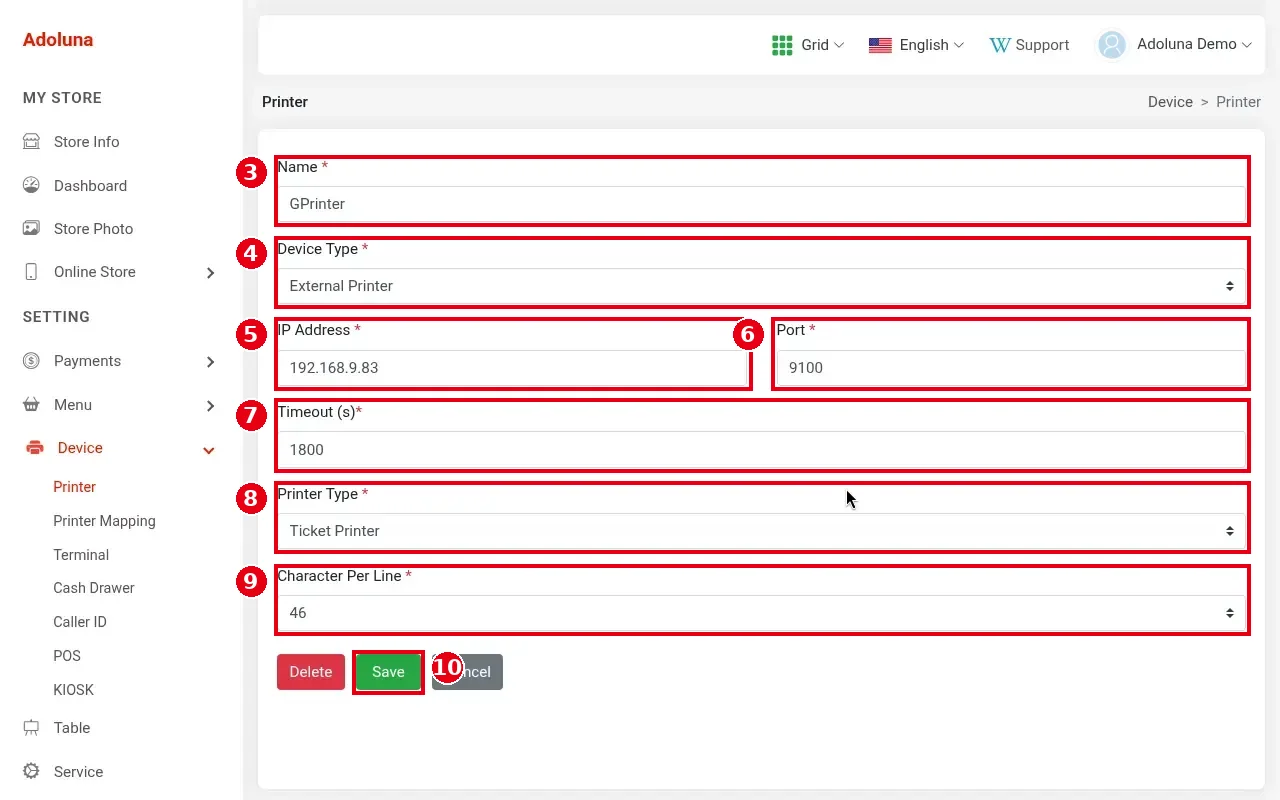
2. Fill in the printer details:
-
③ Name (required): a name that says where the printer is, e.g. “Kitchen 1” or “Front Receipt”.
-
④ Device Type (required): External Printer (network printer) or Built-In (the printer built into the POS device). Built-In needs no IP or port, but you must enter the Sunmi device’s serial number.
-
⑤ IP Address (required): the printer’s IP, shown on its config page (see 3.3.2 How to print a config page and change a printer’s IP).
-
⑥ Port (required): 9100 for most printers (the default).
-
⑦ Timeout (s) (required): print job timeout in seconds, default 1800. If the printer doesn’t respond within this time, the system drops the job. It applies only to Kitchen printer mappings.
-
⑧ Printer Type (required): Ticket Printer (receipts / kitchen tickets) or Label Printer (see 3.3.5 How to set up a label printer).
-
⑨ Character Per Line (required): the maximum characters per printed line. Use 32 for 58mm paper, 46 for 80mm paper and 42 for 80mm Epson printers (46 in the screenshot).
Click ⑩ Save.
3. Adding the printer alone doesn’t print anything. Next, set up printer mappings (kitchen, receipt, packager, etc.) and link them to this printer: 3.3.3 How to set up printer mapping and route items to kitchen printers.
4. There’s no “print test page” button in the Backoffice or on the POS. Send a test order to make sure it prints (see 3.6.2 How to run a go-live test (test orders, printing, cards, Batch)).
Notes / FAQ #
-
Click the pencil icon under a card to edit it, or the trash icon to delete it. If you replace a printer or change its IP, update IP Address here.
-
Each printer’s IP must be unique. Don’t use an address the router hands out automatically (DHCP), or the IP may change after a restart and the printer stops printing.
-
Caution: deleting a printer that a printer mapping still uses gives no warning at all. Before deleting, check under Device > Printer Mapping whether any mapping uses it, and move those mappings to another printer first (see 3.3.3 How to set up printer mapping and route items to kitchen printers).
-
If a printer isn’t printing, see 4.2.1 What to do when a printer isn’t printing.


