
Quick answers to common Adoluna POS questions, shared by the adolunapos.com chat assistant and POS tech support. Each question has a one-line answer, the steps, and a link to the full manual article.
Contents
Hardware and connection
-
2. The kitchen didn’t get the order, or the ticket shows *UNKNOWN ITEM*. What should I do?
-
4. The card terminal won’t connect or the card payment fails. What should I do?
-
6. The customer display isn’t showing anything. What should I do?
Daily operations
-
8. An employee forgot their passcode or can’t log in. What should I do?
-
13. The batch failed or doesn’t reconcile. What should I do?
-
14. An employee forgot to clock in or out. How do I fix their hours?
-
27. How do I open the cash drawer without a sale (Open Drawer)?
-
37. How does a new employee log in to the POS for the first time?
Menu and settings
-
16. An item doesn’t show on the Kiosk or online. What should I do?
-
20. There’s no language button on the Kiosk. What should I do?
Online and third-party
Reports and other
Hardware and connection #
1. The printer isn’t printing. What should I do? #
Short answer: Check the POS alert, the printer itself, the network and IP, the local service and the print settings, in that order; most cases can be fixed on site.
Steps
1. Check the POS alert: when a printer goes offline, the POS warns you within 5 seconds. Tap the notification bell at the top right of the home screen to see failed prints (see 1.1.4 How to check the Notification Center).
2. Check the printer: is it on, does it have paper, is the paper cover closed, is any light showing an error? Turn it off and on again.
3. Print a config page (see 3.3.2 How to print a config page and change a printer’s IP). If it prints, the printer itself works. Note the IP on the config page.
4. Check the network: the cable must be plugged in (the lights at both the printer and the switch should be on), and the switch and router must be working.
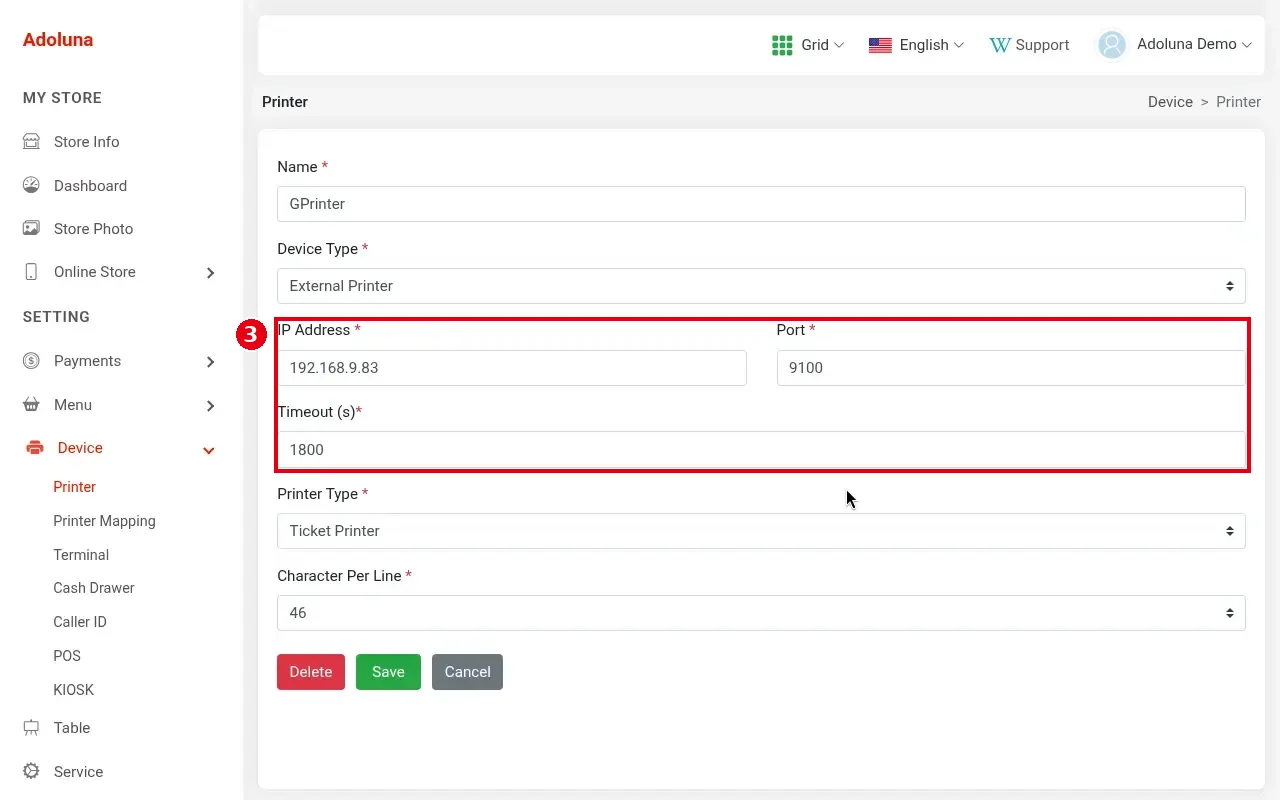
5. Check the Backoffice: under Device > Printer, this printer’s IP Address and Port must match the config page (the port is usually 9100). After a power cut or a router change, the printer’s IP may have changed.
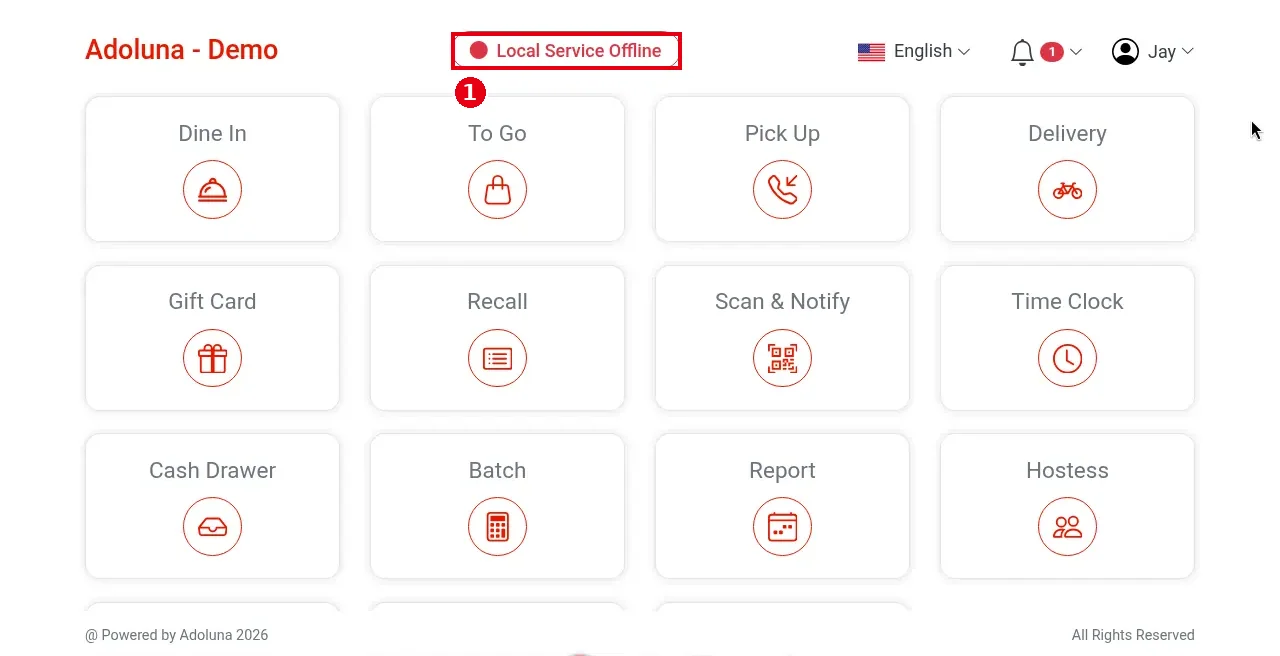
6. If a red Local Service Offline shows at the top of the home screen, fix the local server first (see question 36).
7. If only some tickets don’t print, check the items’ print departments, this POS’s default Receipt department and the auto-print switches (see question 2).
8. After it recovers: if the printer comes back within 30 minutes, kitchen tickets reprint automatically, so don’t reprint them by hand (to avoid duplicates). Reprint other receipts, and kitchen tickets older than 30 minutes, from Recall.
9. Refresh the POS: tap the employee name at the top right, then Refresh. Still not working? Contact Adoluna support: phone +1 (866) 588-8868, email support@adoluna.com.
See: 4.2.1 What to do when a printer isn’t printing
2. The kitchen didn’t get the order, or the ticket shows *UNKNOWN ITEM*. What should I do? #
Short answer: If items stay SAVED after Send, the item usually has no kitchen print department or the local service is offline. (*UNKNOWN ITEM*) is not an error: it marks a custom item.
Steps
1. Look at the coloured bar to the right of each item: SAVED (teal) means not sent yet, SENDED (green) means sent, FAILURE (red) means it failed (see 1.2.12 How to save, send and settle an order).
2. If items stay SAVED after Send with no error, first check for a red Local Service Offline at the top of the home screen. While the local service is offline, items stay SAVED after Send; see question 36.
3. If the local service is fine, check that the item has a kitchen print department. Only items with a kitchen print department are sent to the kitchen: tick the department under Printer Mapping on the item’s edit page in the Backoffice (see 3.3.3 How to set up printer mapping and route items to kitchen printers).
4. An item with (*UNKNOWN ITEM*) after its name is a custom item. It isn’t in the system menu, so it carries this label; that is normal. Tick Kitchen Printer when you add a custom item, or it won’t be sent to the kitchen and no error appears (see 1.2.8 How to add a custom menu item).
5. If an item printed at the wrong kitchen, check the item’s Printer Mapping, the printer each department uses under Device > Printer Mapping, and whether two printers’ IPs have swapped (see 4.2.2 Why did an item print at the wrong kitchen printer?). Changing a category’s default print department doesn’t change items already in it; edit them one by one.
6. If the printer itself isn’t printing, see question 1. After fixing it, resend the order from Recall if needed. Still not working? Contact Adoluna support: phone +1 (866) 588-8868, email support@adoluna.com.
See: 1.2.12 How to save, send and settle an order; 1.2.8 How to add a custom menu item; 4.2.2 Why did an item print at the wrong kitchen printer?
3. The cash drawer won’t open. What should I do? #
Short answer: The cash drawer is opened by the receipt printer, and this POS must have done Cashier In first. Check Cashier In and the cable, then the printer and the Backoffice settings.
Steps
1. Make sure this POS has done Cashier In: tap Cash Drawer on the home screen. A title of POS01 – Cashier In means no drawer is started yet; tap the drawer to use and complete Cashier In (see 1.5.3 How to start a cash drawer (Cashier In)). Without Cashier In, cash payments don’t open the drawer.
2. Check that the drawer cable (RJ11/RJ12) is plugged into the cash drawer port on the receipt printer.
3. Check that this printer is online and printing (for printer problems see question 1).
4. Check the Backoffice under Device > Cash Drawer: the drawer’s Printer must be the printer it is actually connected to (see 3.3.6 How to set up a cash drawer).
5. Make sure this POS chose this drawer at Cashier In: the drawer you tap at Cashier In is the one this POS uses.
6. When a red Local Service Offline shows at the top of the home screen (Local Server offline) or the store’s internet is down, the cash drawer won’t open and you can’t take cash: for the Local Server see question 36; for the internet see question 7.
7. Settle a test order in cash; the drawer should open. Still not working? Contact Adoluna support: phone +1 (866) 588-8868, email support@adoluna.com.
See: 3.3.6 How to set up a cash drawer; 1.5.3 How to start a cash drawer (Cashier In)
4. The card terminal won’t connect or the card payment fails. What should I do? #
Short answer: First make sure you picked the right terminal and it is on and connected. A PAX terminal also needs the local service online; VP3350 and Clover Go 3 readers connect straight to the POS and are not affected by it.
Steps
1. Make sure you picked the right terminal: in the Credit Card – PAX window each terminal shows its name and IP (e.g. T4 192.168.9.74), and the selected one is red. Pick the one in front of the guest.
2. Check the terminal: is it on, is the screen normal, is the battery charged or is it plugged in?
3. PAX terminal: it must be on the same store network as the POS; check its Wi-Fi or network cable. When a red Local Service Offline shows on the home screen, PAX terminals can’t be used; fix the local server first (see question 36).
4. VP3350 and Clover Go 3 readers connect straight to the POS device and are not affected by the local service. The VP3350 plugs into the POS with a USB cable; the Clover Go 3 is a Bluetooth device, see question 5. The VP3350 works on Android devices only; the Clover Go 3 works on Android and iOS. Both need the latest Adoluna App (the new version is waiting for app store approval and is coming soon).
5. If the payment result shows Terminal : Terminal Offline, the POS can’t reach the selected terminal. Tap Continue to go back to Settle; the amount due is unchanged, so check and take the payment again.
6. Before trying again, make sure the guest was not charged (look at the terminal screen or ask the guest). If the system says the order already has a payment request, tap Cancel unless you are sure the first request was cancelled. If an order is stuck in payment, a Cancel button appears after 30 seconds.
7. Reconcile before the day’s batch (Batch) to make sure the terminal and the POS agree (see question 13).
8. Still not working? Contact Adoluna support: phone +1 (866) 588-8868, email support@adoluna.com.
See: 4.1.2 What to do when the card terminal doesn’t respond; 1.3.2 How to take a credit card payment
5. How do I pair a Clover Go 3 card reader? #
Short answer: The Clover Go 3 is a Bluetooth reader and is set up the same way as the VP3300 Bluetooth reader: create the terminal in the Backoffice and assign it to the POS, then connect it inside Adoluna POS, not in the device’s own Bluetooth settings; when asked for a pairing code, enter the last 6 digits of the serial number printed on the reader. The Clover Go 3 works on Android and iOS and needs the latest Adoluna App (the new version is waiting for app store approval and is coming soon).
Steps
1. In the Backoffice, go to Device > Terminal and click + Add New: set Terminal Type to BOLT, enter a Name, set Connection Method to Bluetooth, fill in HSN (required, but only a note, e.g. the serial number to tell readers apart; it doesn’t affect connecting or pairing), and click Save.
2. On this POS’s edit page, tick the reader under Terminal and set it as Default (see 3.2.2 How to create POS and Kiosk devices in the Backoffice).
3. On the POS home screen, tap the settings icon at the top right and choose Bluetooth: set Device Type to Clover, tap Start Scan, and when the reader shows up (its name looks like Clover_Go_830672), tap Bind.
4. When the Bluetooth Pairing Request appears, enter the pairing code: the last 6 digits of the serial number printed on the reader (it may differ from the number in the device name or the HSN in the Backoffice), then tap Pair. Device connected and Bound mean it’s connected.
5. The reader has no screen of its own. Tip and signature show on the customer display if one is bound to this POS (see question 6); otherwise they show directly on the POS screen, so turn the POS toward the guest.
6. Settle a small test order: check that the reader reads the card and the tip and signature screens appear (on the customer display or the POS), then void or refund it.
7. A reader can only be connected to one POS at a time. To move it to another POS, disconnect it on the first POS first.
8. Still not working? Contact Adoluna support: phone +1 (866) 588-8868, email support@adoluna.com.
See: 3.4.3 VP3350 读卡器 / How to connect a Clover Go 3 / VP3350 card reader
6. The customer display isn’t showing anything. What should I do? #
Short answer: Check the device binding, the Customer Display settings in the Backoffice, the network and the local service, then refresh both devices, and rebind as a last step.
Steps
1. Make sure the display device is bound as Customer Display (not POS). If it isn’t bound or is bound wrongly, bind it again (see 3.2.3 How to bind a device). The second screen of a Sunmi dual-screen device shows by itself and needs no binding.
2. In the Backoffice, open this POS under Device > POS and scroll to Customer Display: the switch on the right must be on, Binding Status must show BOUND, and check whether Enable Cloud Connection is on. Click Save after changes.
3. Check the network: the display must be online. With Enable Cloud Connection off, the display connects through the local server, so it must be on the main network (not the guest network) and on the same network as the POS and the local server; also check the POS for a red Local Service Offline (see question 36). With cloud connection on, it doesn’t depend on the local server.
4. Tap Refresh on both the POS and the customer display.
5. If it still doesn’t work, click Unbound for the customer display on this POS’s edit page in the Backoffice, then bind it again on the display device.
6. Still not working? Contact Adoluna support: phone +1 (866) 588-8868, email support@adoluna.com.
See: 4.4.2 What to do when the customer display won’t connect
7. If the network goes down, can I still use the POS? #
Short answer: No. Adoluna POS is cloud-based and needs the internet even to take orders. When the store’s internet is down, the whole POS stops working: no orders, printing or cash (the cash drawer won’t open), and card payments, online orders and third-party orders all stop too.
Steps
1. When the store’s internet is down: you can’t take orders; the cloud can’t reach the Local Server, so printers don’t print and the cash drawer won’t open (no cash payments); card payments, online orders and third-party orders all stop too (see 4.4.1 What to do when the Local Server is offline).
2. Keep the router online at all times. The recommended router (GL.iNet Flint 2) can use a phone hotspot as a backup connection when the broadband line is down.
3. If a red Local Service Offline still shows at the top of the home screen after the internet is back, see question 36.
4. Still not working? Contact Adoluna support: phone +1 (866) 588-8868, email support@adoluna.com.
See: 4.4.1 What to do when the Local Server is offline
36. The local server is offline. What should I do? #
Short answer: When a red Local Service Offline shows at the top of the home screen, check the local server’s power and network cables, restart it, wait about 3 minutes and tap Refresh on the POS. While it is offline, printers don’t print, the cash drawer won’t open (no cash payments) and PAX terminals can’t be used.
Steps
1. How to tell: a red Local Service Offline at the top centre of the home screen means this POS can’t reach the store’s local server; nothing shows while it is online. Printers also stop printing, the cash drawer won’t open (no cash payments) and PAX terminals can’t be used. If the store’s internet is down, the whole POS stops working; see question 7.
2. Check that the local server’s power and network cables are plugged in.
3. If both are fine, unplug the local server and restart it.
4. Wait about 3 minutes, then tap the employee name at the top right of the POS and tap Refresh.
5. Printing while offline: failed prints show in the Notification Center (see 1.1.4 How to check the Notification Center). If the local server is back within 30 minutes, kitchen tickets reprint automatically; after 30 minutes use Resend. Guest receipts and other receipts don’t reprint automatically; use Reprint.
6. Card payments while offline: PAX terminals can’t be used; VP3350 and Clover Go 3 readers connect straight to the POS and are not affected. With PAX terminals only, you can use Bolt Key In (manual card entry) on the POS (the POS must be online; see 3.4.2 How to set up a Bolt terminal).
7. Cash while offline: the cash drawer won’t open, so you can’t take cash.
8. Prevention: keep the local server switched on all the time, and don’t share its network cable with other devices.
9. If Local Service Offline still shows after the restart: Still not working? Contact Adoluna support: phone +1 (866) 588-8868, email support@adoluna.com. Adoluna technicians handle resetting or replacing the local server.
See: 4.4.1 What to do when the Local Server is offline
Daily operations #
8. An employee forgot their passcode or can’t log in. What should I do? #
Short answer: There is no password recovery on the POS login screen; only a manager can reset an employee passcode in the Backoffice. If someone can’t log in, also check whether they are logged in on another device or must clock in first.
Steps
1. The manager logs in to the Backoffice, goes to Employee > Employee, finds the employee and clicks the pencil icon.
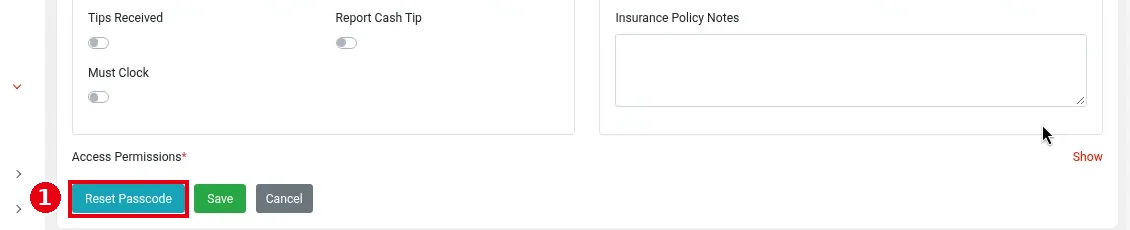
2. At the bottom of the edit page, click Reset Passcode and set the new passcode (4–6 digits, not used by any other employee).
3. Give the employee the new passcode and have them log in on the POS: tap any function button, enter the passcode and tap Enter (see 1.1.1 How to log in and out of the POS).
4. Right passcode but logged out: one passcode can only be logged in on one device at a time. Logging in on another device logs out this one.
5. Can log in but can’t open orders: the store may require staff to clock in at Time Clock first (Must Clock in the employee profile).
6. For a Backoffice account password (not a POS passcode), click Forget your password? on the Backoffice login page. If a manager forgets their own POS passcode, the owner or someone else with a Backoffice account resets it. If nobody can log in to the Backoffice, contact Adoluna support: phone +1 (866) 588-8868, email support@adoluna.com.
See: 4.5.1 What to do when an employee forgets their passcode; 1.1.1 How to log in and out of the POS
9. How do I void an order? #
Short answer: For an unpaid order, tap Void. For a paid order, Reopen it, void each payment, then void the whole order. To void only some items, use ×.
Steps
1. To void some items: in Order Detail tap Edit, select the item on the left and tap ×. Tick the items to void, choose or type a reason, tap Confirm, then save the order (see 1.4.4 How to void an item).
2. To void a whole unpaid order: open the order’s Order Detail, tap Void, choose or type a reason and tap Confirm (see 1.4.5 How to void an unpaid order).
3. To void a whole paid order: in Recall choose Paid, find the order and tap Reopen. Tap Void under each payment and confirm; once all payments are voided, tap Void on the right to void the order (see 1.4.6 How to void a paid order).
4. Use Void, not Refund: once an order has a refund it can no longer be voided. After a card payment has been batched (Batch) it can’t be voided, only refunded (see question 10).
5. Whether a void needs manager approval depends on the employee’s permissions. Voiding an item already sent doesn’t print a void ticket in the kitchen, so tell the kitchen if needed.
See: 1.4.4 How to void an item; 1.4.5 How to void an unpaid order; 1.4.6 How to void a paid order
10. How do I give a refund? #
Short answer: Find the paid order in Recall and tap Refund under the payment to refund, in full or in part. A PAX card refund needs the guest to present the card on the terminal again; Bolt devices don’t.
Steps
1. In Recall choose Paid, find the order and open Order Detail. Each payment has its own Refund button; you don’t need to Reopen first.
2. Tap Refund under the payment to refund, type the amount on the keypad (entered in cents, e.g. 5, 0, 0 gives $5.00) and tap Confirm. You can refund part of a payment.
3. Cash and similar payments: the refund is done at once; a negative line appears at the top of the payment list and the order stays Paid.
4. PAX card payments: after Confirm, pick the terminal and ask the guest to present the card on the PAX terminal again (tap, insert or swipe), because PAX keeps neither the card number nor a token.
5. Bolt device payments (VP3350, Clover): the refund doesn’t need the guest’s card, so you can refund without the guest present.
6. After a card payment has been batched (Batch) it can’t be voided, only refunded. If you need to void the whole order, void instead of refunding, because an order with a refund can no longer be voided (see question 9).
7. Gift card payments are refunded to the gift card. Refunds of custom payment types such as DoorDash or Uber Eats are only recorded on the POS; the actual refund is done on that platform. After a refund, the guest receives the money within 5–10 business days.
See: 1.4.7 How to refund an order
11. How do I add or change a tip? #
Short answer: Before settling, tap TIP at the bottom of the order to pick, customise or remove a tip. A tip the guest writes on the card receipt is added in Batch before the batch is closed; once the batch is closed, tips can’t be added or changed.
Steps
1. Before settling: tap TIP at the bottom of the order and pick a tip option in the Tip window. Custom lets you enter an amount, REMOVE TIP removes the tip; tap Confirm (see 1.2.10 How to add an order-level discount, charge or tip).
2. To add a handwritten tip after a card payment: tap Batch on the home screen and choose Batch – PAX or Batch – BOLT.
3. Find the transaction by the number on the receipt in the Troutd column and tap it to open Order Detail.
4. Tap Tip under the payment, enter the tip amount and tap Confirm. No card and no terminal step is needed (see 1.6.1 How to add credit card tips in bulk).
5. Add tips before the batch is closed; once it’s closed, tips can’t be added or changed. Whether an employee can add tips, and whether manager approval is needed, depends on their permissions.
See: 1.6.1 How to add credit card tips in bulk; 1.2.10 How to add an order-level discount, charge or tip
12. How do I split or combine orders? #
Short answer: Use Split to move items into separate orders and Combine to merge unpaid orders into one. Split Even only prints evenly split receipts; it doesn’t split the order.
Steps
1. To split: in the order’s Order Detail (or at the bottom of Settle) tap Split, tick the items to move and tap Move To. Repeat to make more orders.
2. Tap Confirm, confirm Split orders?, then choose whether to print all split orders. The new orders are numbered like P0010-1 and P0010-2; settle each one separately (see 1.3.7 How to split a check by item).
3. To split evenly: tap Split Even at the bottom of Settle and enter the number of people. It only prints split receipts by head count; it doesn’t split the order, and Amount Due doesn’t change (see 1.3.6 How to split a check evenly).
4. To combine: open the main order you want to keep, tap Combine, tap the unpaid orders to merge in (they turn red) and tap Confirm.
5. Combining voids the discounts and charges on the orders, so it asks you to confirm; add them again afterwards if needed. The merged orders are moved to AutoVoid; to find them, choose AutoVoid under Order Status in Recall. A combine can’t be undone (see 1.3.8 How to combine orders, 4.6.4 Why can’t I find the original order after combining?, 1.4.1 How to find an order in Recall).
See: 1.3.7 How to split a check by item; 1.3.8 How to combine orders; 1.3.6 How to split a check evenly
13. The batch failed or doesn’t reconcile. What should I do? #
Short answer: If the batch doesn’t reconcile, fix the mismatched transactions in Reconcile and batch again. If the batch fails, find the failed terminal, check it and batch only that terminal again; retrying never settles twice.
Steps
1. To reconcile: go to Batch > Batch – PAX > Actions > Reconcile, choose the terminal and see which transactions don’t match.
2. For rows that exist on both sides but don’t match, tap Sync: the terminal’s transaction wins, and the POS order’s payment record is changed.
3. A transaction on the terminal but not on the POS: tap Void in the results, or tap Select Order, pick the matching order and tap Sync.
4. A transaction on the POS but not on the terminal: tap Void in the results to void that payment on the POS order; the order goes back to unpaid, then take the payment again.
5. When done, batch again. Use Bypass Reconciling only when an old terminal broke before it was batched and reconciling fails after the new terminal is in place.
6. If the batch failed: in Actions > History filter Status to Failure to see which terminal failed. Check that it is on and online and that the local service is online, then select only that terminal in the Batch window and batch again. Retrying is safe and never settles twice.
7. Still not working? Contact Adoluna support: phone +1 (866) 588-8868, email support@adoluna.com.
See: 4.1.3 What to do when a batch fails or doesn’t reconcile
14. An employee forgot to clock in or out. How do I fix their hours? #
Short answer: A manager with the right permissions edits or adds time card records on the POS. The Backoffice Time Card report can only view and export.
Steps
1. The manager needs the View All Time Card and Edit Time Card permissions (set on the position, see 2.8.1 How to create positions and set permissions).
2. On the POS home screen tap Time Clock, enter the manager’s passcode and tap History.
3. Choose the date range; you can filter by Status and by employee (Server).
4. To edit a record: tap it, tap Modify and change the times; tap Add to add another shift if needed, then tap Confirm.
5. To add a missed clock-in: tap Create Clock +, choose Date, Employee, Begin Time and End Time, and tap Confirm.
6. Check the result in the Backoffice under Report > Time Card, where you can also export it.
See: 2.8.5 How to edit or add time card records
27. How do I open the cash drawer without a sale (Open Drawer)? #
Short answer: Tap Cash Drawer on the home screen, tap Open Draw on the Cashier In/Out page, enter a reason and tap Confirm; the drawer opens at once. The button only appears once a drawer has been started (Cashier In).
Steps
1. Make sure this POS has done Cashier In: tap Cash Drawer on the home screen. A title of POS01 – CASHIER OUT means a drawer is started; if it shows POS01 – Cashier In, tap the drawer to use and complete Cashier In first (see 1.5.3 How to start a cash drawer (Cashier In)).
2. On the Cashier In/Out page, tap Open Draw. The button only appears once a drawer is started.
3. In the Open Draw Reason window, enter a reason in Reason (e.g. No sale) and tap Confirm (Cancel cancels). The drawer opens at once and the window closes with no other message.
4. To see drawer openings, tap History on the Cashier In/Out page, tap a shift record to open Cashier Detail, then tap Open Draw History (see 1.5.4 How to close out a cash drawer (Cashier Out)).
5. Whether Open Draw needs manager approval depends on the employee’s permissions.
6. If the drawer doesn’t open after Confirm: no message appears even when no drawer is connected, so check the drawer cable, the printer and the Backoffice settings as in question 3. Still not working? Contact Adoluna support: phone +1 (866) 588-8868, email support@adoluna.com.
See: 1.5.5 How to open the cash drawer without a sale
28. How do I reprint a receipt or a kitchen ticket? #
Short answer: In the order’s Order Detail, tap Resend and tick the items to reprint kitchen tickets, or tap Reprint to reprint the receipt. If the printer comes back within 30 minutes, kitchen tickets reprint automatically, so don’t reprint them again.
Steps
1. Open the order’s Order Detail: tap the table on the table map, or find the order in Recall (see 1.4.1 How to find an order in Recall).
2. To reprint kitchen tickets, tap Resend. The Resend window lists the sent items by seat; tick the items to send again (or tick Select All; Clear clears the ticks) and tap Resend.
3. To reprint the order receipt, tap Reprint, then Confirm at Print?. For printing or texting the guest receipt, see 1.3.9 How to print or text a receipt.
4. If the order has not been sent yet, the button shows Send, not Resend (see 1.2.12 How to save, send and settle an order). Resending doesn’t change the items’ original send time.
5. If the printer or the local service comes back within 30 minutes, kitchen tickets reprint automatically, so don’t reprint them by hand; after 30 minutes use Resend. Guest receipts and other receipts don’t reprint automatically; use Reprint.
6. Failed prints show in the Notification Center: kitchen send failures under the Send tab, receipt print failures under the Print tab (see 1.1.4 How to check the Notification Center). If the printer itself isn’t printing, see question 1. Still not working? Contact Adoluna support: phone +1 (866) 588-8868, email support@adoluna.com.
See: 1.4.2 How to resend or reprint an order
33. How do I open a table, move a table, or merge tables? #
Short answer: To open a table, tap Dine In and tap a free table. To move a table, tap the table number at the top of the order, pick the new table and tap Save. To settle two tables’ orders together, use Combine.
Steps
1. To open a table: tap Dine In on the home screen, choose the section at the top of the Table page and tap a free table (white/grey) to open the order screen.
2. (Optional) Tap the guest count after the table number at the top (e.g. 0P), enter the number of guests in the Guest window and tap Confirm.
3. Add items and tap Save (tap Send to send to the kitchen at the same time). The table turns green and shows the guest count, server, time seated and amount (see 1.2.1 How to start a dine-in order).
4. To move a table: tap the table on the table map to open Order Detail and tap Edit. Tap the table number itself at the top right (tapping the guest count opens the Guest window), choose the section and new table in the Table window and tap Confirm.
5. You must tap Save after moving: only then does the order move to the new table and the old table become free. If you leave without saving (× at the top right → Exit?), the change is lost (see 1.2.13 How to change an order’s type, server, table or customer).
6. To settle two tables’ orders together: open the Order Detail of the main order to keep, tap Combine, tap the unpaid orders to merge in (they turn red) and tap Confirm. Combining voids the orders’ discounts and charges; afterwards only the main order remains, with items grouped by seat (see 1.3.8 How to combine orders).
7. Whether moving a table needs manager approval depends on the employee’s permissions; without permission a manager must enter their own passcode. Still not working? Contact Adoluna support: phone +1 (866) 588-8868, email support@adoluna.com.
See: 1.2.1 How to start a dine-in order; 1.2.13 How to change an order’s type, server, table or customer; 1.3.8 How to combine orders
35. How do I use the Waitlist? #
Short answer: Turn on the waitlist under Service > Waitlist in the Backoffice. On the POS, tap Waitlist to add a party; a confirmation text goes out automatically. When the table is ready, tap the text icon to notify the guest, and tap the green tick when they are seated.
Steps
1. Turn it on: in the Backoffice click Service, choose the Waitlist tab and turn on the Waitlist switch at the top right. Set the party groups, the guest limit, the default wait time and the notification templates, then click Save (see 2.6.1 How to set up the waitlist).
2. Add a party: tap Waitlist on the POS home screen, tap the green add button at the top right, fill in Name, Phone, the party size and Quoted Time (expected wait in minutes), optionally choose a Table and add Notes, and tap Confirm. A confirmation text with a link to check the queue or cancel goes to the guest automatically (see 1.7.2 How to add a party to the waitlist).
3. Notify: when the table is ready, tap the guest’s text icon in the Check-In list and tap Confirm at “Table is ready. Notify guests?”. The phone icon places a voice call to the guest instead.
4. Seat: when the guest arrives, tap the green tick. They move to the Seated list at once, with no confirmation; if you tapped by mistake, tap Undo in the Seated list. Seating doesn’t open an order; open one on the table separately (see 1.7.3 How to notify a waiting party that their table is ready).
5. Cancel: if the guest leaves, tap the red X in the Operate column; it cancels at once with no confirmation. To undo, tap Undo in the Canceled list. Guests can also cancel themselves from the link in the confirmation text (see 1.7.4 How to cancel a waitlist entry).
6. Every text and voice call uses SMS credits; the balance shows as SMS Credit at the top left of the Waitlist screen. At 0 credits you can still add parties, but no texts are sent (see question 25).
7. If a text fails: with a wrong phone number, a red failed record (Failed) is added under the Notify column; tap the blue pencil in the Operate column to fix the number and send again. If the guest has unsubscribed or blocked our number, the POS only shows the reason in a pop-up and no text record is added. If it says This number is unsubscribed from text updates…, the guest has replied STOP; they can text START to (866) 370-0007 to receive texts again. Still not working? Contact Adoluna support: phone +1 (866) 588-8868, email support@adoluna.com.
See: 1.7.2 How to add a party to the waitlist; 1.7.3 How to notify a waiting party that their table is ready; 1.7.4 How to cancel a waitlist entry; 2.6.1 How to set up the waitlist
37. How does a new employee log in to the POS for the first time? #
Short answer: A manager first creates the employee in the Backoffice and sets a 4–6 digit Passcode. The employee then taps any function button on the POS, enters the passcode and taps Enter.
Steps
1. The manager goes to Employee > Employee in the Backoffice and clicks + Add New: choose Positions, fill in the name, Contact and Passcode (4–6 digits, not used by any other employee), choose POS Language if needed, and click Save (see 2.8.2 How to add an employee and set their passcode). The employee’s permissions come from the position.
2. Give the employee the passcode.
3. The employee taps any function button on the POS home screen (e.g. Dine In). When Please enter employee password appears, they enter the passcode (← deletes a digit, Clear clears it) and tap Enter (see 1.1.1 How to log in and out of the POS).
4. Once logged in, the gear icon at the top right of the home screen changes to the employee’s name. To log out at the end of a shift, tap the name and then Logout. Don’t use Exit System: it unbinds the device from the system and is not a normal logout.
5. Can log in but can’t open orders: if Must Clock is on in the employee profile, they must clock in at Time Clock first.
6. Logged out again after logging in: one passcode can only be logged in on one device at a time. For a forgotten passcode or other login problems, see question 8. Still not working? Contact Adoluna support: phone +1 (866) 588-8868, email support@adoluna.com.
See: 1.1.1 How to log in and out of the POS; 2.8.2 How to add an employee and set their passcode
38. How do I give a discount on an order? #
Short answer: For the whole order, tap DISCOUNT at the bottom of the order and pick a discount. For one item, select the item, tap the pencil and choose under Discount. Preset discounts are set in the Backoffice under Payments > Discount.
Steps
1. Whole-order discount: tap DISCOUNT at the bottom of the order, choose a discount in the Discount window (e.g. 10% Off) or tap Custom, and tap Confirm. REMOVE DISCOUNT removes it. Whole-order discounts are calculated on SUBTOTAL (see 1.2.10 How to add an order-level discount, charge or tip).
2. Item discount: select the item in the order on the left and tap the pencil. In the edit window, pick a preset from the Discount drop-down, or under Custom choose Percent or Cash and enter the value, then tap Confirm (see 1.2.7 How to change an item’s quantity, price, discount or charge).
3. The difference: an item discount only changes that item’s price and is not a whole-order discount; only whole-order discounts count as Discount in reports.
4. If an employee without whole-order discount permission taps DISCOUNT, Please enter manager password appears first and a manager enters their own passcode. Whether manager approval is needed depends on the employee’s permissions.
5. Preset discounts: in the Backoffice go to Payments > Discount, click + Add New, fill in Name (English) and Name (中文) (shown as the discount button on the POS), choose Percent or Cash under Value and enter the value, turn on Include Bar Drink if the discount should also apply to bar drinks, turn on Enable and click Save (see 2.4.1 How to set up discounts).
6. Combining orders voids their discounts, so add them again afterwards (see question 12). If an item can’t be discounted, check the Discount Item switch on the item form. Still not working? Contact Adoluna support: phone +1 (866) 588-8868, email support@adoluna.com.
See: 1.2.10 How to add an order-level discount, charge or tip; 1.2.7 How to change an item’s quantity, price, discount or charge; 2.4.1 How to set up discounts
Menu and settings #
15. How do I add a menu item or change a price? #
Short answer: Add or edit items one by one in the Backoffice under Menu > Menu. Excel import is not recommended for merchants at the moment.
Steps
1. In the Backoffice go to Menu > Menu, choose the menu in the left column and the category in the middle column.
2. To add an item: click + Add Menu Item, fill in Name (English), Name (中文) and the other details, and choose the Menu Item Type (it can’t be changed later).
3. Further down, fill in Price (one row per active price level), tick Tax, tick the kitchen under Printer Mapping, attach forced modifiers if needed, and click Save at the bottom of the form.
4. To change a price: click the pencil icon on the item card, change the amount under Price and click Save.
5. If you forget the print department, the item isn’t sent to the kitchen (see question 2). If prices show $0.00, see 4.3.1 Why do item prices show $0.00?.
6. To change the price on one order only (not the menu), change the item price while ordering on the POS (see 1.2.7 How to change an item’s quantity, price, discount or charge).
7. Don’t use Excel import: it is not recommended for merchants at the moment (see 2.3.12 How to import and export the menu with Excel); add items one by one in the Backoffice.
See: 2.3.5 How to add menu items
16. An item doesn’t show on the Kiosk or online. What should I do? #
Short answer: The menu, the category and the item must all have the channel switched on (Show on Kiosk / Show on Online), with a matching order type and schedule. Check each level.
Steps
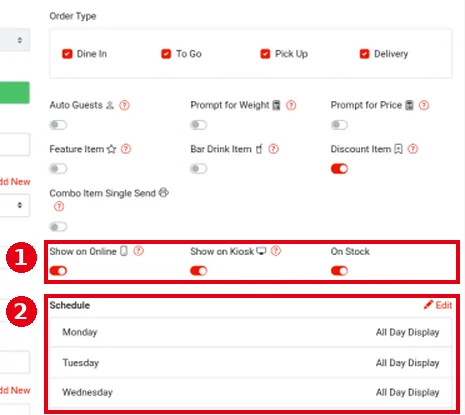
1. Item: open the item’s edit page and check that Show on Online, Show on Kiosk and On Stock are on (scan-to-order follows Show on Kiosk), that the current time is inside its Schedule, and that Order Type includes the right order types (e.g. Pick Up and Delivery for online).
2. Category: open the category’s edit page and check Show on Online, Show on Kiosk and Enable, plus the category’s Order Type and Schedule.
3. Menu: open the menu’s edit page and check Order Type, Show on Online, Show on Kiosk, Enable, Schedule, and that the category is ticked under Menu Category.
4. The Kiosk or online store itself: check the Kiosk’s device settings (see 3.5.2 How to configure a Kiosk) and whether the online store is open and within its business hours.
5. After changes, refresh the Kiosk or the online ordering page.
6. A sold-out item is turned off with On Stock: the Kiosk and online still show it, marked sold out and not orderable (see question 17). Still not working? Contact Adoluna support: phone +1 (866) 588-8868, email support@adoluna.com.
See: 4.3.2 Why isn’t an item showing on the Kiosk or online?
17. How do I mark an item as sold out? #
Short answer: Turn off the item’s (or modifier’s) On Stock switch in the Backoffice. It doesn’t switch back on by itself each day; turn it on again when the item is back.
Steps
1. Item: in the Backoffice go to Menu > Menu, choose the category, click the pencil icon on the item card, turn off On Stock in the right column and click Save at the bottom.
2. Modifier: in Menu > Modifiers click the pencil icon on the modifier card, turn off On Stock and click Save.
3. Once it is off, the item can’t be ordered on the POS, and the Kiosk and online show it as sold out.
4. When it is back: turn On Stock on again and save. It doesn’t switch back on by itself each day.
5. You can’t mark items sold out on the POS; do it in the Backoffice. To hide an item for a long time, use Show on Online and Show on Kiosk (see question 16).
See: 2.3.9 How to mark an item as unavailable (out of stock)
18. How do I add an employee or change permissions? #
Short answer: Create a position with its permissions, then add the employee in the Backoffice and choose the position. Changing a position’s permissions doesn’t change existing staff; edit existing employees on their own edit page.
Steps
1. Create a position: in the Backoffice go to Employee > Positions, click + Add New, enter the position name, tick what it may use under Access Permissions (at least one) and click Save (see 2.8.1 How to create positions and set permissions).
2. Add an employee: go to Employee > Employee, click + Add New, choose Positions, fill in First Name, Last Name, Contact and Passcode (4–6 digits, not used by any other employee), and click Save (see 2.8.2 How to add an employee and set their passcode).
3. Give the employee the passcode and have them try logging in on the POS.
4. To change an existing employee’s permissions: click the pencil icon next to the employee, scroll to the bottom, click Show next to Access Permissions, tick or untick, and click Save.
5. Note: changing a position’s permissions only affects employees added to it later. It doesn’t change employees already in that position (each employee keeps their own copy of the permissions).
6. If an employee can’t see a feature or report, see 4.5.2 Why can’t an employee see a feature or report?.
See: 2.8.2 How to add an employee and set their passcode; 2.8.1 How to create positions and set permissions
19. How do I set up a promotion? #
Short answer: Create and save the promotion under Marketing > Promotion in the Backoffice, then click start in the list. It only takes effect once its status is LIVE.
Steps
1. In the Backoffice go to Marketing > Promotion and click + Add New.
2. Fill in Platform (APP, KIOSK, POS; you can pick several), the event name in English and Chinese, the begin and end time, and choose the Promotion Scheme Type: Discount Promotion, Menu Item Promotion or Second Item Discount.
3. Click + Add New next to Promotion Scheme to add the rule, set the display times (Schedule) if needed, and click Save.
4. Start it: a new promotion is saved as STOPPED and won’t apply even after its begin time. Click the green start icon in the Operate column; it takes effect once the status is LIVE.
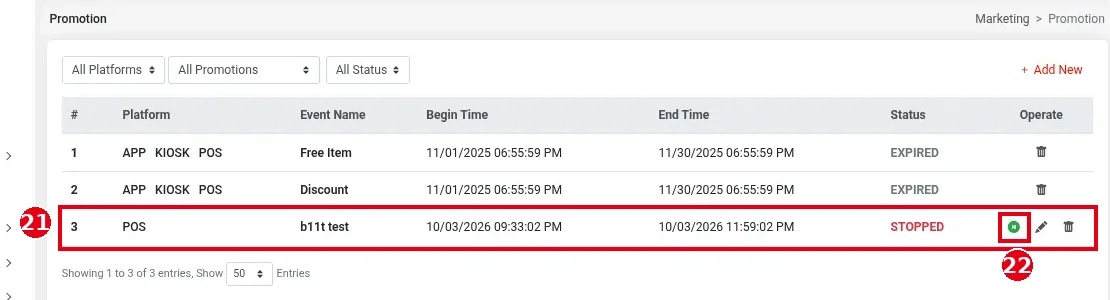
5. With POS ticked and the promotion started, matching orders on the POS get it automatically. Each order can use only one promotion or coupon.
6. To see results, go to Report > Promotion Summary and choose the promotion and dates.
See: 2.12.2 How to create a promotion
20. There’s no language button on the Kiosk. What should I do? #
Short answer: The Kiosk welcome page only shows the language buttons when both English and 中文 are ticked in that Kiosk’s device settings in the Backoffice.
Steps
1. In the Backoffice go to Device > KIOSK and click the pencil icon on this Kiosk.
2. Under Language, tick both English and 中文 and click Save.
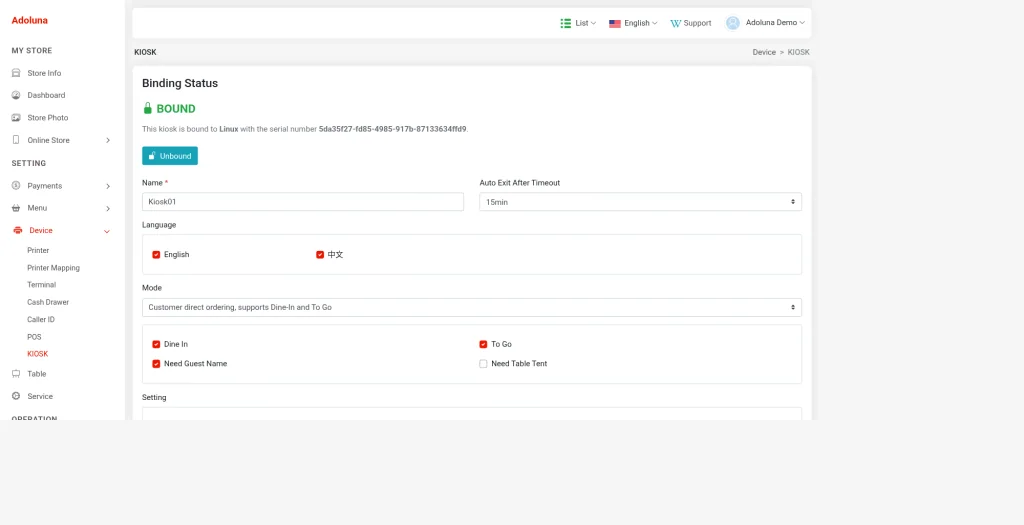
3. After saving, the Kiosk list shows “English 中文” for this device, and the Kiosk welcome page shows the English / 中文 buttons. With only one language ticked, no buttons show.
4. Still not working? Contact Adoluna support: phone +1 (866) 588-8868, email support@adoluna.com.
See: 3.5.2 How to configure a Kiosk
29. How do I set up or change a tax rate? #
Short answer: In the Backoffice, go to Menu > Tax Table and click + Add New to create a tax rate, then tick it on categories and items. Whether tax is calculated before or after discounts is set under Tax Calculation in Store Info.
Steps
1. In the Backoffice, go to Menu > Tax Table to open the list of tax rates (columns #, Name, Value (%), Default, Status, Operate). A green dot under Default marks a default rate; a green dot under Status means it is enabled.
2. Click + Add New and fill in Name (English), Name (中文) (required) and Value (%) (the rate, up to four decimal places; e.g. 6 means 6%).
3. Turn on Default (default rate; on by default in a new form) and Enable as needed, and click Save. The Default rate is used for custom items.
4. Item tax: an item’s tax comes from the Tax ticked on the item’s edit page. A category’s Default Tax is only the rate ticked by default for new items in that category (see 2.3.4 How to create and sort menu categories). Changing a category’s Default Tax doesn’t change items already in it; edit them one by one.
5. You can set several rates as Default. If an item has several rates ticked, they are added together.
6. Tax before or after discounts and surcharges: check Tax Calculation in Store Info and click Edit to change it. Before Tax takes off discounts or adds surcharges first and then calculates tax; After Tax calculates tax on the amount before discounts or surcharges (see 2.4.1 How to set up discounts).
7. If tax comes out wrong, check the rates ticked on the item, whether the rate is enabled, and the Tax Calculation setting. Still not working? Contact Adoluna support: phone +1 (866) 588-8868, email support@adoluna.com.
See: 2.3.2 How to set up tax tables; 2.4.1 How to set up discounts
31. How do I set up tip options (percentages)? #
Short answer: In the Backoffice, go to Payments > Tip, click + Add New, enter the percentage in Value (%) and choose where it shows. The amount the tip is calculated on is set under Service > Other > Tip Calculation Mode.
Steps
1. In the Backoffice, go to Payments > Tip. The drop-down at the top left filters by platform (All, APP, KIOSK, POS, Scan To Order, Screen).
2. Click + Add New and fill in Name (English), Name (中文) (required) and Value (%) (the tip percentage, required).
3. (Optional) Minimum Tip: the minimum tip amount for this option; leave it empty for no minimum. If the percentage works out below the minimum, the minimum is used.
4. Show On Platforms: tick where this option shows (APP is online ordering, Screen is the customer display; all are ticked for a new option). Show On Receipt controls whether it appears in the tip guide on receipts. Turn on Enable and click Save.
5. Calculation base: in Service > Other, find Tip Calculation Mode, turn on its switch, click the pencil icon and choose Order Total, Subtotal or Subtotal + Discount + Surcharge. With the switch off, tips are calculated on Order Total.
6. To hide an option, turn off its Enable (the row turns grey); you don’t need to delete it.
7. On the POS, staff tap TIP at the bottom of the order to choose a tip (see 1.2.10 How to add an order-level discount, charge or tip). If an option doesn’t show on a platform, check that it is enabled and that the platform is ticked under Show On Platforms. Still not working? Contact Adoluna support: phone +1 (866) 588-8868, email support@adoluna.com.
See: 2.4.3 How to set up tip options, minimum tip and tip base
Online and third-party #
21. I’m not getting alerts for online orders, or they aren’t accepted automatically. What should I do? #
Short answer: Auto-accept is controlled by four switches under Online Store > Store Setting in the Backoffice. When they are off, staff must accept orders on the POS, or the kitchen won’t get them.
Steps
1. In the Backoffice go to Online Store > Store Setting and check the four auto-accept switches: paid / unpaid pick-up orders and paid / unpaid delivery orders.
2. When a switch is on, those orders go straight to the kitchen when they reach the POS, without staff confirming. When it is off, staff open the order in Recall on the POS and tap Accept; it is sent to the kitchen right away (see 1.9.1 How to receive and handle online and app orders on the POS).
3. Without auto-accept, someone must watch the POS for new online orders and accept them promptly. With auto-accept on for unpaid (UnSettled) orders, the kitchen starts cooking before the guest has paid.
4. New order alerts: each new Adoluna online order sends a notification that pops up on the POS for 5 seconds and then goes to the Notification Center (see 1.1.4 How to check the Notification Center).
5. For SMS or email alerts, turn on New Order Notification (SMS) or New Order Notification (Email) and enter the phone number or email. Alert texts use SMS credits (see question 25). To print the guest receipt automatically, turn on Auto Print Customer Receipt.
6. DoorDash, Uber Eats and other third-party orders come through Deliverect and are all accepted and sent to the kitchen automatically; the four switches don’t affect them. If a third-party order doesn’t reach the POS, the merchant can sign in to the Deliverect platform to check (see 1.9.3 How to handle third-party delivery orders (Deliverect), 4.6.1 What to do when an online or third-party order doesn’t reach the POS).
7. Still not working? Contact Adoluna support: phone +1 (866) 588-8868, email support@adoluna.com.
See: 2.9.3 How to set up auto-accept and new order notifications; 1.9.1 How to receive and handle online and app orders on the POS; 4.6.1 What to do when an online or third-party order doesn’t reach the POS
22. DoorDash 的菜单怎么同步? / How do I sync my menu to Deliverect / DoorDash? #
Short answer: You don’t sync it by hand: Deliverect pulls the menu from the Adoluna system for DoorDash, Uber Eats and the other platforms. The Sync Menu button in the Backoffice currently does nothing.
Steps
1. Orders from DoorDash, Uber Eats and similar platforms reach the POS through Deliverect. Adoluna sets up Deliverect and links it to the store; the merchant provides an email address and the links to their stores on each delivery platform.
2. Keep the menu in the Adoluna Backoffice (see question 15). After you change it, the system doesn’t push it; Deliverect pulls it from its side.
3. To see sync records, go to Online Store > Third-Party Sync in the Backoffice. The list shows each sync’s Administrator (always Auto), Type (Deliverect) and Sync Time.
4. Don’t rely on Sync Menu at the top right: it is meant to push the menu to other platforms and currently does nothing. Google Sync at the top left is still being improved and is not recommended yet.
5. If the menu on a delivery platform looks wrong, contact Adoluna support: phone +1 (866) 588-8868, email support@adoluna.com.
See: 2.9.5 How to set up third-party delivery sync (Deliverect)
23. How do I sell a gift card and check its balance? #
Short answer: Tap Gift Card on the POS home screen to sell a card (pick a template or Custom); it can be used once paid. To check a balance, tap Search on the Gift Card screen.
Steps
1. To sell: tap Gift Card on the home screen, then tap a template or Custom.
2. In the Gift Card Sales window, swipe or type the Gift Card Number (required); with no card reader, just type the gift card number on the keyboard. With a template, the face value, sale price and expiry are filled in; with Custom, enter them yourself. Holder is optional. Tap Confirm.
3. You can add several cards. Tap Settle to take payment; the card can be used once paid (see 1.11.1 How to sell a gift card).
4. To check a balance: tap Gift Card on the home screen, tap Search at the bottom right, swipe the card or type its number (on the keyboard if there’s no card reader) and tap Search. It shows the Balance, holder, expiry, status and transaction history (see 1.11.2 How to check a gift card balance).
5. If it says the card number doesn’t exist, check the number; a new card must be sold or imported in the Backoffice first. Viewing gift cards needs the View Gift Card permission.
See: 1.11.1 How to sell a gift card; 1.11.2 How to check a gift card balance
30. How do I change online ordering hours? #
Short answer: Online ordering hours are set in the Backoffice under Online Store > Store Availability: the regular online hours, special hours and closures.
Steps
1. In the Backoffice, go to Online Store > Store Availability. These hours apply only to the online store.
2. Regular online hours: click Edit next to Online Store Hour, pick each day’s start and end time from the drop-downs, click ⊕ to add a second time slot for the same day (e.g. separate lunch and dinner), tick CLOSED for days the online store is closed, and click Save.
3. Holidays or temporary closures: click + Add New next to Special Hours and Closures. Special hours temporarily replace the regular online hours.
4. To stop taking online orders for a while (e.g. the kitchen is too busy), click Closed under Online Store Status. Once closed by hand it stays closed and doesn’t reopen at the next online opening time; click it again to reopen.
5. When Order Ahead is ENABLE, customers can order ahead outside the online hours; click Disabled to turn this off (click again to turn it back on).
6. If customers can’t order online during the online hours, first check whether Online Store Status was closed by hand. Still not working? Contact Adoluna support: phone +1 (866) 588-8868, email support@adoluna.com.
See: 2.9.1 How to set online store availability and hours
34. How do I use Scan To Order? #
Short answer: With Scan To Order, guests scan the QR code on their table with their own phone and order on it. In the Backoffice, turn on the main switch under Service > Scan to Order, set the ordering and settling methods, then download a QR code for each table under Table, print it and put it on the table.
Steps
1. First create the dining areas and tables under Table in the Backoffice (see 2.7.1 How to set up dining areas and table layout); QR codes are downloaded per table.
2. In the Backoffice, click Service, choose the Scan to Order tab and turn on the Scan to Order switch at the top right. Turn on Guest Count (guests must enter the party size first) and Order Security Code (guests must enter a code the restaurant gives them, so people outside the store can’t order) as needed.
3. Click the pencil icon next to Ordering Method and choose Single Mode (each guest at the table scans and orders separately), Group Mode (the table shares one order, synced live) or Buffet Mode (buffet: the server opens the buffet table first, guests scan the table’s QR code with their own phone to order, and the server settles at the end; a separate buffet menu isn’t required, the normal menu works too), and click Save.
4. Set Settling Method the same way: Pay Immediate (guests pay on their own phones when they order), Pay Afterward (guests pay on their own phones at the end of the meal) or Pay with Server (the server settles). Click Save. Buffet Mode only works with Pay with Server.
5. Download QR codes: in the Backoffice click Table, choose a dining area, click the first icon under each table (the QR code) and click Confirm at Download Qrcode?. You get a PNG image; print it and place it on that table, labelled with the table number. Renaming a table, or deleting and recreating it, doesn’t stop the old QR code from working.
6. Which items show on Scan To Order follows each item’s Show on Kiosk; if an item doesn’t show, check it as in question 16. Still not working? Contact Adoluna support: phone +1 (866) 588-8868, email support@adoluna.com.
See: 2.6.2 How to set up Scan to Order
Reports and other #
24. Where do I find the daily report, and how do I read it? #
Short answer: Tap Report on the POS home screen and choose the Settlement report; you can preview, print or email it.
Steps
1. Tap Report on the home screen.
2. Choose the time range: the default is today from 12:00:00 AM to now, or tap a shortcut such as Today, Yesterday or This Week.
3. Choose the Settlement category and tick the reports you want (e.g. Settlement, Item Sales, Void Orders, Gift Card Sales; you can tick several).
4. Tap Preview to preview, Print to print, or Email and enter an address to send it. If orders are still open, printing first asks Open orders existed. Continue to print?.
5. The Settlement report’s Daily Total shows Gross Receipt, Tax, Gross Sales, Discount Total, Subcharge Total, Refund Total and Net Sales, followed by payments by payment type, tip totals and more.
6. Staff, cash drawer and driver reports are in the Server, Cash Drawer and Driver categories. Whether an employee can view reports or change the time range depends on their permissions.
7. For the end-of-day steps, see 1.5.7 How to close out the day (end-of-day checklist).
See: 1.5.6 How to view, print or email POS reports; 1.5.7 How to close out the day (end-of-day checklist)
25. We’ve run out of SMS credits. What should I do? #
Short answer: Once SMS credits run out, no more texts can be sent. Contact Adoluna to top up.
Steps
1. To see what is left, look at SMS Credit at the top left of the POS Waitlist screen (see 1.7.2 How to add a party to the waitlist).
2. Credits are used by waitlist confirmation, Ready and cancellation texts, waitlist voice calls, Scan & Notify texts and new online order text alerts. Each text uses 1 credit.
3. At 0 credits you can still add parties to the waitlist, but no texts are sent.
4. Credits are topped up in the Adoluna admin system. Contact Adoluna: phone +1 (866) 588-8868, email support@adoluna.com.
See: 1.7.2 How to add a party to the waitlist; 2.6.1 How to set up the waitlist
26. How do I use Caller ID? #
Short answer: Once the Caller ID device is connected and set up in the Backoffice, the POS pops up incoming calls, and you can open a pick-up or delivery order straight away with the customer details filled in.
Steps
1. Device: any USB 2.0 56K fax modem works. Connect it to the store’s phone line and plug it into a USB port on the local server. Adoluna technicians turn on the Caller ID service on the local server.
2. In the Backoffice go to Device > Caller ID, click + Add New, enter Telephone NO. (the store’s phone number) and Serial NO. (the device serial number), and click Save.
3. In Device > POS, open each POS that should show calls and tick the phone line under Telephone. One line can be ticked on several POS devices.
4. In use: when a customer calls, the POS pops up the call and you can open a Pick Up or Delivery order straight away with the customer details filled in.
5. To see call history, tap Caller ID on the POS home screen; filter by date, phone number and status (Unanswered / Answer).
6. If no calls show, call the store from a mobile to test. If still nothing, check the device connection or contact Adoluna support: phone +1 (866) 588-8868, email support@adoluna.com.
See: 1.12.1 How to use Caller ID to take phone orders; 3.5.4 How to set up Caller ID
32. How do I print the end-of-day report or a staff report? #
Short answer: Tap Report on the POS home screen and choose the time range and report category: the end-of-day report is under Settlement, staff reports under Server (pick the employee too). Then tap Print.
Steps
1. Tap Report on the home screen.
2. Choose the time range: the default is today from 12:00:00 AM to now, or tap Today, Yesterday, This Week, Last Week, This Month or Last Month.
3. End-of-day report: choose the Settlement category and tick Settlement (the daily report), plus Item Sales, Void Orders and others if needed (you can tick several; they appear one after another in the same preview).
4. Staff report: choose the Server category, tick the reports (e.g. Summary, All Orders, Time Card), then pick the employee below (you can filter by role or name). Summary produces the employee’s Employee Balance Report; Time Card counts whole days (see 1.5.2 How to view your time card history).
5. Tap Preview to preview, Print to print on the receipt printer, or Email and enter an address to send it. Tapping Preview with no report ticked shows Please select a report type.
6. If printing shows Open orders existed. Continue to print?, some orders are still open: tap Confirm to print anyway, or Cancel to deal with the open orders first (see 1.4.1 How to find an order in Recall). For the full end-of-day steps, see 1.5.7 How to close out the day (end-of-day checklist).
7. Whether an employee can view reports or change the time range depends on their permissions. If the report doesn’t print, check the printer as in question 1. Still not working? Contact Adoluna support: phone +1 (866) 588-8868, email support@adoluna.com.
See: 1.5.6 How to view, print or email POS reports; 1.5.7 How to close out the day (end-of-day checklist)


