
Purpose: Create an All You Can Eat (buffet) menu in the Backoffice: name, price, tax, serving schedule and the items it includes. Servers pick this menu when they start a buffet table on the POS. For: owners, managers, Adoluna onboarding staff.
Before you start: buffet menu items are picked from the main menu; you don’t create items here, so set up tax tables, categories and items first as in 3.6.1 How to build a new menu from scratch (setup order). The buffet time limit and ordering interval aren’t set here; see 2.6.3 How to set buffet time limits and ordering intervals. Guests can keep ordering on their own in two ways: by scanning the QR code on their receipt at the store’s Kiosk (Kiosk mode 4, Scan-to-Order, see 3.5.2 How to configure a Kiosk; scanning the receipt QR code currently needs a barcode scanner connected and will later change to the device camera, see 1.8.4 How to open a table on the Kiosk by scanning a receipt QR code), or with Scan to Order’s Buffet Mode, where the server opens the buffet table first, guests scan the table’s QR code with their own phone to order, and the server settles at the end (see 2.6.2 How to set up Scan to Order).
Steps #
1. In the Backoffice left menu, click Menu > ① Buffet Menu to open the buffet menu list. Its columns are #, Name, Description, Regular Price, Discount Price, Status and Operate. A green dot under ③ Status means the menu is enabled. Under ④ Operate, the pencil icon edits and the bin icon deletes. ≡ is a drag handle: hold it and drag up or down to reorder. Click ② + Add New to create a buffet menu.

2. Fill in the top part of the form:
-
① Photo: click the plus sign to upload a picture.
-
② Display Color: the display colour, Default by default; the swatch on the right is a preview. Display Color is the colour of the buffet menu button on the POS; ① Photo isn’t currently shown anywhere.
-
③ Name (English), Name (中文): the English and Chinese names; fields with a red * are required.
-
④ Description (English), Description (中文): the English and Chinese descriptions.
-
⑤ Price: the left box, Regular Price, is the buffet price; the right box, Discount Price, is a special price. The × button clears the special price. The calendar icon to the right of × sets specific times on each day, Monday to Sunday, when the special price applies (a time-based special price). The buffet price is per guest.
-
⑥ Enable: the on/off switch. When it’s on, the menu is enabled (green dot under Status in the list).
-
⑦ Tax: tick the tax rates that apply (from Tax Table). + Add New at the top right adds a tax rate.
-
⑧ Schedule: the serving time for each day; every day is All Day Display by default. Click Edit at the top right to set serving time periods (e.g. dinner only); outside them, the POS doesn’t show this buffet menu and it can’t be ordered. The Kiosk follows the same schedule, but a Kiosk table that is already open and still within its dining time can keep ordering from this menu (dining time: see 2.6.3 How to set buffet time limits and ordering intervals) (updated 2026-10-05).
-
⑨ Menu Item: the items this buffet includes; see step 3.

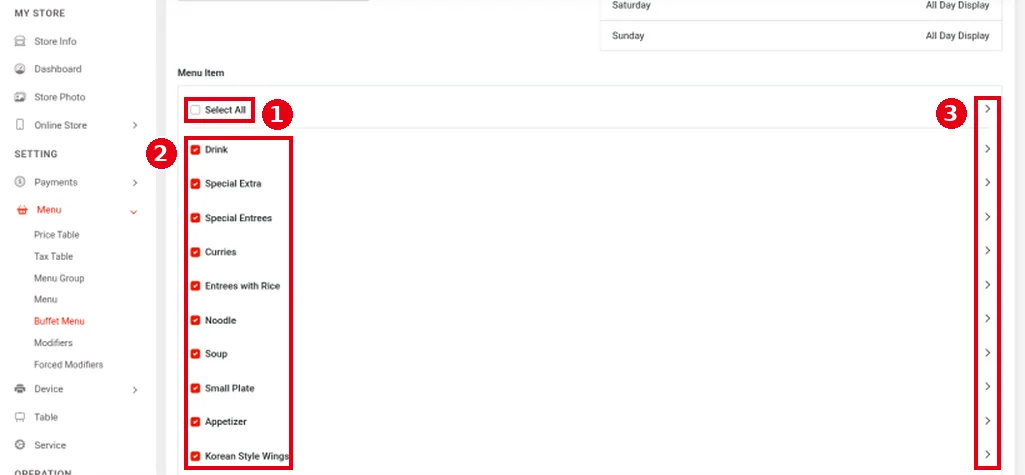
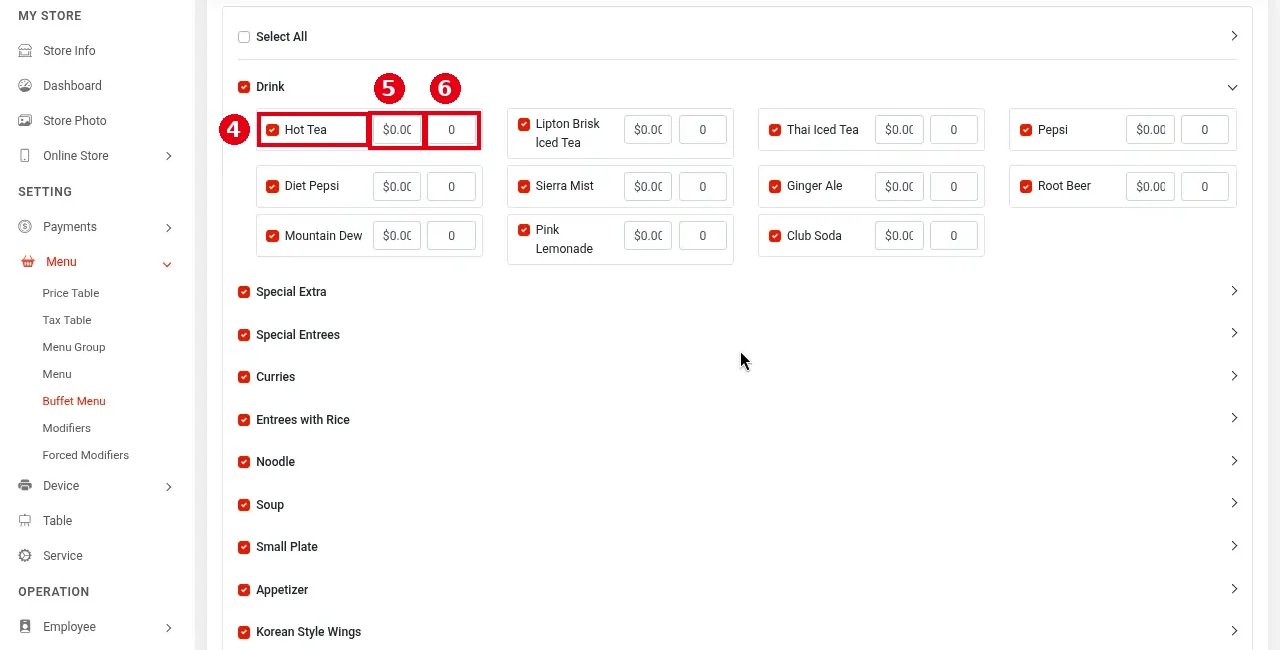
3. Pick items under Menu Item: ① Select All selects every category; ② tick categories one by one; ③ click the arrow on the right to expand a category. Ticking a category selects all its items; after expanding a category you can tick single items and set each one’s own price and quantity limit.
The picture below has the Drink category expanded: each item has a tick box ④, and the two boxes on its right are ⑤ the item’s own price in this buffet ($0.00 in the screenshot) and ⑥ the quantity limit (0 in the screenshot).
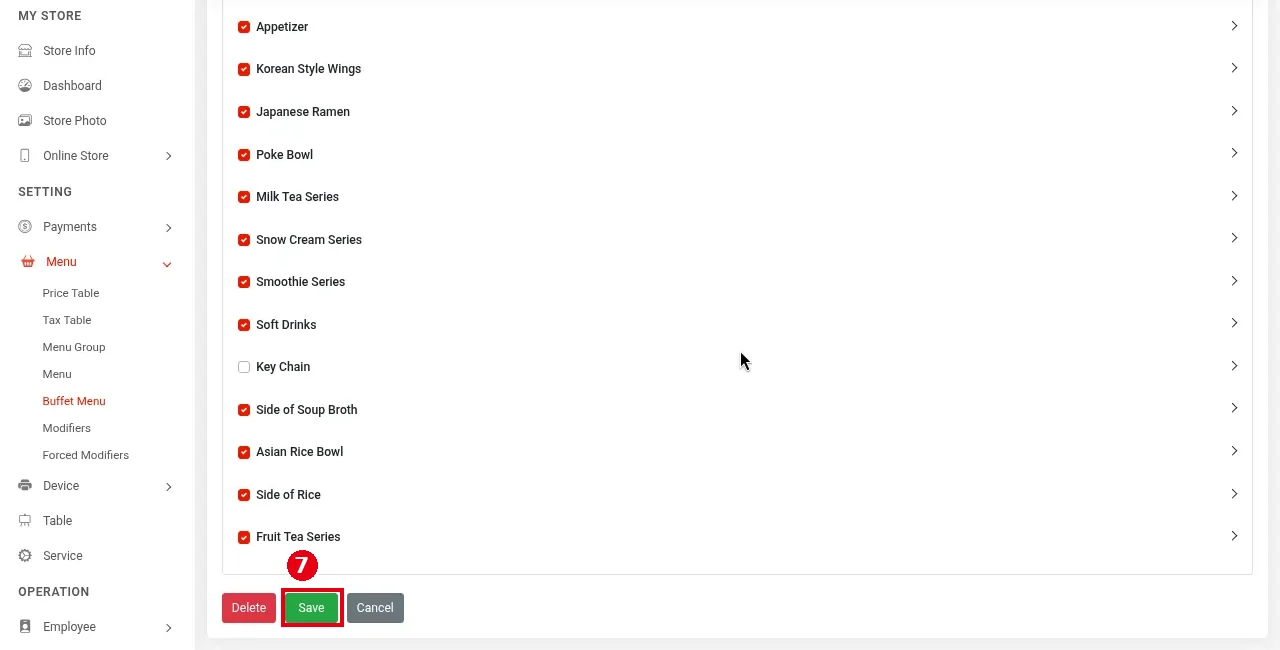
4. When you’re done, click ⑦ Save at the bottom of the form (or Cancel). When you edit an existing buffet menu, there’s also a red Delete button on the left, which deletes the menu.
5. To edit an existing buffet menu, click the pencil icon under ④ in the list. The same form opens; save after your changes. The image shows the demo store’s “All You Can Eat” (the boxes show the English name, the price and the ticked tax rate).

Notes / FAQ #
-
You can create several buffet menus, but a table can use only one buffet menu.
-
Tip: what restaurants currently do: the buffet menu has no price and only provides the menu; adult and kids’ buffet charges are set up as regular menu items (see 2.3.5 How to add menu items) and added by head count after the table is opened.
-
A separate buffet menu isn’t required; you can use the normal menu, since each item can carry several prices, one set per service type (see 2.3.1 How to set up price tables and 2.3.5 How to add menu items). The same goes for Scan to Order’s Buffet Mode (see 2.6.2 How to set up Scan to Order).
-
To change an item itself (name, printer mapping, etc.), edit it under Menu (see 3.6.1 How to build a new menu from scratch (setup order)), not in the buffet menu.
-
If the Kiosk or Scan to Order shows Chinese, fill in the Chinese name and description.
-
For how servers start and settle a buffet table, see 1.8.5 How to start an All You Can Eat (buffet) table and 1.8.6 How to settle an All You Can Eat (buffet) table.


