
Purpose: Create modifier categories and modifiers (e.g. swap rice, add meat, less spicy) for servers to choose when adding modifiers to an item on the POS. For: owners, managers, Adoluna onboarding staff.
Before you start: modifiers here are optional. For choices the guest must make (such as sauce, noodle base or sugar level), use forced modifiers; see 2.3.7 How to set up forced modifiers and default choices. For adding modifiers on the POS, see 1.2.6 How to add modifiers and custom modifiers.
Steps #
1. In the Backoffice left menu, click Menu > ① Modifiers. The page has two columns:
-
Left, modifier categories: ② + Add Modifier Category adds a category, ③ ⇅ Sort sorts them alphabetically, and ④ shows the category cards (the demo store has Exchange, Meat & Seafood, Vegetable, Sauce, Season and Cook); the selected one is red.
-
Right, the modifiers in the selected category: ⑤ + Add Modifier Item adds a modifier, ⑥ ⇅ Sort sorts them, and ⑦ Import / Export import and export with Excel (not recommended for merchants for now; see 2.3.12 How to import and export the menu with Excel).
The icons on each card: ≡ to drag and reorder, the pencil to edit and the bin to delete.

2. To add a modifier category, click ② + Add Modifier Category, fill in ⑧ Name (English) and Name (中文) (required), leave ⑨ Enable on, and ⑩ click Save.

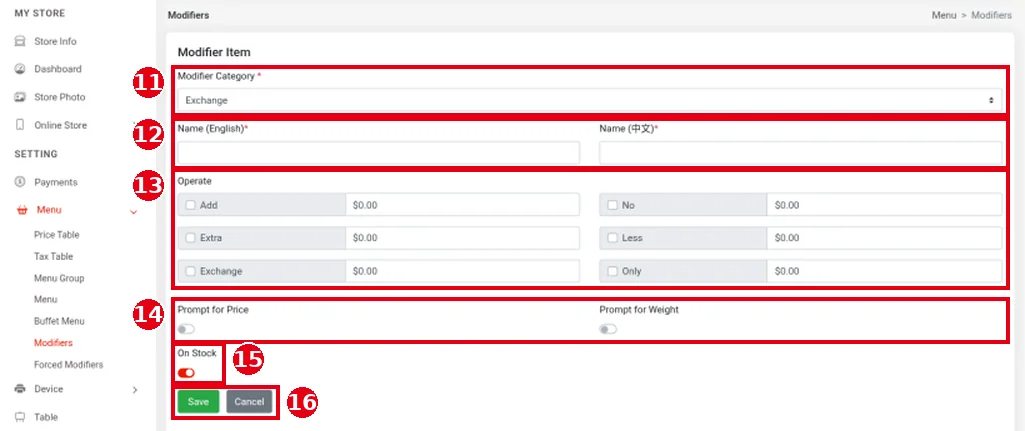
3. To add a modifier, pick a category on the left, click ⑤ + Add Modifier Item, and fill in:
-
⑪ Modifier Category: the category it belongs to (required).
-
⑫ Name (English), Name (中文): the modifier name (required).
-
⑬ Operate: tick the actions this modifier offers and enter a price for each on the right ($0.00 by default). The options are Add, No, Extra, Less, Exchange and Only. On the POS, ticked actions show as small options under the modifier button (e.g. Exchange $0.00; see 1.2.6 How to add modifiers and custom modifiers), and unticked actions are not shown.
-
⑭ Prompt for Price, Prompt for Weight: according to the website docs, when on, choosing this modifier asks for a price or weight; on the POS such modifiers have a small file icon at the bottom right of the button (see 1.2.6 How to add modifiers and custom modifiers).
-
⑮ On Stock: in stock, on by default; turn it off when sold out (see 2.3.9 How to mark an item as unavailable (out of stock)).
-
⑯ Click Save to save or Cancel to cancel.
4. To edit or delete, click the pencil or bin icon on the card.
Notes / FAQ #
-
Modifiers can be used with every item; they don’t need to be attached to items.
-
Excel bulk import isn’t recommended for merchants for now (see 2.3.12 How to import and export the menu with Excel); add modifiers one by one in the Backoffice.


