
Purpose: Learn the Backoffice left menu and top toolbar, where each setting is, and which manual article covers it. For: owners, managers, Adoluna onboarding staff.
Steps #
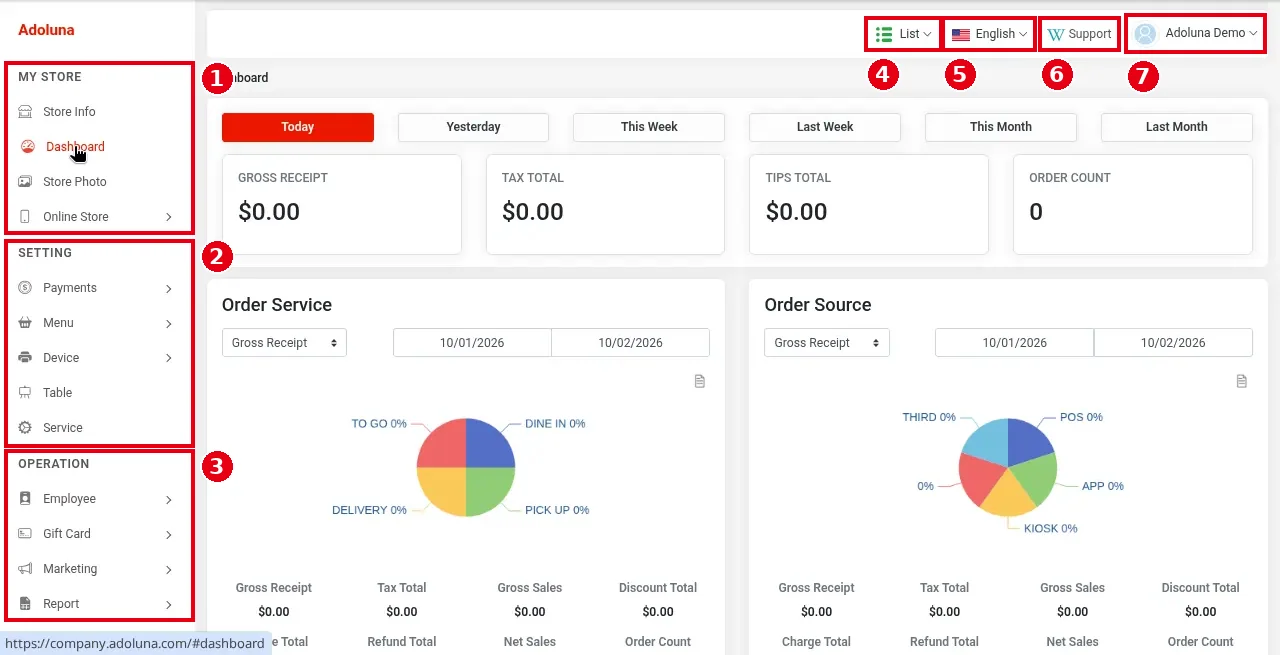
1. After signing in (see 2.1.1 How to sign in to the Backoffice) you land on Dashboard (sales overview: sales, tax, tips and order count for today, yesterday, this week and so on). The left menu has several groups:
-
① MY STORE: Store Info (see 2.2.1 How to set up store info), Dashboard, Store Photo (see 2.2.5 How to manage store photos), Online Store (see 2.9.1 How to set online store availability and hours).
-
② SETTING: Payments (see 2.4.1 How to set up discounts), Menu (see 3.6.1 How to build a new menu from scratch (setup order)), Device, Table (see 2.7.1 How to set up dining areas and table layout), Service (service settings per order type, see 2.5.1 How to configure Dine In service settings).
-
③ OPERATION: Employee (see 2.8.1 How to create positions and set permissions, 2.8.2 How to add an employee and set their passcode), Gift Card, Marketing, Report.
Top toolbar:
-
④ List: switch how the menu is shown (grid or list).
-
⑤ English: switch the Backoffice language.
-
⑥ Support: open the Adoluna POS help pages.
-
⑦ The signed-in account name: Profile, Lock Account, Logout (see 2.1.1 How to sign in to the Backoffice).
2. Menu items with > on the right expand into a submenu when clicked:
-
Payments: Discount, Surcharge, Tip, Payment Type, Void Reason, Hold (see 2.4.1 How to set up discounts to 2.4.6 How to set up hold times).
-
Menu: Price Table, Tax Table, Menu Group, Menu, Buffet Menu, Modifiers, Forced Modifiers (see 2.3.1 How to set up price tables to 2.3.13 How to set up an All You Can Eat (buffet) menu).
-
Device: Printer (3.3.1 How to add a printer), Printer Mapping (3.3.3 How to set up printer mapping and route items to kitchen printers), Terminal (3.4.1 How to add a PAX terminal), Cash Drawer (3.3.6 How to set up a cash drawer), Caller ID (3.5.4 How to set up Caller ID), POS (3.2.2 How to create POS and Kiosk devices in the Backoffice, 2.13.1 How to customize the POS home screen layout), KIOSK (3.5.2 How to configure a Kiosk).
-
Employee: Positions (2.8.1 How to create positions and set permissions), Employee (2.8.2 How to add an employee and set their passcode).
-
Gift Card: Gift Card Template, Gift Card Records.
-
Marketing: Customer, SMS Campaign, Promotion, Coupon, Events, Blacklists.
-
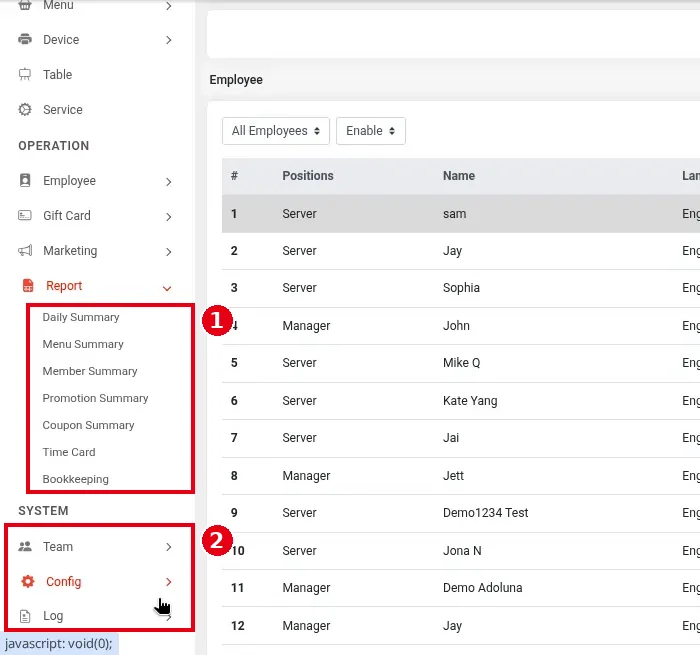
① Report: Daily Summary, Menu Summary, Member Summary, Promotion Summary, Coupon Summary, Time Card (2.8.5 How to edit or add time card records), Bookkeeping.
3. Scroll down the left menu. At the bottom is ② SYSTEM:
-
Team: Positions, Department, Administrator, for Backoffice accounts (see 2.1.3 How to manage Backoffice users (Team)).
-
Config: Config Export, Config Import.
-
Log: Authorization, Operate Log.
Config Export / Config Import export and import the store’s configuration. Authorization records each time a manager’s passcode authorized a staff action on the POS (e.g. a server voids an order and needs the manager’s passcode). Operate Log is empty for now: nothing is logged there yet, and it is reserved for future operation logs.
Notes / FAQ #
-
Gift Card: see 2.10.1 How to set up gift card templates to 2.10.3 How to import PIN gift cards. Marketing: see 2.12.1 How to manage customer records to 2.12.3 How to create a coupon. Report: see 2.11.1 How to read the Dashboard to 2.11.5 How to record entries in Bookkeeping.
-
For the recommended order of Backoffice setup for a new store, see 3.0.1 Onboarding checklist for a new store.


