
Purpose: Add a label printer and set the label size, for printing labels for drinks, to-go meals and so on. For: Adoluna onboarding staff. Hardware: a network label printer and labels of the matching size.
Steps #
1. In the Backoffice, go to Device > Printer, click + Add New, and fill in the name, Device Type, IP, port and timeout as in 3.3.1 How to add a printer.
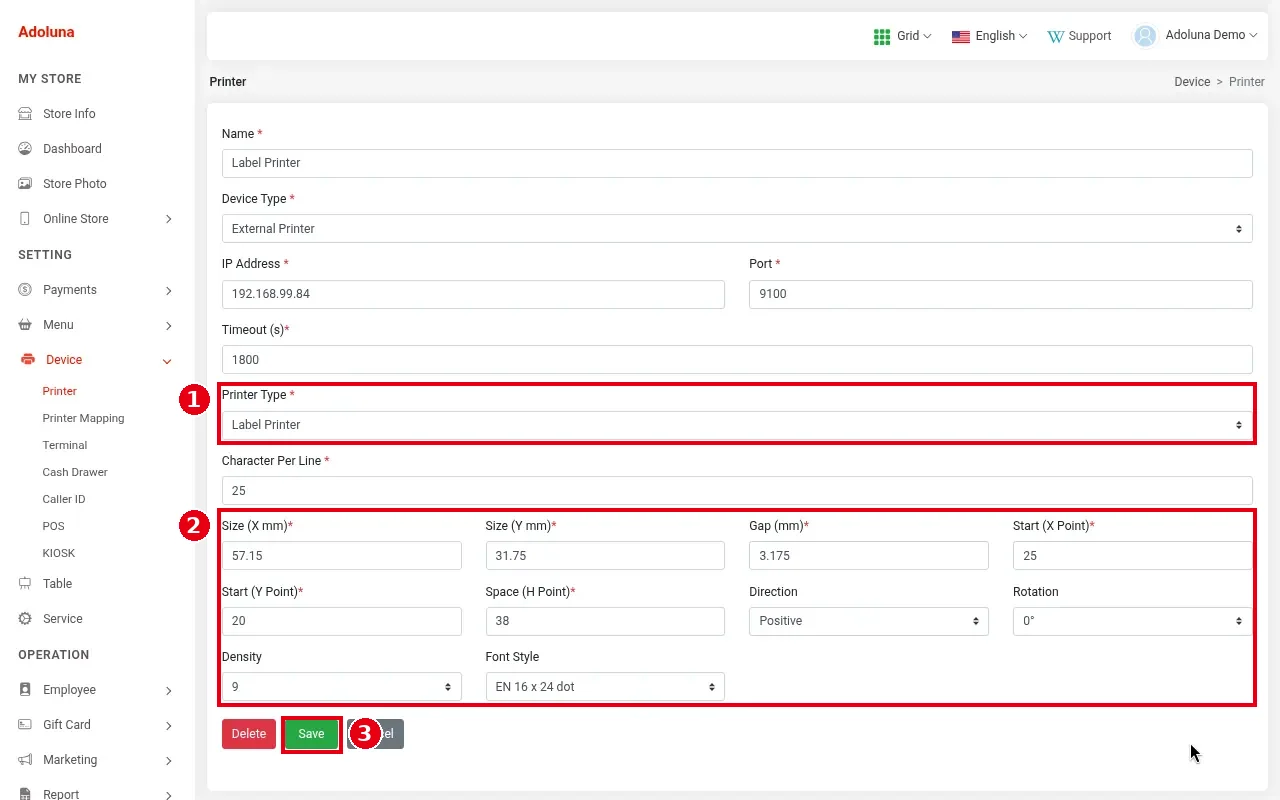
2. Set ① Printer Type to Label Printer. The label fields appear below.
3. Fill in the ② label fields to match your labels:
-
Size (X mm), Size (Y mm): label width and height in mm; 57.15 × 31.75 in the screenshot (2.25 × 1.25 inches).
-
Gap (mm): the gap between labels; 3.175 in the screenshot.
-
Start (X Point), Start (Y Point): where printing starts (left and top margin); 25 and 20 in the screenshot.
-
Space (H Point): line spacing, i.e. the distance between lines of text, in printer dots. 38 in the screenshot. Common label printers print at 203 dpi (8 dots = 1 mm), so 38 dots is about 4.75 mm. Increase it if lines run together, reduce it if the lines don’t fit.
-
Direction (print direction, Positive in the screenshot), Rotation (0°).
-
Density: print darkness; 9 in the screenshot.
-
Font Style: EN 16 x 24 dot in the screenshot.
Character Per Line is 25 in the screenshot. Suggested starting values for 2.25 × 1.25 in labels (a starting point only): the most common label is 2.25 × 1.25 inches (57.15 × 31.75 mm), and the fields to adjust are Size (X mm), Size (Y mm), Gap (mm), Start (X Point) and Start (Y Point). Start with Size (X mm) 57.15, Size (Y mm) 31.75, Gap (mm) set to the roll’s actual gap (usually 2–3 mm; 3.175, i.e. 1/8 inch, in the screenshot), Start (X Point) 25 and Start (Y Point) 20 (the screenshot values). These are only starting values: print a test label and fine-tune. If the print is off-position, adjust Start (X Point) (left/right) and Start (Y Point) (up/down) first.
Click ③ Save.
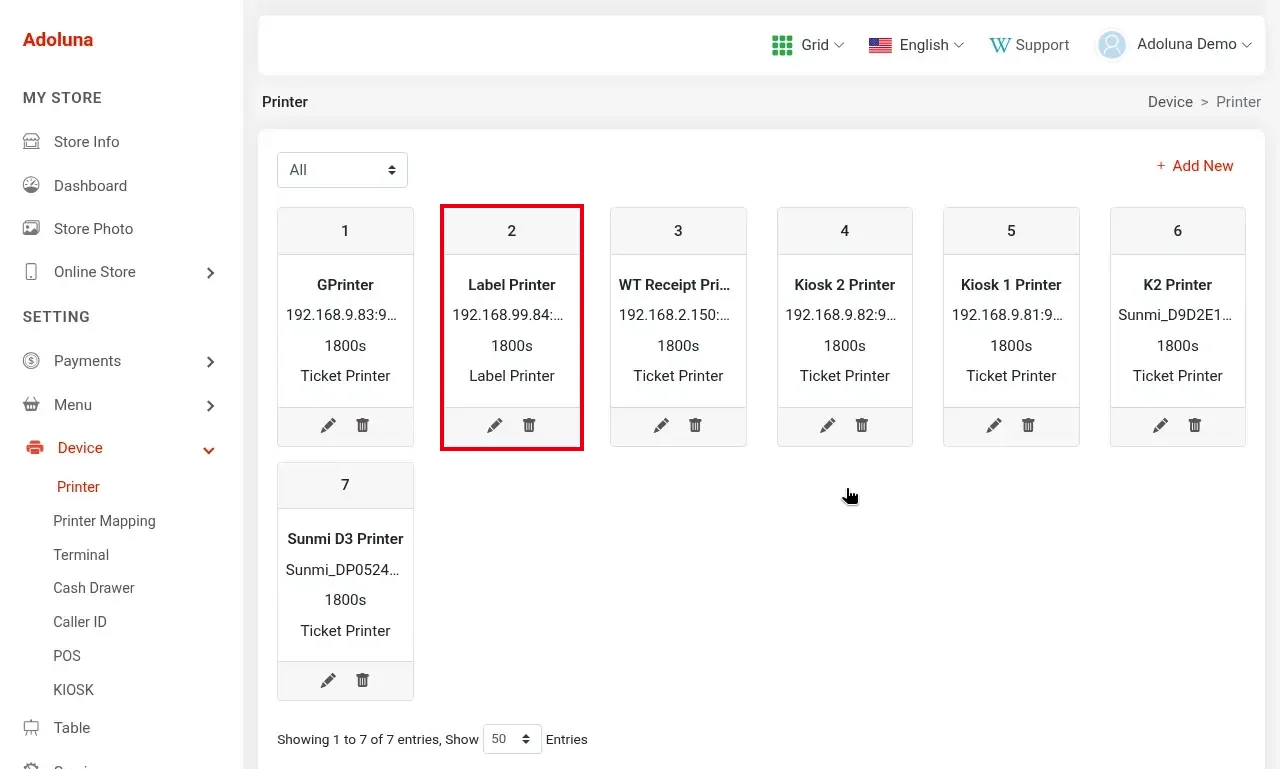
4. After saving, the label printer appears in the printer list with the type Label Printer.
5. Under Device > Printer Mapping, create a Label mapping and choose this label printer (see 3.3.3 How to set up printer mapping and route items to kitchen printers).
6. Assign the items that need labels (such as drinks) to this label mapping in the item’s Printer Mapping, the same way as kitchen mappings (see step 5 of 3.3.3 How to set up printer mapping and route items to kitchen printers).
7. Place a test order and check the label content and position. Since 2026-06-28, labels show the order type.
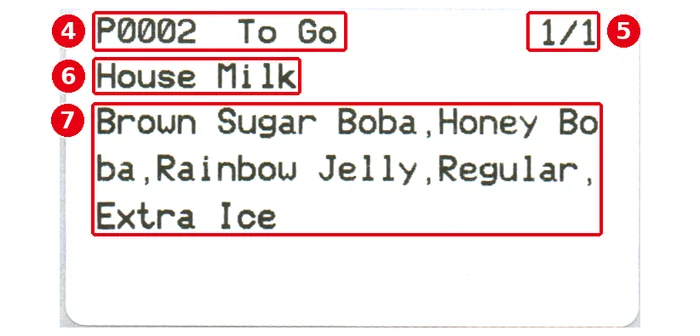
A printed label: ④ the order number and order type (e.g. P0002 To Go); ⑤ the label number / total labels (e.g. 1/1); ⑥ the item name (e.g. House Milk); ⑦ the modifiers and options (e.g. Brown Sugar Boba,Honey Boba,Rainbow Jelly,Regular,Extra Ice).
Notes / FAQ #
-
If labels print off-position, adjust Start (X Point) / Start (Y Point) first. If the position drifts further on each label, check that Size and Gap match the label roll; after changing label rolls you can calibrate the gap sensor: turn the printer off, hold PAUSE while turning it on, and release it after the automatic calibration (check the printer’s manual for the exact steps).
-
The website has no documentation for label printers; the field notes above are based on the current screen, the Adoluna technical team’s answers and TSPL references.


