
Purpose: Add a Bolt card terminal (e.g. Clover Flex), or a Key-in terminal for manual card entry, in the Backoffice. For: Adoluna onboarding staff. Hardware: a card terminal with Bolt service activated.
Before you start: Bolt is a CardConnect product. Bolt terminals don’t use an IP and port. They’re identified by the terminal’s serial number, HSN. The terminal list shows several kinds of Bolt terminal: BOLT ( Network ) (e.g. Clover Flex), BOLT ( Key-in ) (manual card entry), BOLT ( USB Hid ) (VP3350) and BOLT ( Bluetooth ) (Clover Go 3, older VP3300). For Clover Go 3 / VP3350 readers, see 3.4.3 How to connect a Clover Go 3 / VP3350 card reader. Online order payments also run on Bolt. Adoluna Sales opens the Bolt merchant account and terminals.
Steps #
1. In the Backoffice, go to Device > Terminal and click + Add New (see step 1 of 3.4.1 How to add a PAX terminal).
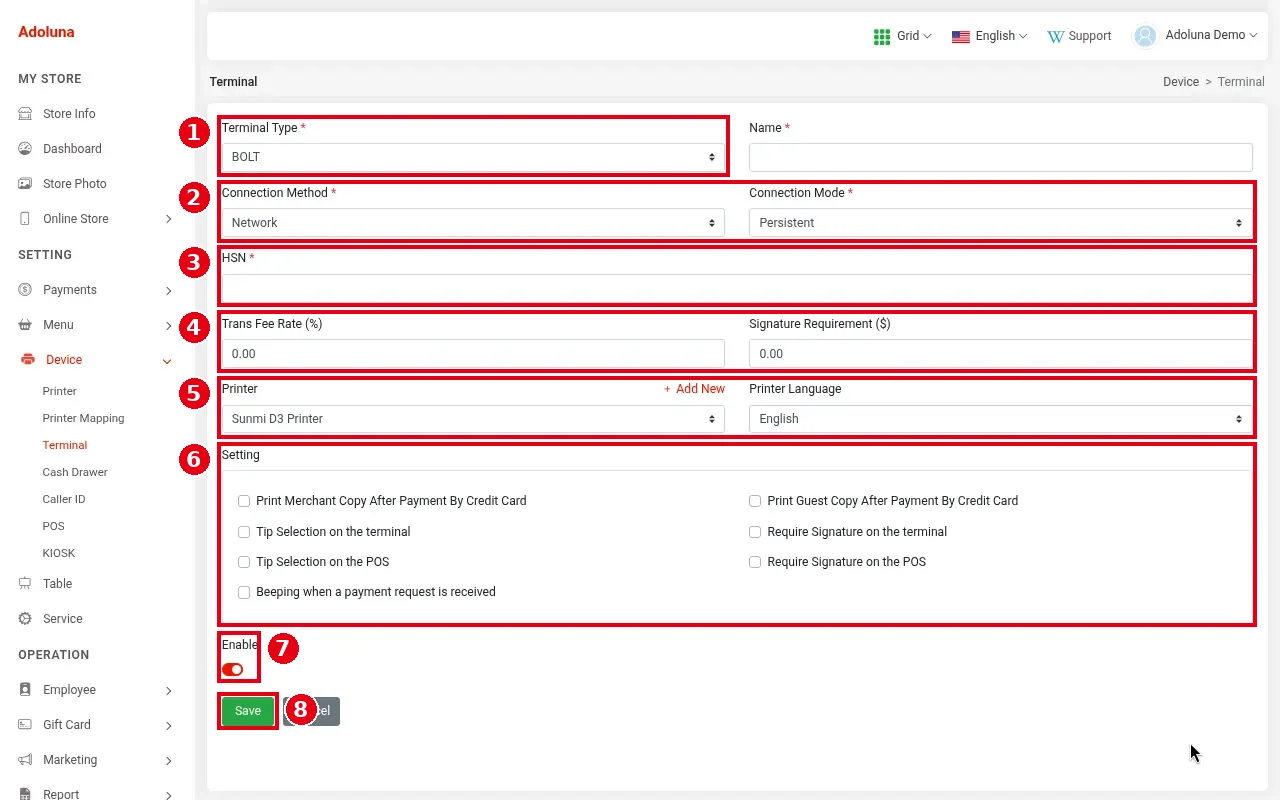
2. Fill in the terminal details:
-
① Terminal Type: choose BOLT, then enter the Name.
-
② Connection Method: Network for networked terminals such as Clover Flex (leave Connection Mode at Persistent as in the screenshot; it only matters for Bluetooth readers (Clover Go 3, VP3300), see 3.4.3 How to connect a Clover Go 3 / VP3350 card reader); Internet for a Key-in (manual card entry) terminal.
-
③ HSN (required): the terminal’s hardware serial number, i.e. the device serial number.
-
④ Trans Fee Rate (%), Signature Requirement ($): fee rate and signature threshold, as in 3.4.1 How to add a PAX terminal.
-
⑤ Printer, Printer Language: the printer and print language for this terminal.
-
⑥ Setting: merchant / guest copy printing and tip / signature on the terminal or POS, as in 3.4.1 How to add a PAX terminal. Bolt adds Beeping when a payment request is received.
-
⑦ Enable: the on/off switch (on in the screenshot). It currently has no effect.
Click ⑧ Save.
3. On each POS edit page, tick this terminal under Terminal and set it as Default if needed (see 3.2.2 How to create POS and Kiosk devices in the Backoffice).
4. Run a small test payment and void or refund it (see 3.6.2 How to run a go-live test (test orders, printing, cards, Batch)). At checkout, the Bolt terminal’s payment button carries the BOLT label (see 1.3.2 How to take a credit card payment).
Notes / FAQ #
-
Bolt card payments are batched under the Bolt device in Batch (see 1.6.3 How to close a credit card batch).
-
If the terminal doesn’t respond or won’t connect, see 4.1.2 What to do when the card terminal doesn’t respond.
-
The Enable switch currently has no effect, so turning it off doesn’t disable the terminal. To stop using a terminal for now, untick it under Terminal on the POS edit page (see 3.2.2 How to create POS and Kiosk devices in the Backoffice).


