
Purpose: Set a Kiosk’s name, languages, ordering mode, dine-in / to-go, call for help, printer, card terminal, payment types and start page pictures. For: Adoluna onboarding staff, store managers. Hardware: a Kiosk, a receipt printer and a card terminal (see 3.1.3 How to wire a Kiosk station).
Steps #
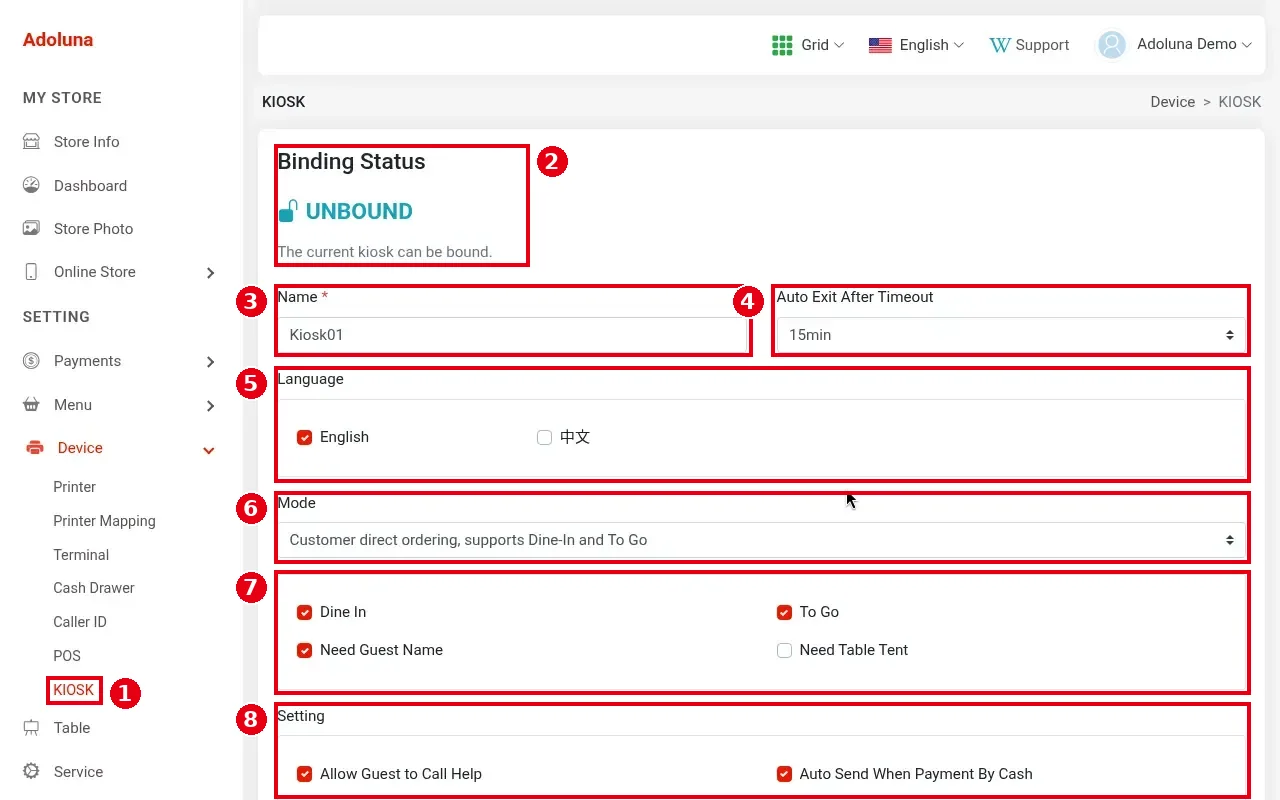
1. In the Backoffice left menu, click Device > ① KIOSK, then click the pencil icon on the Kiosk to set up (see 3.2.2 How to create POS and Kiosk devices in the Backoffice).
2. The top of the settings page:
-
② Binding Status: UNBOUND (“The current kiosk can be bound”) means no device is bound yet; to bind on the Kiosk device, see “Binding the Kiosk device” below.
-
③ Name (required): e.g. Kiosk01.
-
④ Auto Exit After Timeout: how long with no activity before it returns to the start page (15min in the screenshot).
-
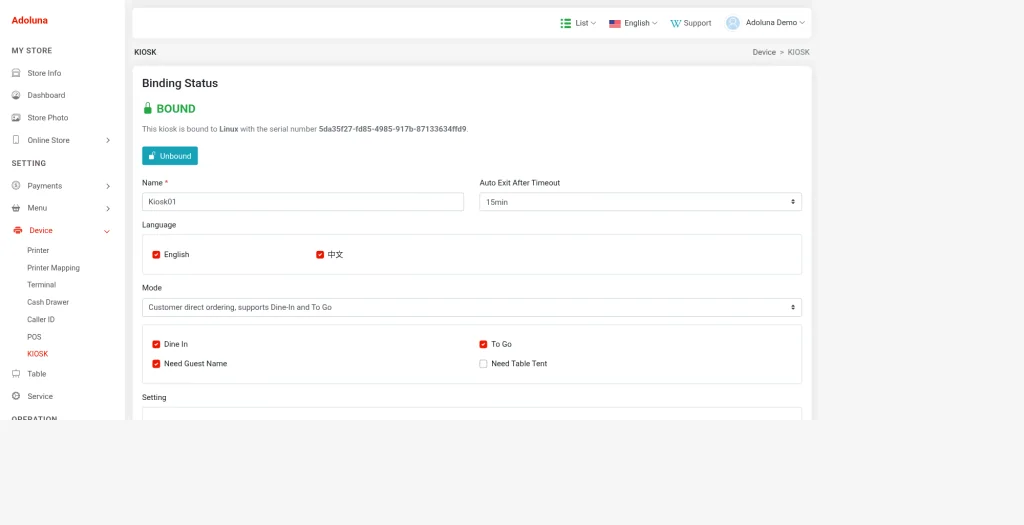
⑤ Language: tick the languages guests can choose (English and 中文 in the screenshot). With both English and 中文 ticked, the Kiosk welcome page shows the English / 中文 language buttons (see 1.8.1 How guests order and pay at the Kiosk); with only one ticked, no buttons show. After saving, the Kiosk list in the Backoffice shows “English 中文” for this device.
-
⑥ Mode: the ordering mode; mode 1, Self-Order (Customer direct ordering, supports Dine-In and To Go), in the screenshot. See “The four Kiosk modes” below.
-
⑦ Order options: Dine In, To Go (order types guests can choose), Need Guest Name (guest must enter a name), Need Table Tent (guest must enter a table tent number).
-
⑧ Setting: tick boxes; see the list under the screenshot.
Language with both English and 中文 ticked (Kiosk01):
Setting has 9 tick boxes in two columns (see the screenshot below):
-
Allow Guest to Call Help: shows the Help button on the Kiosk so guests can call staff (see 1.8.2 How to respond to a Kiosk Need Help request).
-
Auto Send When Payment By Cash: when a guest chooses cash, the order goes to the kitchen right away, without waiting for payment.
-
Print Guest Receipt After Payment By Credit Card: print the guest receipt after a card payment.
-
Print Guest Copy After Payment By Credit Card: print the guest copy of the card slip after a card payment.
-
Add Tip on Screen When Credit Card Payment (Customer Display): choose a tip on screen during a card payment.
-
Signature on Screen After Payment By Credit Card (Customer Display): sign on screen after a card payment.
-
Enable Portrait Mode: use portrait (vertical) layout.
-
Display Advertising: show advertising pictures (uploaded under Start Page Settings below).
-
Allow adding dish notes: allow notes to be added to items; when it’s off, the Kiosk cart doesn’t show the dish notes button (updated 2026-10-05).
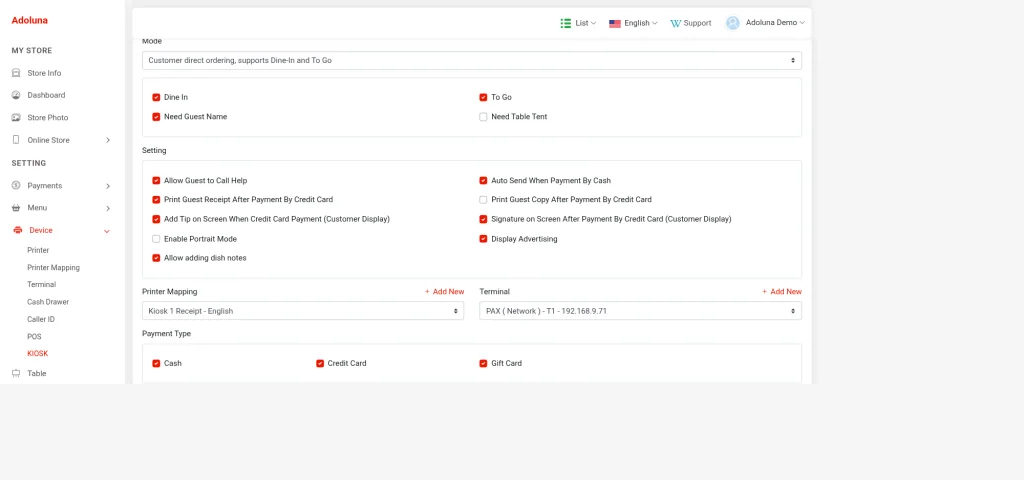
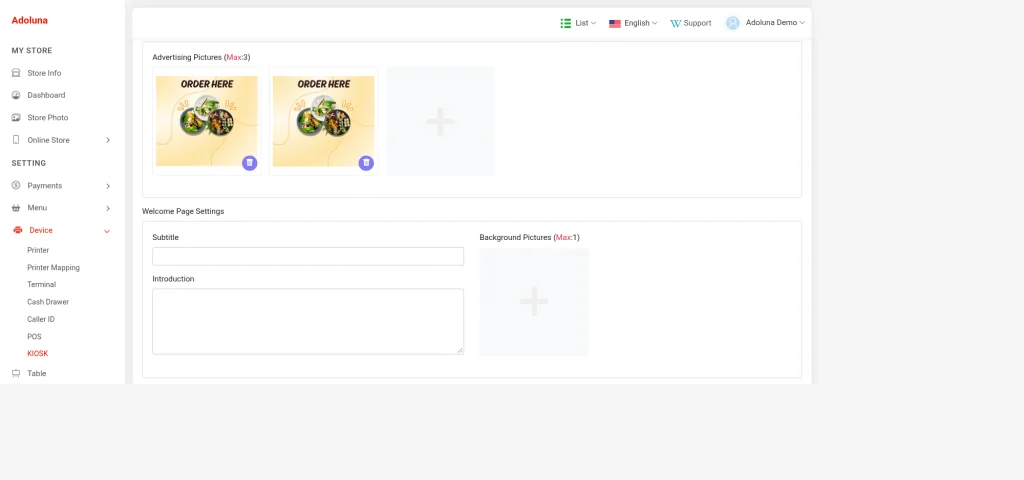
3. Scroll down and set the following (Printer Mapping, Terminal and Payment Type sit directly below Setting, see the screenshot above; Start Page Settings and Welcome Page Settings are further down, see the screenshot below):
-
Printer Mapping: the printer mapping for Kiosk receipts (see 3.3.3 How to set up printer mapping and route items to kitchen printers).
-
Terminal: this Kiosk’s card terminal (see 3.4.1 How to add a PAX terminal, 3.4.2 How to set up a Bolt terminal).
-
Payment Type: payment types guests can use (e.g. Cash, Credit Card, Gift Card, Bolt Pay). Gift cards need a magnetic stripe reader.
-
Start Page Settings: start page advertising pictures (Advertising Pictures, up to 3).
-
Welcome Page Settings: the welcome page subtitle (Subtitle), introduction text (Introduction) and background picture (Background Pictures, up to 1).
4. Click Save, then place a test order on the Kiosk (see 1.8.1 How guests order and pay at the Kiosk, 3.6.2 How to run a go-live test (test orders, printing, cards, Batch)).
The four Kiosk modes (Mode) #
The Mode dropdown has four options. Their names are long, so this manual uses the short names given here:
-
Mode 1, Self-Order: Customer direct ordering, supports Dine-In and To Go. Guests choose dine-in or to-go, order and pay on the Kiosk; the order goes to the kitchen after payment (see 1.8.1 How guests order and pay at the Kiosk).
-
Mode 2, Fixed Table: Assign to a fixed table, order after the server opens the table. The Kiosk belongs to one table. Once a server opens that table on the POS, adds any item and saves, the Kiosk activates and guests can order (when you choose this Kiosk’s table number in the back office, tables are sorted A–Z (updated 2026-10-05)); the cart has a Send to kitchen button (see 1.8.3 How to open a table on the Kiosk for guests (server mode)).
-
Mode 3, Server-Assigned Table: No fixed table assignment, order after the server selects and opens a table. The Kiosk has no fixed table. The server enters an employee passcode on the Kiosk and chooses the table number, then guests order. Sending works as in mode 2 (see 1.8.3 How to open a table on the Kiosk for guests (server mode)).
-
Mode 4, Scan-to-Order: Scan receipt QR code to open a table and order. The guest pays at the counter first and the receipt has a QR code; on the Kiosk the guest taps Start to open the scan window, scans it and orders, and the cart has a Send to kitchen button. It only supports paying first, and there’s currently no Backoffice setting for which table a scan maps to (see 1.8.4 How to open a table on the Kiosk by scanning a receipt QR code). No employee passcode is needed. Scanning the receipt QR code currently needs a barcode scanner connected; it will later change to scanning with the device camera (see 1.8.4 How to open a table on the Kiosk by scanning a receipt QR code).
Employee passcode: mode 3 needs the server to enter an employee passcode on the Kiosk; modes 2 and 4 don’t. Payment: in modes 2 and 3 the server settles on the POS; if payment types are ticked under Payment Type, guests can also pay on the Kiosk.
Binding the Kiosk device #
Once the Backoffice settings are done, bind the Kiosk device (for the general binding steps, see 3.2.3 How to bind a device):
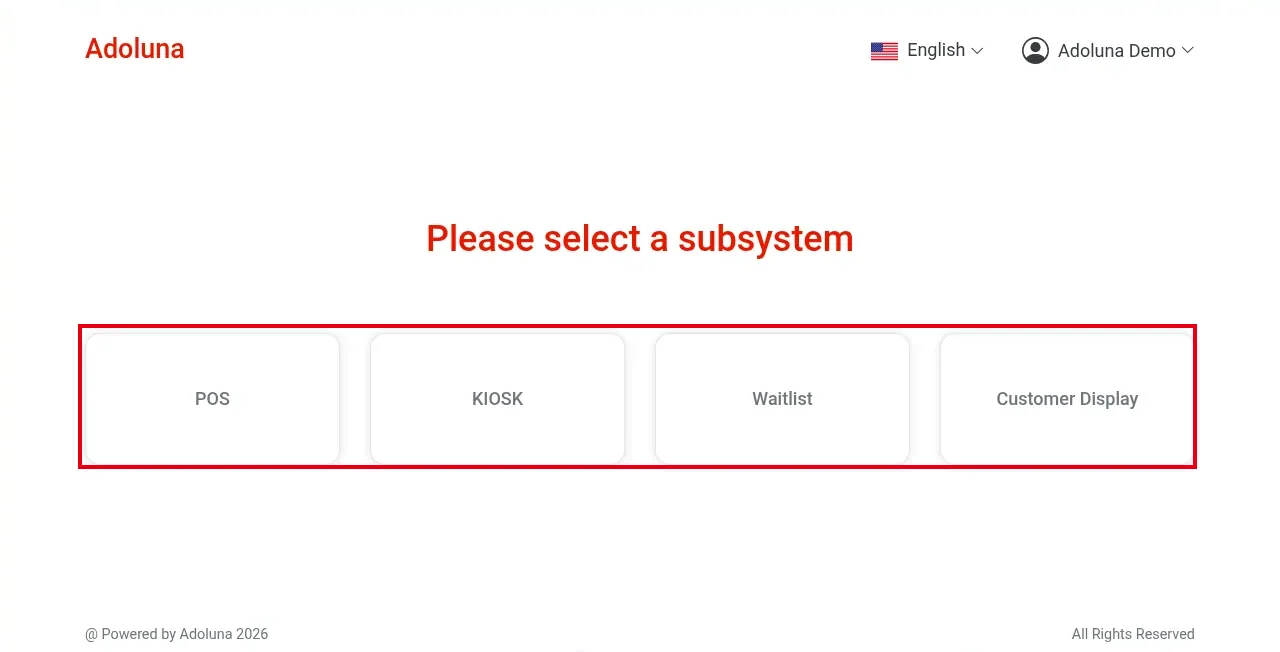
1. On the Kiosk device, open the Adoluna POS app or go to pos.adoluna.com in a browser and log in. On “Please select a subsystem”, choose KIOSK (the other options are POS, Waitlist and Customer Display).
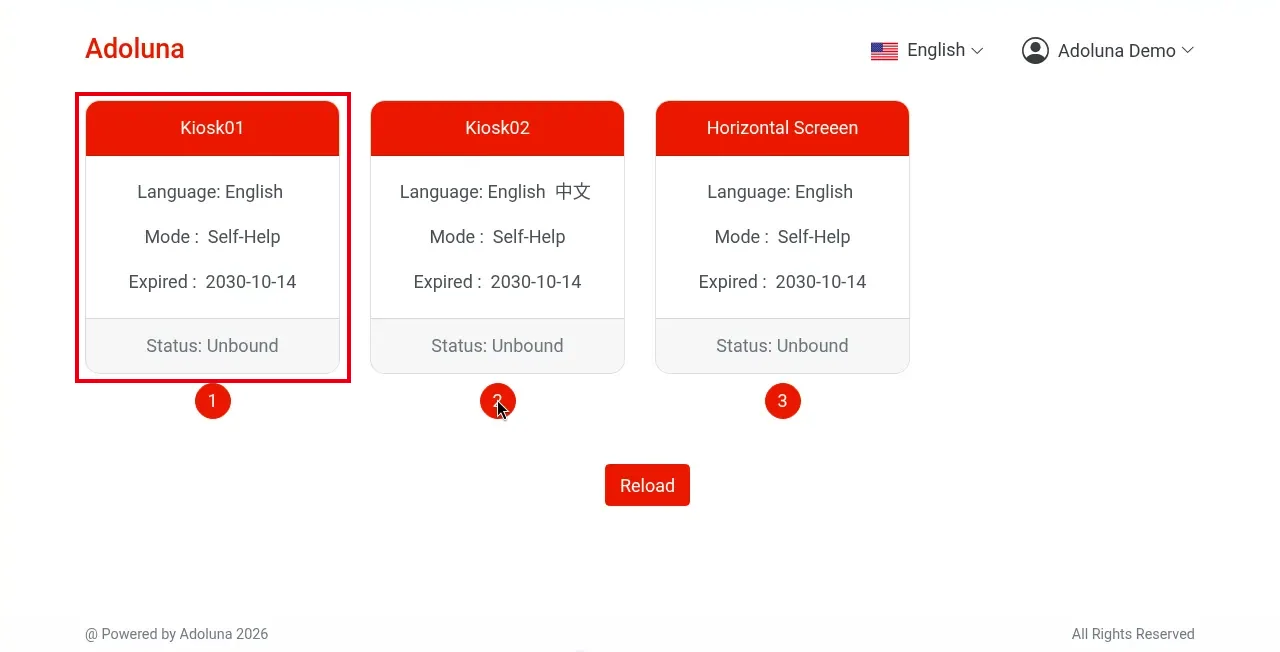
2. The list shows the Kiosks set up in the Backoffice (e.g. Kiosk01, Kiosk02, Horizontal Screen). Each card shows the language (Language), mode (Mode, e.g. Self-Help), expiry date (Expired) and binding status; unbound ones show Status: Unbound. Tap the one to bind. Tap Reload if the list is out of date.
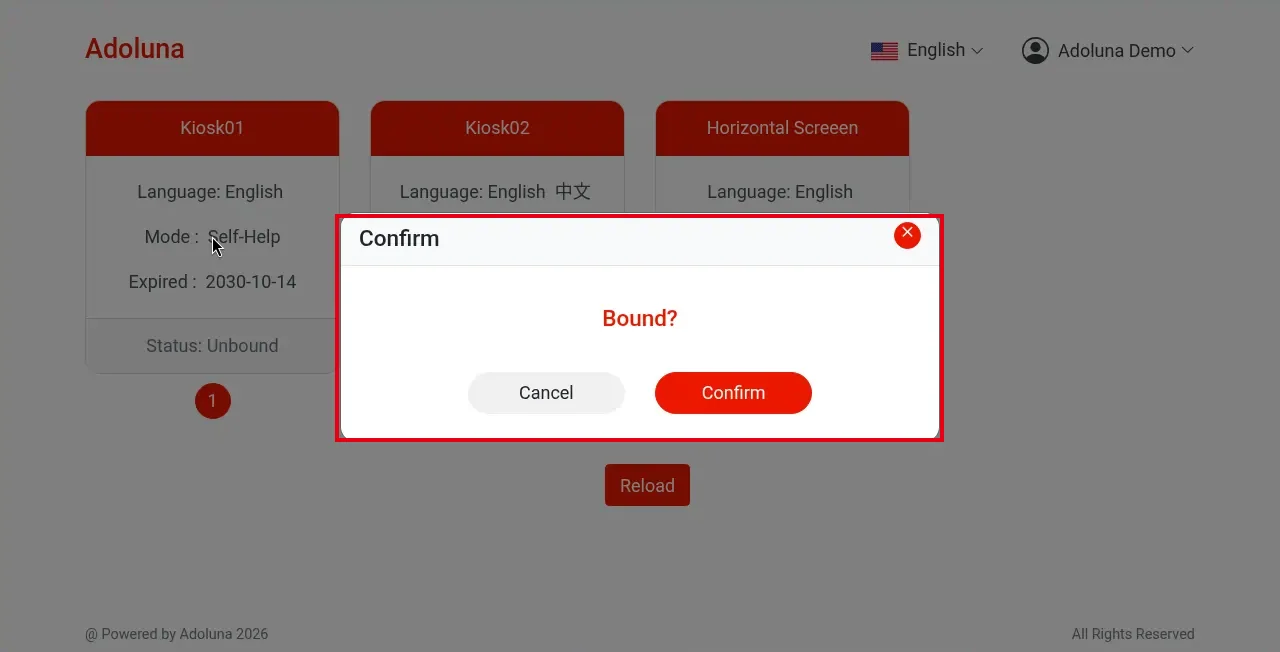
3. “Bound?” appears; tap Confirm to bind (Cancel to go back). No passcode is needed. After binding, the Kiosk welcome page appears (see 1.8.1 How guests order and pay at the Kiosk).
-
Use a separate device for each station (each Kiosk, POS and customer display), or at least a separate browser profile; don’t bind several stations in the same browser profile.
-
To unbind or replace a device, see 3.2.4 How to unbind or replace a device.
Notes / FAQ #
-
Which categories and items show on the Kiosk is set with the Show on Kiosk switch on menus, menu categories and items (see 2.3.8 How to schedule items and choose where they appear, 2.3.4 How to create and sort menu categories, 2.3.5 How to add menu items); if something doesn’t show, see 4.3.2 Why isn’t an item showing on the Kiosk or online?.
-
Kiosk orders with a failed payment are voided automatically if staff don’t open them within 30 minutes.
-
For server-opened tables, see 1.8.3 How to open a table on the Kiosk for guests (server mode); for opening a table by scanning a receipt QR code, see 1.8.4 How to open a table on the Kiosk by scanning a receipt QR code.


