
Purpose: Create tax rates (e.g. sales tax) for categories and items to use. For: owners, managers, Adoluna onboarding staff.
Before you start: an item’s tax is determined by the tax rates ticked on its edit page (see 2.3.5 How to add menu items). A category’s Default Tax is the rate ticked by default for new items created in that category (see 2.3.4 How to create and sort menu categories). The tax set as Default is used for custom items (see 1.2.8 How to add a custom menu item). For making a whole order tax exempt, see 1.2.11 How to make an order tax-exempt.
Steps #
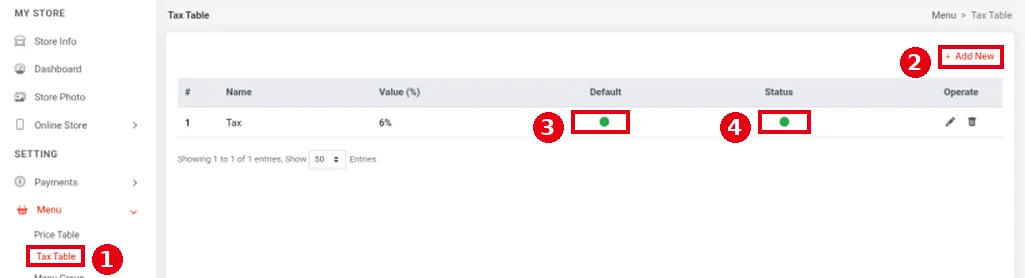
1. In the Backoffice left menu, click Menu > ① Tax Table to open the tax list. Its columns are #, Name, Value (%), Default, Status and Operate; the demo store has one tax, Tax (6%). A green dot under ③ Default marks the default tax; a green dot under ④ Status means it is enabled. Click ② + Add New to add a tax.
2. Fill in the form:
-
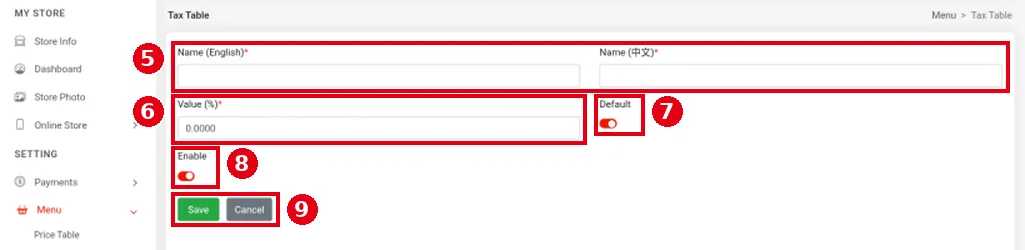
⑤ Name (English), Name (中文): the tax name (required).
-
⑥ Value (%): the tax percentage. It defaults to 0.0000 and takes up to four decimal places (e.g. 6 means 6%).
-
⑦ Default: makes this the default tax. On by default in the new form.
-
⑧ Enable: turns the tax on.
-
⑨ Click Save to save or Cancel to cancel.
3. Apply the tax to items: on a category’s edit page, tick under Default Tax the rate new items in that category should use by default (see 2.3.4 How to create and sort menu categories); on an item’s edit page, tick under Tax the rates the item actually uses (see 2.3.5 How to add menu items).
Notes / FAQ #
-
Changing a category’s Default Tax doesn’t change the items already in it; edit those one by one.
-
Whether tax is calculated before or after discounts and surcharges is set under Tax Calculation in Store Info (see 2.4.1 How to set up discounts).
-
More than one tax can be Default. When an item has several taxes ticked, they stack (all of them are charged).


