
Purpose: Add items to a category and set their name, type, prices, tax, printer mapping and forced modifiers. For: owners, managers, Adoluna onboarding staff.
Before you start: set up price tables, tax tables, menu groups, categories and printer mappings first (see 3.6.1 How to build a new menu from scratch (setup order)). The item is created in the currently selected category, and the form starts with that category’s menu group, default tax and default printer mapping.
Steps #
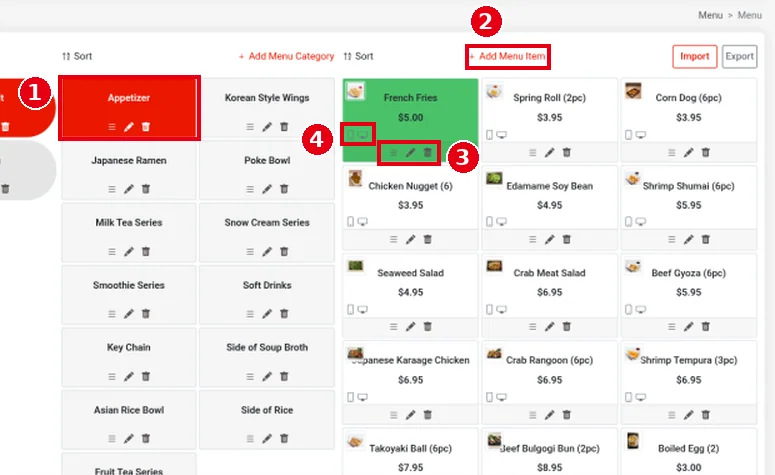
1. In the Backoffice left menu, click Menu > Menu, pick a menu in the left column, and pick ① a category (e.g. Appetizer) in the middle column; its items appear on the right. Click ② + Add Menu Item to add an item. Each item card shows the picture, name and price, with ③ three icons below: ≡ to drag and reorder, the pencil to edit and the bin to delete. The small phone and monitor icons at ④ the bottom left of a card are the same icons used for Show on Online (phone) and Show on Kiosk (monitor) in the item form. The card’s background is the item’s Display Color (e.g. French Fries is set to Green, so its card is green).
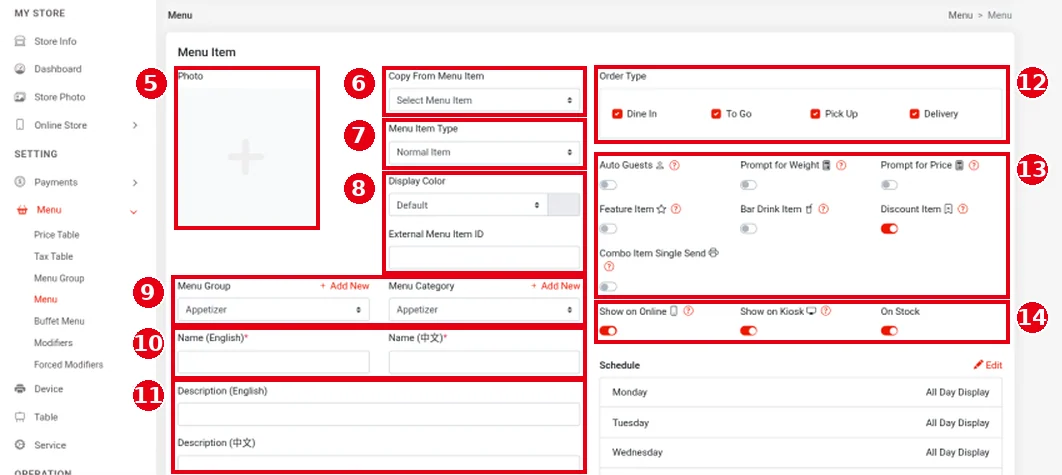
2. Fill in the top part of the form:
-
⑤ Photo: upload an item picture. According to the website docs, item pictures show on the Kiosk and in online ordering. (Updated 2026-10-05) The picture can also be viewed on the POS order screen: tap the i icon next to the Search bar, then tap Detail on the dish (see 1.2.1 How to start a dine-in order).
-
⑥ Copy From Menu Item: pick an existing item to copy all of its information (only shown when adding an item).
-
⑦ Menu Item Type: the item type; see step 3.
-
⑧ Display Color: the colour of the item button on the POS. External Menu Item ID: an item ID for third-party integration; not used at present.
-
⑨ Menu Group, Menu Category: the menu group and category; + Add New adds one directly.
-
⑩ Name (English), Name (中文): the item name. Fields marked * are required. The Chinese name shows when the Kiosk is switched to Chinese (see 1.8.1 How guests order and pay at the Kiosk).
-
⑪ Description (English), Description (中文): the item description. (Updated 2026-10-05) When filled in, it also shows in the dish Detail window on the POS order screen (see 1.2.1 How to start a dine-in order).
-
⑫ Order Type: the order types this item is for (see 2.3.8 How to schedule items and choose where they appear).
-
⑬ Feature switches, each with an ⓘ help icon: Auto Guests (ordering this item increases the order’s guest count), Prompt for Weight (enter a weight when ordering), Prompt for Price (enter a price when ordering), Feature Item (a featured item, shown first in online ordering and on the Kiosk under Featured Items; see 1.8.1 How guests order and pay at the Kiosk), Bar Drink Item (a bar drink; related to Include Bar Drink on discounts, see 2.4.1 How to set up discounts), Discount Item (whether the item can be discounted; on by default for a new item) and Combo Item Single Send (sends the combo’s items to the kitchen separately).
-
⑭ Show on Online, Show on Kiosk, On Stock: show online, show on the Kiosk, and in stock; all on by default (see 2.3.8 How to schedule items and choose where they appear, 2.3.9 How to mark an item as unavailable (out of stock)).
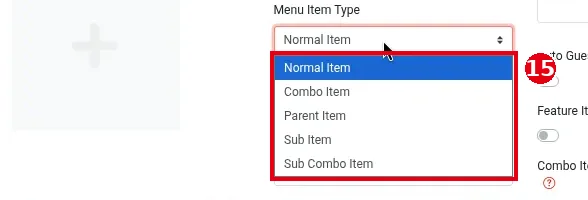
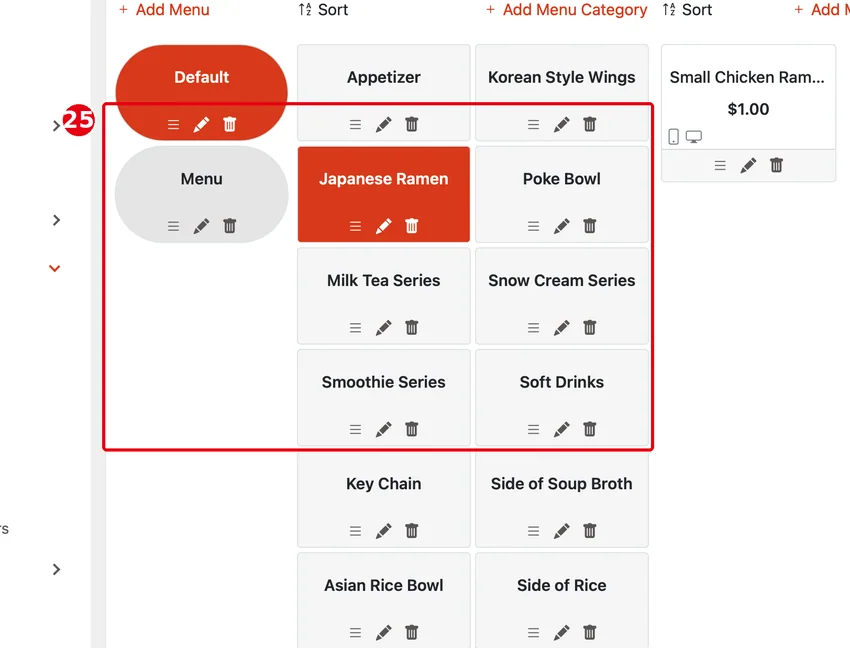
3. ⑮ Menu Item Type offers Normal Item, Combo Item, Parent Item, Sub Item and Sub Combo Item. The type can’t be changed after the item is created (see step 6). A Combo Item is made up of several items. A Parent Item works like a new category inside a category; Sub Items and Sub Combo Items can only go inside a Parent Item. Example: ㉑ set type to Parent Item and save; ㉒ the parent appears in the category (price often $0.00).


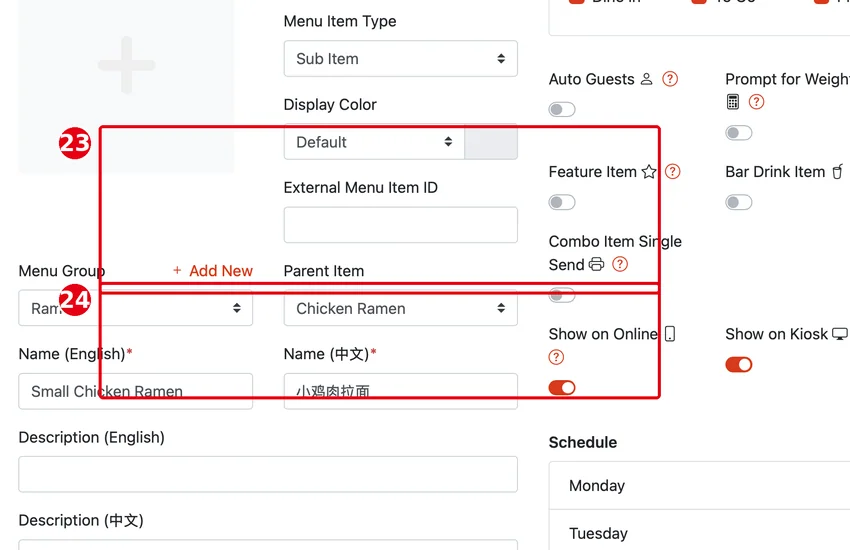
Add a Sub Item under it: ㉓ type Sub Item, ㉔ choose the parent in Parent Item, set a price and save; ㉕ both parent and sub show in the category.
4. Scroll down and fill in the bottom part:
-
⑯ Price: one row per enabled price table; enter the price in the amount box (see 2.3.1 How to set up price tables). Discount Price is the discount price (see 2.3.10 How to set a discount price on an item).
-
⑰ Tax: tick the tax rates (see 2.3.2 How to set up tax tables).
-
⑱ Printer Mapping: tick the kitchen this item prints to (see 3.3.3 How to set up printer mapping and route items to kitchen printers).
-
⑲ Forced Modifiers: click + Attach Forced Modifier to attach forced modifiers (see 2.3.7 How to set up forced modifiers and default choices).
-
Schedule on the right is the item’s display time (see 2.3.8 How to schedule items and choose where they appear).

5. When done, click Save at the bottom of the form (the bottom of the form isn’t in the screenshot).
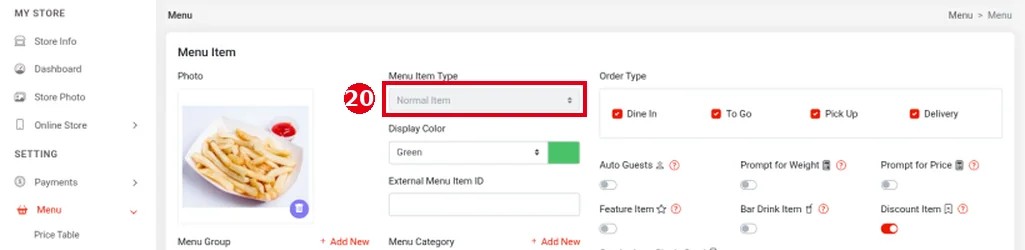
6. To edit an item, click the pencil icon on its card. On the edit page, ⑳ Menu Item Type is greyed out and can’t be changed, and Copy From Menu Item isn’t shown.
Notes / FAQ #
-
If you forget the printer mapping, the item isn’t sent to the kitchen and stays SAVED after Send (see 3.3.3 How to set up printer mapping and route items to kitchen printers).
-
If prices show $0.00, see 4.3.1 Why do item prices show $0.00?; if an item doesn’t show on the Kiosk or online, see 4.3.2 Why isn’t an item showing on the Kiosk or online?.
-
Excel bulk import isn’t recommended for merchants for now (see 2.3.12 How to import and export the menu with Excel); add items one by one here. For regular modifiers, see 2.3.6 How to set up modifiers.


