
Purpose: Set the rules for Dine In orders: price table, table selection, table cleaning, auto send and printing, guest count, timeout reminders and more. For: owners, managers, Adoluna onboarding staff.
Before you start: The Service page has seven tabs at the top: Dine In, To Go, Pick Up, Delivery, Scan to Order, Waitlist and Other; each order type is set separately. For To Go, Pick Up and Delivery, see 2.5.2 How to configure To Go, Pick Up and Delivery settings; Scan to Order, 2.6.2 How to set up Scan to Order; Waitlist, 2.6.1 How to set up the waitlist; Other, 2.5.5 How to set receipt messages and tip guidelines. Switches take effect immediately with no Save; for items with an input box, click the pencil to change the value. Hover over the ⓘ (question mark) next to an item to see its description.
Steps #
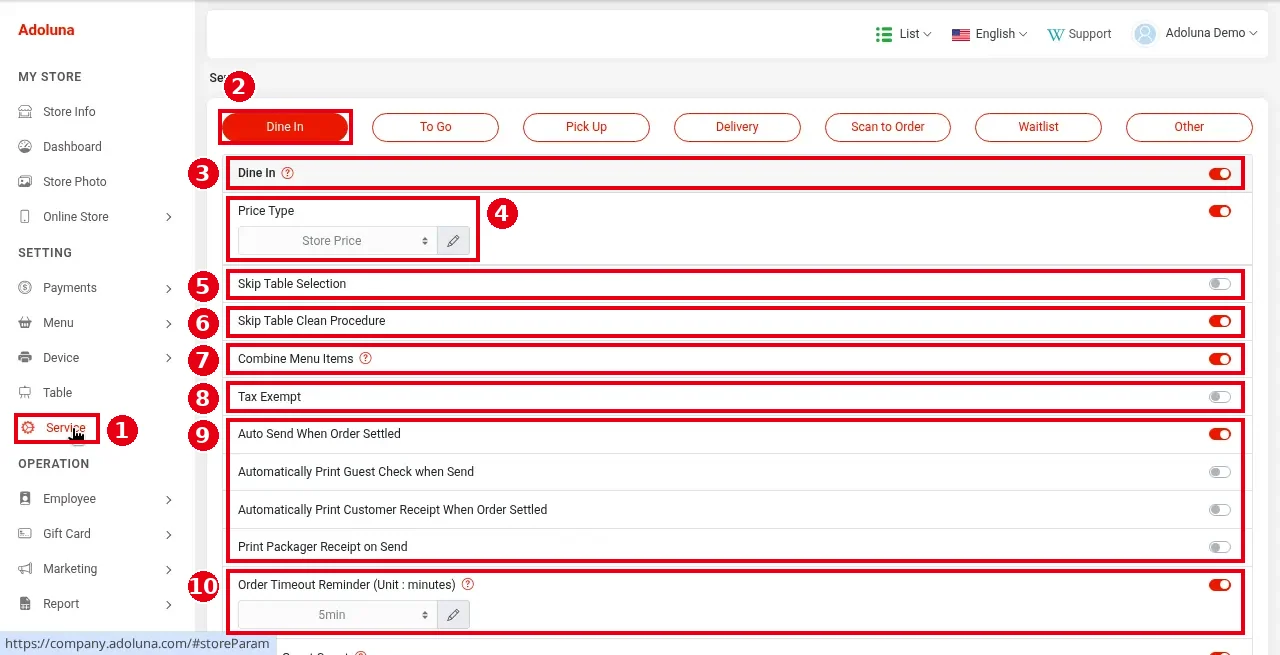
1. In the Backoffice left menu, click ① Service and choose the ② Dine In tab.
2. Set the options as needed (the screenshot shows the demo store’s current settings):
-
③ Dine In: turns the Dine In service on or off.
-
④ Price Type: the price table used for Dine In (Store Price in the screenshot); click the pencil to choose. If it’s off or no price table is chosen, item prices show $0.00 (see 2.3.1 How to set up price tables, 4.3.1 Why do item prices show $0.00?).
-
⑤ Skip Table Selection: skip choosing a table. When it’s on, Dine In orders start without a table, and a table can’t be added later.
-
⑥ Skip Table Clean Procedure: skip table cleaning. When it’s on (as in the demo store), the table goes straight back to available after payment; when it’s off, the table turns yellow (needs cleaning) after payment until staff mark it clean (see 1.7.1 How to check table status and mark tables clean).
-
⑦ Combine Menu Items: show identical items without modifiers as one line.
-
⑧ Tax Exempt: no tax on any Dine In order. To exempt one order, see 1.2.11 How to make an order tax-exempt.
-
⑨ Auto Send When Order Settled, Automatically Print Guest Check when Send, Automatically Print Customer Receipt When Order Settled, Print Packager Receipt on Send: automatic send on settle and automatic printing of guest checks, receipts and packager tickets, see 3.3.4 How to set up automatic printing of checks, receipts and packager tickets.
-
⑩ Order Timeout Reminder (Unit : minutes): remind staff when an order has been open longer than the set minutes (5min in the screenshot). When it triggers, a message appears on the POS for 5 seconds and then moves to the notification center (see 1.1.4 How to check the Notification Center).
3. Scroll down:
-
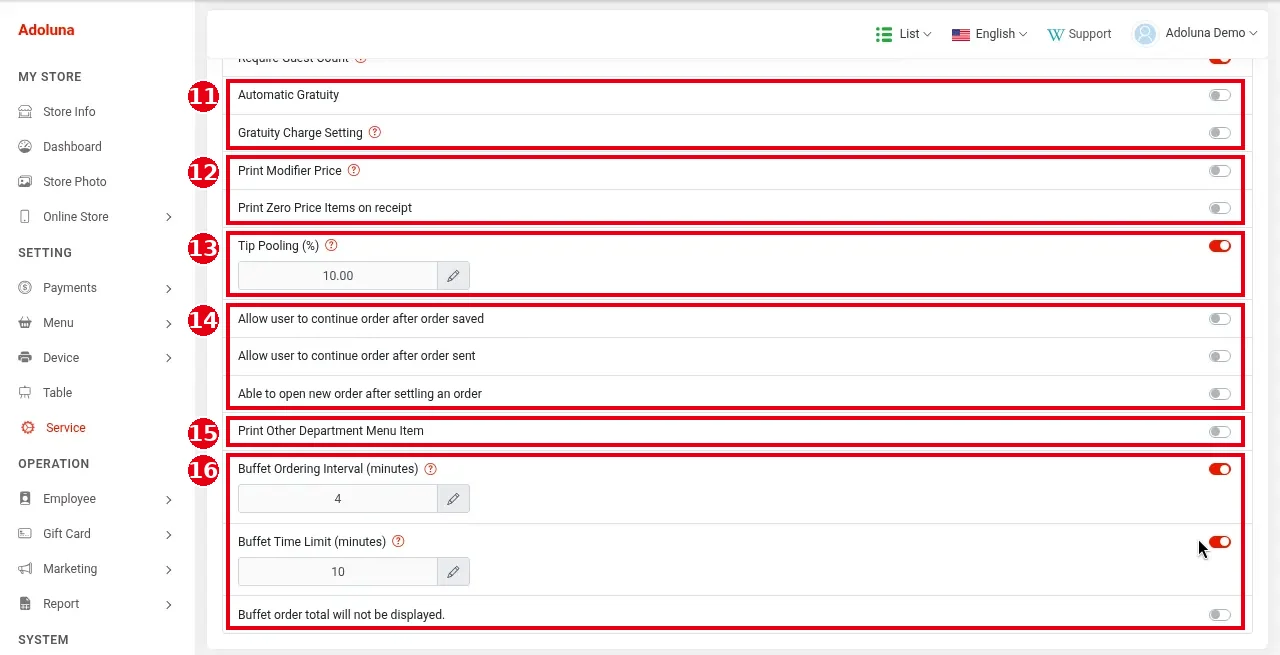
Require Guest Count (just below item ⑩): when on, staff must enter the guest count when starting a Dine In order (on in the demo store).
-
⑪ Automatic Gratuity, Gratuity Charge Setting: automatic gratuity for large parties, see 2.5.3 How to set up automatic gratuity for large parties.
-
⑫ Print Modifier Price: when on, modifier prices print separately; when off, they’re added to the item price. Print Zero Price Items on receipt: when on, $0 items also print on the receipt.
-
⑬ Tip Pooling (%): see 2.5.4 How to set up tip pooling.
-
⑭ Allow user to continue order after order saved: stay on the ordering page after saving; Allow user to continue order after order sent: stay on the ordering page after sending; Able to open new order after settling an order: start a new Dine In order automatically after settling from the ordering page.
-
⑮ Print Other Department Menu Item: when on, every kitchen printer also prints items from other departments, see 4.2.2 Why did an item print at the wrong kitchen printer?.
-
⑯ Buffet Ordering Interval (minutes), Buffet Time Limit (minutes), Buffet order total will not be displayed.: buffet settings, see 2.6.3 How to set buffet time limits and ordering intervals.
Notes / FAQ #
-
After changing settings, start a Dine In test order on the POS to check (see 1.2.1 How to start a dine-in order, 3.6.2 How to run a go-live test (test orders, printing, cards, Batch)).
-
Kiosk orders follow their own rules in the Kiosk settings (see 3.5.2 How to configure a Kiosk).


