
Purpose: Create menus and menu categories, set each category’s default tax and printer mapping, and arrange the category order. For: owners, managers, Adoluna onboarding staff.
Before you start: the Backoffice Menu > Menu page has three columns: menus on the left (the demo store has Default and Menu), the selected menu’s categories in the middle, and the selected category’s items on the right (see 2.3.5 How to add menu items). Categories need a menu group, default tax and default printer mapping, so set up menu groups, tax tables and printer mappings first (see 3.6.1 How to build a new menu from scratch (setup order), 3.3.3 How to set up printer mapping and route items to kitchen printers).
Steps #
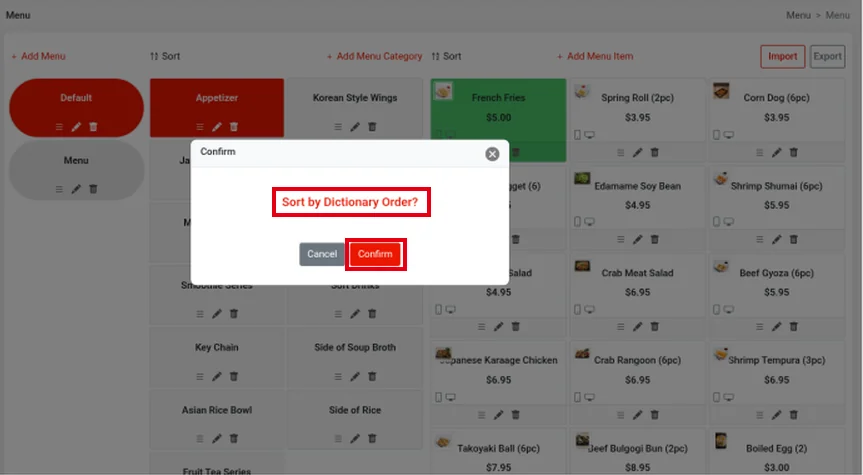
1. In the Backoffice left menu, click Menu > ① Menu. ② The left column lists menus; the selected menu is red, and + Add Menu adds a menu. At the top of the middle column, ③ ⇅ Sort sorts categories alphabetically and ④ + Add Menu Category adds a category. Each category card has ⑤ three icons: drag ≡ up or down to change the order; the pencil icon edits and the bin icon deletes.

2. To add a menu, click + Add Menu and fill in:
-
⑥ Name (English), Name (中文) (required) and the English and Chinese descriptions.
-
⑦ Order Type: the order types this menu is for (Dine In, To Go, Pick Up, Delivery); all ticked for a new menu.
-
⑧ Show on Online, Show on Kiosk, Enable: show online, show on the Kiosk, and turn the menu on; all on for a new menu (see 2.3.8 How to schedule items and choose where they appear).
-
⑨ Schedule: the display time for each day, All Day Display by default; click Edit to change it (see 2.3.8 How to schedule items and choose where they appear).
-
⑩ Menu Category: tick the categories in this menu; Select All ticks them all.
When done, click Save at the bottom of the form (the bottom of the form isn’t in the screenshot). When a store has several menus, the POS, Kiosk and online store all show all of them, and one category can be in several menus.
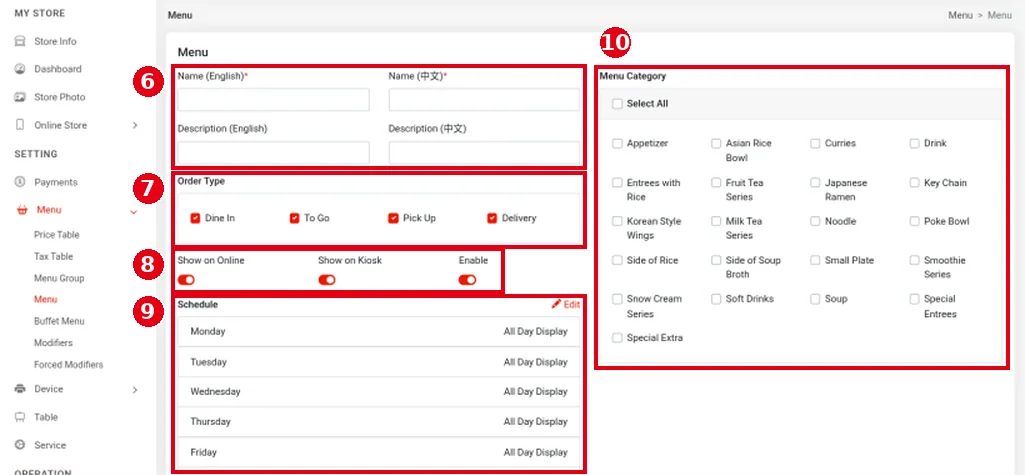
3. To add a category, select a menu in the left column, click ④ + Add Menu Category, and fill in the top part of the form:
-
⑪ Photo: click the plus sign to upload a category picture. It shows on the Kiosk and in online ordering; the POS doesn’t show it.
-
⑫ Display Color: Default, Red, Orange, Blue, Green, Yellow, Purple, Pink, Grey, Black or White; the swatch on the right is a preview. According to the website docs, the colour applies only to the category button on the POS.
-
⑬ Menu Category Type: Normal or Virtual (see 2.3.11 How to pin a category and use virtual categories). It can’t be changed after the category is created.
-
⑭ Menu Group: choose a menu group (see 2.3.3 How to set up menu groups for reporting); + Add New adds one directly. It is only the default for new items in this category.
-
⑮ Name (English), Name (中文): the category name (required). The Chinese name shows when the Kiosk is switched to Chinese (see 1.8.1 How guests order and pay at the Kiosk). Below are the English and Chinese descriptions; according to the website docs, descriptions show on the Kiosk and in online ordering.
-
⑯ Default Tax: according to the website docs, new items created in this category have this tax ticked by default (see 2.3.2 How to set up tax tables).
-
⑰ Default Printer Mapping: the printer mapping ticked by default for new items in this category (see 3.3.3 How to set up printer mapping and route items to kitchen printers).
-
⑱ Schedule: the category’s display time, all day by default (see 2.3.8 How to schedule items and choose where they appear).
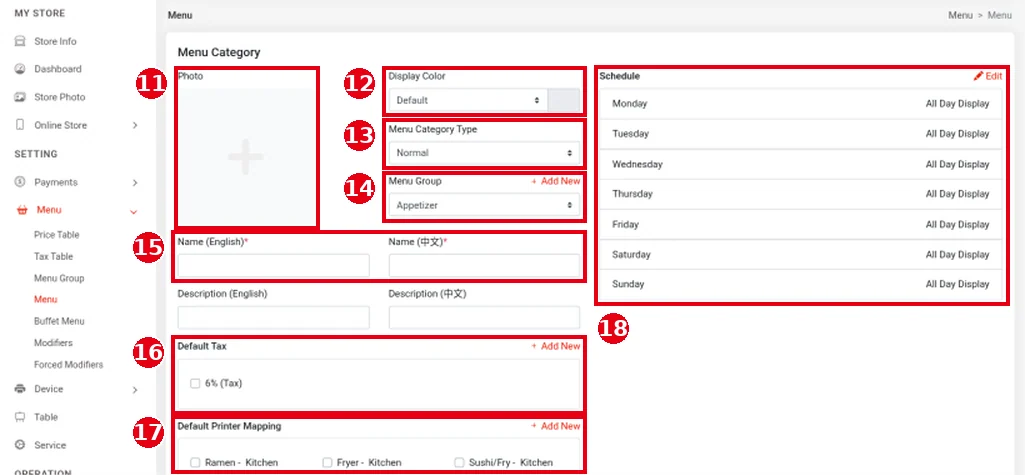
4. Scroll down and fill in the bottom part: ⑲ Order Type (the order types it applies to); ⑳ Show on Online and Show on Kiosk (see 2.3.8 How to schedule items and choose where they appear); Sticky Top for Category (see 2.3.11 How to pin a category and use virtual categories); and Enable to turn the category on. Then click Save (when editing an existing category there is also a Delete button on the left).

5. Sorting: click ③ ⇅ Sort. “Sort by Dictionary Order?” appears; click Confirm to sort alphabetically or Cancel to cancel. To sort by hand, drag the ≡ icon on a category card.
6. To edit a category, click the pencil icon on its card to open the same form. Menu Category Type is greyed out and can’t be changed.
Notes / FAQ #
-
Changing a category’s Default Tax or Default Printer Mapping doesn’t change the items already in it; edit those one by one (see 4.2.2 Why did an item print at the wrong kitchen printer?).
-
Menus, categories and items all have Name (中文). If the Kiosk or Scan to Order uses Chinese, remember to fill in the Chinese names.
-
If a category doesn’t show on the Kiosk or online, check it as in 4.3.2 Why isn’t an item showing on the Kiosk or online?.


