
Note: Excel import/export still needs further work and isn’t recommended for merchants for now. Merchants should create and edit items, modifiers and forced modifiers one by one in the Backoffice (see 2.3.5 How to add menu items, 2.3.6 How to set up modifiers, 2.3.7 How to set up forced modifiers and default choices).
Purpose: Import items in bulk from an Excel file, or export the current menu. For: Adoluna onboarding staff.
Before you start: Import and Export are at the top right of three pages: Menu > Menu, Menu > Modifiers and Menu > Forced Modifiers (see 2.3.5 How to add menu items, 2.3.6 How to set up modifiers, 2.3.7 How to set up forced modifiers and default choices). Set up price tables, tax tables, menu groups and printer mappings before importing (see 3.6.1 How to build a new menu from scratch (setup order)).
Steps #
1. In the Backoffice left menu, click Menu > Menu. ① Import and Export are at the top right of the items column. Click Export to export all items as an Excel file (see “The export file and the import template” below).
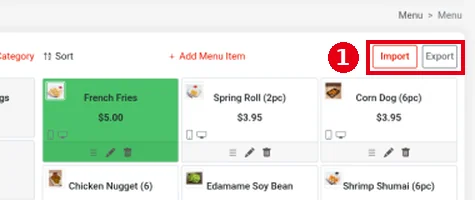
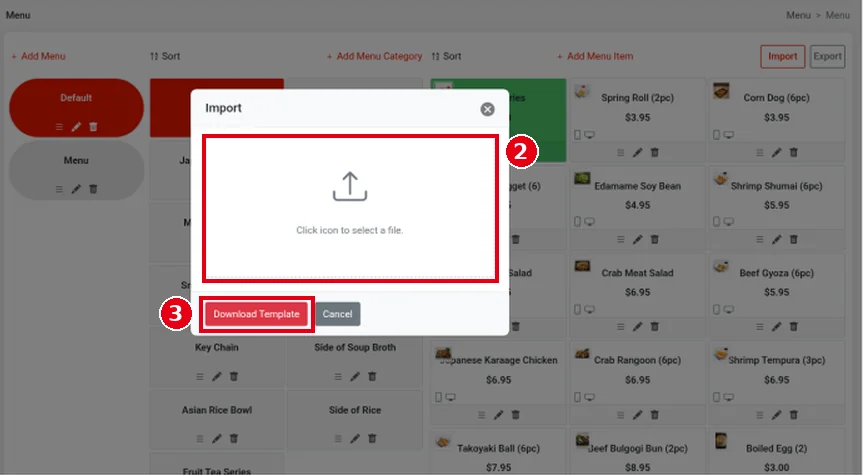
2. Click Import to open the Import window:
-
② Click the icon (“Click icon to select a file.”) to choose the Excel file to import.
-
③ Download Template: downloads the import template; fill it in using the template’s format.
-
Cancel closes the window.
3. After importing, spot-check the price, tax and printer mapping of a few items on the menu page. Imports can’t carry printer mappings, so set each imported item’s printer mapping in the Backoffice afterwards (see 4.2.2 Why did an item print at the wrong kitchen printer?).
4. Modifiers and forced modifiers: use the same Import / Export buttons on the Modifiers and Forced Modifiers pages.
The export file and the import template #
Clicking Export shows Exporting All Items: it exports every item, regardless of menu or category, one item per row (the demo store’s export had 147 items on a sheet named MenuItems, with 30 columns). The import template from Download Template (sheet Menu Item) has 28 columns, and row 2 explains each column. The main columns:
| Column | Setting | How to fill it in |
|---|---|---|
| menuItemId | Item ID | A number (the template example is 100). A Sub Item‘s parentItemId uses this ID to link to its Parent Item |
| menuObjList, menuCategoryObj | The menu and category the item belongs to | JSON; copy from an exported file |
| menuGroupName, menuItemName, menuItemDescription | Menu group, item name, item description | In the form {“en”:”English”,”zh-CN”:”Chinese”}, e.g. {“en”:”MenuItem”,”zh-CN”:”菜品名称”} |
| menuItemColor | Display Color (POS button colour) | A colour code, e.g. #FFFDDD |
| isAutoGuests, isPromptForWeight, isPromptForPrice, isFeatureItem, isBarDrinkItem, isDiscountItem | The switches with the same names in the item form (see 2.3.5 How to add menu items) | 1 = on, 0 = off |
| isComoboItem, isParentItem, isSubItem | Item type Combo Item, Parent Item, Sub Item | 1 = yes, 0 = no. The template spells it isComoboItem; the export uses isComboItem |
| parentItemId | The Parent Item it belongs to | The Parent Item‘s menuItemId; 0 for other items |
| menuOrderType | Order Type | Add up the values of the order types to tick: 1 Dine In, 2 To Go, 4 Pick Up, 8 Delivery. E.g. Dine In + To Go = 3; all four = 15 |
| isAvailableOnOnline, isAvailableOnKiosk, isAvailable | Show on Online, Show on Kiosk, On Stock | 1 = on, 0 = off |
| queue | Display order | A number, e.g. 1 |
| picsData, scheduleData, priceData, taxData, modifierForceData, comboData | Pictures, display times, prices per price table, taxes, forced modifiers, combo contents | JSON; copy from an exported file. E.g. priceData has one entry per price table, and value is the price |
The export has two columns the template doesn’t: comboPartSend (the Combo Item Single Send switch) and printerData (printer mapping). When copying data from an export into the template, line the columns up by name. The import doesn’t accept a printerData column (not even if you add it to the template by hand), so set Printer Mapping on each item’s edit page in the Backoffice after importing (see 4.2.2 Why did an item print at the wrong kitchen printer?).
Notes / FAQ #
-
Before importing, Export the current menu so you can check for duplicate items afterwards.
-
Importing only adds items; it doesn’t overwrite or update existing items (including items with the same name). Editing an export and importing it again creates duplicate items, so change existing items one by one on the item edit page (see 2.3.5 How to add menu items).


